
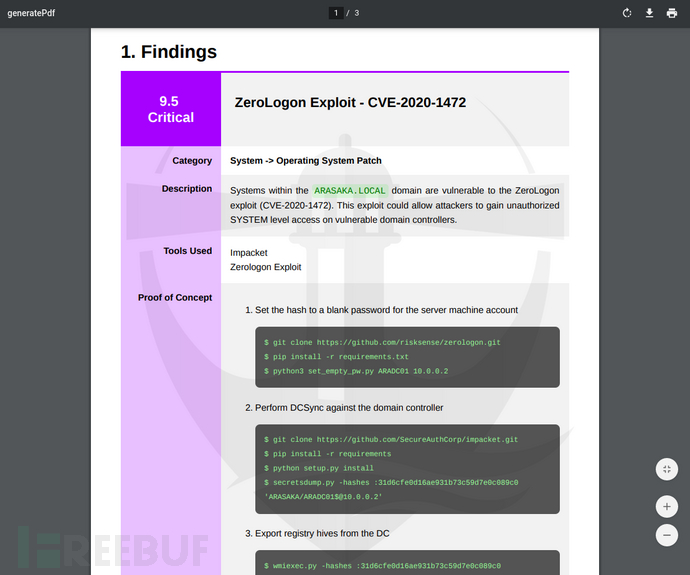
Easily generate beautiful and attractive penetration testing reports;
Dynamic drag-and-drop report generator;
Markdown support, including code blocks and icons, etc.;
Support for copy, comments, titles, and image upload;
Customizable report background/footers;
Operators and tracking status can be assigned to each report section;
Can clone and template reports;
Search results database;
Supports multiple scoring types (CVSS 3.1, DARED);
Multiple reports can be easily generated from the same set of analysis results;
The extensible design allows advanced users to create highly customized report sections;
LDAP integration;
Installation Requirements
The use of this tool requires Docker and Docker Compose to be installed on the local host. We can use tools such as apt, pacman, and dnf to install the required components:
$ sudo apt install docker.io docker-compose
Deploy WriteHat
Method 1 (for testing only)
WriteHat can be easily deployed and installed with the following one-line command:
$ git clone https://github.com/blacklanternsecurity/writehat && cd writehat && docker-compose up
Next, access https://127.0.0.1 in the browser to use WriteHat. The default username and password are 'admin / PLEASECHANGETHISFORHEA*VENSSAKE'.
Method Two
Firstly, we still need to install Docker and Docker Compose. Next, use the following command in the /opt directory to clone the project source code locally:
$ cd /opt

$ git clone https://github.com/blacklanternsecurity/writehat

$ cd writehat
Next, create a secure password protection in the writehat/config/writehat.conf file, which will be used for:
MongoDB
MySQL
Django
Administrator User
Add our target hostname and set it in the allowed_hosts field in the writehat/config/writehat.conf file.
After the settings are complete, replace the self-signed SSL certificate in nginx/.
writehat.crt

writehat.key
Now, we can use the following command to test whether the tool is configured correctly:
$ docker-compose up --build
Note that if you use a VPN, you need to disconnect the VPN connection before running the service with docker-compose for the first time, to ensure that Docker can correctly create virtual networks.
Now, we need to install and activate the Systemd service. After configuration, WriteHat will run automatically when the device starts up:
$ sudo cp writehat/config/writehat.service /etc/systemd/system/

$ sudo systemctl enable writehat --now
We can use the following command to track service logs:
$ sudo journalctl -xefu writehat.service
Regarding user creation, we need to log in to https://127.0.0.1/admin using the administrator credentials defined in writehat/config/writehat.conf, as some operations can only be performed by administrators, such as database backups, etc.:
# Enter the app container

$ docker-compose exec writehat bash


# Promote the user and exit

$ https://www.freebuf.com/articles/es/manage.py ldap_promote <ldap_username>

$ exit
How to write a custom report component
Each report component consists of the following content:
1. Python files in the 'writehat/components/' directory;
2. HTML templates in the 'writehat/templates/componentTemplates/' directory;
3. CSS files in the 'writehat/static/css/component/' directory;
We recommend that you directly refer to the existing files in these directories, and if you want to customize the development, please refer to the following examples.
components/CustomComponent.py
from .base import *


class CustomComponentForm(ComponentForm):


summary = forms.CharField(label='Component Text', widget=forms.Textarea, max_length=50000, required=False)

field_order = ['name', 'summary', 'pageBreakBefore', 'showTitle']


class Component(BaseComponent):


default_name = 'Custom Report Component'

formClass = CustomComponentForm


# the "templatable" attribute decides whether or not that field

# gets saved if the report is ever converted into a template

fieldList = {

'summary': StringField(markdown=True, templatable=True),

}


# make sure to specify the HTML template

htmlTemplate = 'componentTemplates/CustomComponent.html'


# Font Awesome icon type + color (HTML/CSS)

# This is just eye candy in the web app

iconType = 'fas fa-stream'

iconColor = 'var(--blue)'


# the "preprocess" function is executed when the report is rendered

# use this to perform any last-minute operations on its data

def preprocess(self, context):


# for example, to uppercase the entire "summary" field:

#   context['summary'] = context['summary'].upper()

return context
componentTemplates/CustomComponent.html
{% load custom_tags %}

<section class="l{{ level }} component{% if pageBreakBefore %} page-break{% endif %}" id="container_{{ id }}">

{% include 'componentTemplates/Heading.html' %}

<div class='markdown-align-justify custom-component-summary'>

<p>

{% markdown summary %}

</p>

</div>

</section>
componentTemplates/CustomComponent.css
div.custom-component-summary {

font-weight: bold;

}
After the configuration is completed, don't forget to use the following command to restart the WriteHat service:
$ docker-compose restart writehat
Project Address
WriteHat:【GitHub Gateway】

评论已关闭