During the HW period, in order to prevent phishing, FreeBuf will cancel all external links in submitted articles as of today. We apologize for any inconvenience caused and appreciate your understanding~
0x00 Preface
While many researchers are planning to engage in 5G network security research, a problem naturally arises in front of everyone: 5G networks have very high requirements for some basic facilities and professional facilities, thereby becoming a threshold for studying 5G security.
Therefore, finding a simple 5G network simulation method for the purpose of studying 5G networks and discovering potential security issues in 5G networks has become an essential task.
The following introducesDeployment and construction method of a simulated 5G network environment based on the free5gc simulation of the 5G core network and the UERANSIM simulation of the 5G user equipment, and by completing the relevant configurations, it can simply realize the registration process and de-registration process of 5G user equipment accessing the core network, and simulate the process of a user equipment conducting actual data services through a simulated core network.
Such a simulation of a 5G environment can effectively alleviate the problems faced by researchers, such as the lack of an actual 5G environment and the complexity of the real environment, and provide a feasible approach for 5G security research.
0x01 Preparations before installation
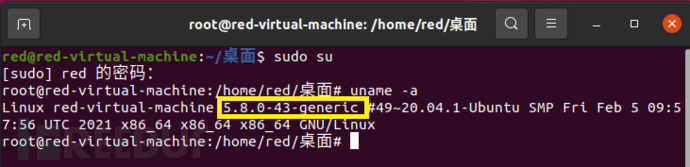
0x011 Confirm Linux kernel version
Use the command:uname -a
This command is used to confirm the installed virtual machine kernel version, the required kernel version is5.0.0-23-genericor5.4.0 and laterversion :
If the current virtual machine kernel version does not meet the requirements, you need to change the kernel and install it using the following command:5.0.0-23-generickernel:
sudo apt install 'linux-image-5.0.0-23-generic'
sudo apt install 'linux-headers-5.0.0-23-generic'
After the installation is complete, you need to restart the virtual machine and boot withPress shift repeatedlyPress the key to entergrubBoot page, replace the Linux kernel to be started
0x012 Install some basic support components through apt
sudo apt install git-all
sudo apt-get install curl
sudo apt install make
sudo apt -y install gcc
sudo apt -y install g++
sudo apt -y install autoconf
sudo apt -y install libtool
sudo apt -y install pkg-config
sudo apt -y install libmnl-dev
sudo apt -y install libyaml-dev
!After the installation is complete, you need to execute the following command:
git config --global url."https://hub.fastgit.org".insteadOf https://github.com
This command can make the followinggit cloneWhen downloading, you can use domestic mirror sources to download to avoid the instability of GitHub
0x013 Install Go language environment
!Note that the Go language environment must be installed for a regular user, otherwise it may cause problems with subsequent installations
Enter the commandgoTo confirm if there are other versions of Go installed, if there are, delete them using the following command:
sudo rm -rf /usr/local/go
After that, start installing the required Go language environment:
cd ~
wget https://dl.google.com/go/go1.15.7.linux-amd64.tar.gz
sudo tar -C /usr/local -zxvf go1.15.7.linux-amd64.tar.gz
After installation, you need to configure the environment variables with the following command:
mkdir -p ~/go/{bin,pkg,src}
echo 'export GOPATH=$HOME/go' >> ~/.bashrc
echo 'export GOROOT=/usr/local/go' >> ~/.bashrc
echo 'export PATH=$PATH:$GOPATH/bin:$GOROOT/bin' >> ~/.bashrc
source ~/.bashrc
After that, we need to configure the go language module download proxy with the following command, the default module download address is not available due to domestic network reasons:
# The following three configurations are used to ensure that the proxy configuration is always effective in different go language versions, it is recommended to execute all of them
export GOPROXY=https://goproxy.io
export GO111MODULE=on
go env -w GOPROXY=https://goproxy.io
After installation, run the command with normal user privilegesgo, confirm whether the installation is successful, if successful, install the following modules in addition, which is for the independent deployment of free5gcLog module, must be installed when deployed independently:
go get -u github.com/sirupsen/logrus
Note: This step isFree5gc independent deploymentis a necessary step
0x014 Install docker environment
Install docker through the official installation script:
curl -fsSL https://get.docker.com | bash -s docker --mirror Aliyun
After installation, run the following commanddocker --versionVerification
After that, we need to install docker-compose, complete it with the following command:
sudo curl -L "https://github.com/docker/compose/releases/download/1.28.5/docker-compose-$(uname -s)-$(uname -m)" -o /usr/local/bin/docker-compose
After that, we need to change the docker source, the default source download speed is too slow, which may cause timeout errors during deployment:
sudo vim /etc/docker/daemon.json
Write content:
{"registry-mirrors": ["https://docker.mirrors.ustc.edu.cn"]}
After that, restart the docker service to complete the deployment of docker:
systemctl restart docker
After completion, it is necessary to restart the currentNormal userJoin the docker user group, the docker user group is automatically created during the above installation and does not need to be created manually:
sudo gpasswd -a $USER docker # Add the current normal user to the docker user group
newgrp docker                # Update docker user group
The purpose of this step is to prevent errors during the subsequent free5gc container deployment tomake basesteps, the following errors may occur:
Note: This step isfree5gc container deploymentis a necessary step
0x015 Install cmake
!The cmake installed here requires version 3.17 or above; otherwise, errors will occur during the subsequent UERANSIM environment setup.
Method 1:
wget https://cmake.org/files/v3.20/cmake-3.20.0-rc3-linux-x86_64.tar.gz
tar zxvf cmake-3.20.0-rc3-linux-x86_64.tar.gz
sudo mv cmake-3.20.0-rc3-linux-x86_64 /opt/cmake-3.20.0
sudo ln -sf /opt/cmake-3.20.0/bin/*  /usr/bin/
The advantage of this method is that the installed cmake version is controllable, and the first step's wget is recommended to be downloaded manually, as the wget method is slower
Method 2:
sudo snap install cmake --classic
The advantage of this method is its simplicity, which can be executed with a single command
0x016 Install mongodb
sudo apt -y update
sudo apt -y install mongodb wget git
sudo systemctl start mongodb
Note: This component is the database component of free5gc, forFree5gc independent deploymentis a necessary step
0x017 Install yarn
curl -sS https://dl.yarnpkg.com/debian/pubkey.gpg | sudo apt-key add -
echo "deb https://dl.yarnpkg.com/debian/ stable main" | sudo tee /etc/apt/sources.list.d/yarn.list
sudo apt update && sudo apt install yarn
Note: This component is a webui support component for free5gc, and it isFree5gc independent deploymentis a necessary step
0x02 Free5gc containerized deployment
0x021 Build GTP5G module
!Attention: When building the GTP5G module, it is necessary to build with a normal user, otherwise, errors will occur during subsequent use
Firstly, download the project code through git clone:
cd ~
git clone https://github.com/PriczOwO/gtp5g.git
cd gtp5g
Compile the code:
make
sudo make install
Note: The gtp5g module is the kernel module of the free5gc simulation core network, and it is necessary for any deployment scheme,It is necessary to install
0x022 Containerized deployment of free5gc simulation core network
Firstly, download the project code through git clone:
cd ~
git clone https://github.com/free5gc/free5gc-compose.git
cd free5gc-compose
According to the installation process suggested on the official website, at this point, you should executemake baseContainerized installation of the free5gc core network, but due to domestic network issues, when executing make base, the script ingit cloneAlsogo getWhen installing modules, a timeout error occurs, so here we need to modify the script executed by make base to add the proxy setting steps:
cd base
vim Dockerfile
Find **# Get Free5GC**Add the following code before this line:**
RUN git config --global url."https://hub.fastgit.org".insteadOf https://github.com
# The following three configurations are used to ensure that the proxy configuration is always effective in different go language versions, and it is recommended to write all of them
RUN export GOPROXY=https://goproxy.io
RUN export GO111MODULE=on
RUN go env -w GOPROXY=https://goproxy.io
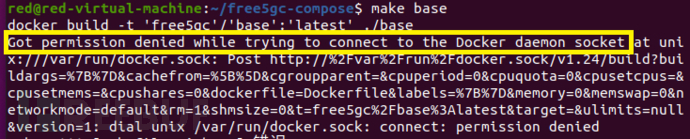
If this step is not executed, run directlymake baseand it will report a git download failure, as shown in the following figure:

The reason for this error ismake baseStep 1 is to guide a Docker image to install and deploy the free5gc environment, but we have not configured a proxy in this image, and the configuration method can only be added in the guidance file Dockerfile
! This step cannot be manually git cloned to /go/src, because the go environment in the virtual machine is not the go environment in the docker image container. The code manually git cloned cannot be obtained and used by the docker image for the construction environment
After completing the above steps, you can continue to execute the following steps:
cd ~/free5gc-compose
make base
docker-compose build
Among themdocker-compose buildOne step may report a version error, the reason lies in the installation abovedocker, docker-composeIt may have installed a lower versiondocker, docker-compose, at this time, you can choose to reinstalldocker, docker-composeor modifydocker-compose.yamlThe version number 3.8 in the first line of the file is the current version, and it is recommended to choose to reinstall firstdocker, docker-compose, to avoid unknown errors
Through the commanddocker --versionQuery the current version with the command, and correspond to the table in the following link:
| Compose file format | Docker Engine release |
|---|---|
| Compose specification | 19.03.0+ |
| 3.8 | 19.03.0+ |
| 3.7 | 18.06.0+ |
| 3.6 | 18.02.0+ |
| 3.5 | 17.12.0+ |
| 3.4 | 17.09.0+ |
| 3.3 | 17.06.0+ |
| 3.2 | 17.04.0+ |
| 3.1 | 1.13.1+ |
| 3.0 | 1.13.0+ |
| 2.4 | 17.12.0+ |
| 2.3 | 17.06.0+ |
| 2.2 | 1.13.0+ |
| 2.1 | 1.12.0+ |
| 2.0 | 1.10.0+ |
| 1.0 | 1.9.1.+ |
Up to this point, the containerized deployment of free5gc is completed
0x023 Independent deployment of free5gc simulation core network (optional)
In addition, free5gc also exists a direct independent deployment scheme in the virtual machine environment. By adopting this scheme, you can skip the steps of installing docker and containerizing free5gc mentioned above. This article focuses on the containerized deployment scheme, and the independent deployment scheme is only briefly introduced here:
First, download and obtain the source code with the following command:
cd ~
git clone --recursive -b v3.0.5 -j `nproc` https://github.com/free5gc/free5gc.git
After that, compile the source code:
cd ~/free5gc
make all
After the source code compilation is completed, the basic construction of the independently deployed free5gc has been finished. Regarding the联动 with UERANSIM, the difference between containerized deployment and independent deployment is only in the configuration file writing, while the rest of the parts have no significant difference between independent deployment and containerized deployment. In the independent deployment scheme, the simulation core network can be started with the following command:
cd ~/free5gc
https://www.freebuf.com/articles/wireless/run.sh
After the simulation core network is started, the independent deployment plan provides some independent test scripts for testing, such as the test registration process:
cd ~/free5gc
https://www.freebuf.com/articles/wireless/test.sh TestRegistration
If you need to use the independent deployment plan combined with UERANSIM testing, you first need to run the webserver of the independent deployment plan:
cd ~/free5gc/webconsole
go run server.go
After that, the configuration part of UERANSIM in the two plans is not very different, the cause of the difference lies in the fact that the UERANSIM in the independent deployment plan needs to be deployed on another virtual machine, which will cause some differences in ip address configuration. In addition, in the case of independent deployment, the following rules need to be configured to allow free5gc to access the internet:
sudo sysctl -w net.ipv4.ip_forward=1
sudo iptables -t nat -A POSTROUTING -o <dn_interface (used for internet access network card name)> -j MASQUERADE
sudo iptables -A FORWARD -p tcp -m tcp --tcp-flags SYN,RST SYN -j TCPMSS --set-mss 1400
sudo systemctl stop ufw
Up to this point, the free5gc independent deployment is completed
Note: Both deployment plans have their own advantages and disadvantages, choose the appropriate plan according to actual needs, and it is not recommended to install both plans on the same virtual machine, as this may cause some conflict issues
0x03 UERANSIM simulation device installation
0x031 Source code download
cd ~
git clone https://github.com/aligungr/UERANSIM
0x032 Dependency download
sudo apt update
sudo apt upgrade
sudo apt install make
sudo apt install g++
sudo apt install libsctp-dev
sudo apt install lksctp-tools
sudo apt install iproute2
0x033 Compile source code
cd ~/UERANSIM
make
0x04 Full environment configuration and operation
0x041 Start free5gc environment
cd ~/free5gc-compose
docker-compose up -d
0x042 UERANSIM configuration settings
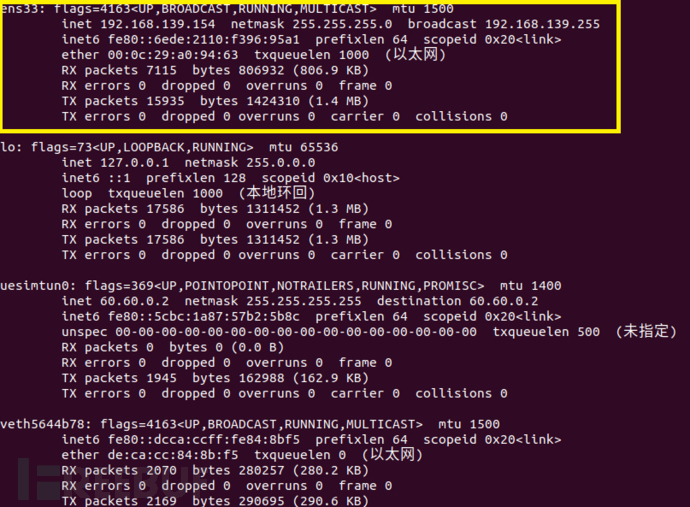
View and record the virtual machine network card address:
ifconfig
Note: After starting free5gc in the previous step, a series of network cards will be virtualized locally. This step needs to pay attention to the original virtual machine's built-in network card, usually the ip address of this type of network card is in the 192.168.*.* subnet, and the network card name is similar to ens33, eth0, etc., which can be distinguished by this feature
Next, you need to view and record the ip address of the amf element:
docker inspect amf
Find the line recorded with "IPAddress":, the following is the amf's ip address:
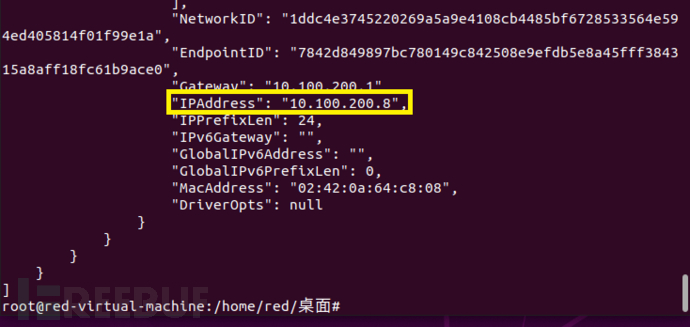
After recording these two ip addresses, you can complete the gnb configuration in UERANSIM, through modifying the free5gc-gnb.yaml configuration file to complete this operation:
cd ~/UERANSIM/config/
vim free5gc-gnb.yaml
need to modify the followingngapIp,gtpIptolocal ip
modify the followingamfconfigunderaddresstoamf's ip
!The amf address may change after each machine restart, pay attention to change
Up to this point, the base station configuration of UERANSIM is completed, and the next step is to register the UERANSIM UE part in free5gc:
Access address http://localhost:5000/ can enter the free5gc webui, login:
Username: admin
Password: free5gc
After that, add a UE registration information through free5gc's webui:
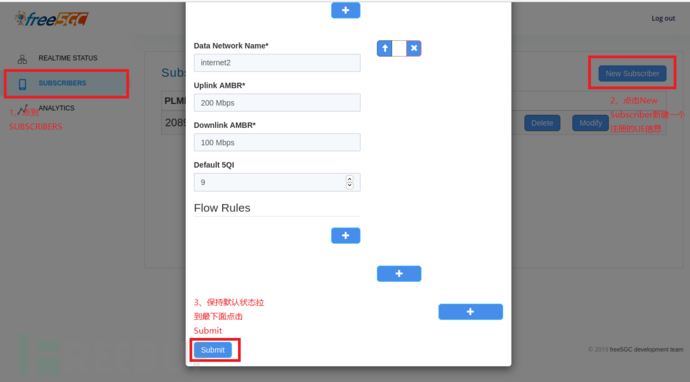
Note: The UE information configured here should be consistent with the information in ~/UERANSIM/config/free5gc-ue.yaml in principle, but since the code author of UERANSIM here has already set it up, no changes are actually needed
0x043 Start UERANSIM simulation device
#Start a shell to execute the process of starting gnb
cd ~/UERANSIM/build
#Use the nr-gnb program to specify the gnb configuration file and start the simulated base station
https://www.freebuf.com/articles/wireless/nr-gnb -c https://www.freebuf.com/articles/config/free5gc-gnb.yaml

#Start a new shell to execute the process of starting UE
cd ~/UERANSIM/build
#Start the simulated user equipment through the nr-ue program, specifying the used UE configuration file
sudo https://www.freebuf.com/articles/wireless/nr-ue -c https://www.freebuf.com/articles/config/free5gc-ue.yaml
#This is because a virtual network interface for a UE needs to be virtualized, so root privileges are required to execute
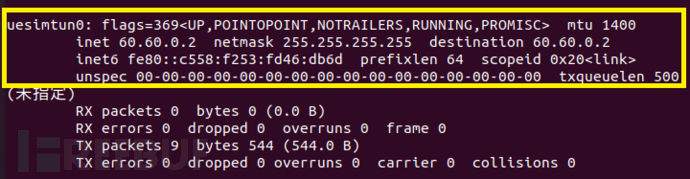
After the startup is complete, executeifconfigyou can see an additional network interface nameduesimtun0network interface; in addition, infree5gcofwebuiviewREALTIME STATUSYou can see that there is a UE in the connected state, which proves that the UERANSIM environment has started successfully at this time:
Note: The startedThe two shells cannot be closedIt can be executed in the background, but it is recommended to execute it in the foreground for convenience in real-time viewing of status information
0x05 Demonstration of basic usage of 5G network simulation
0x051 View basic information of the free5gc simulation core network
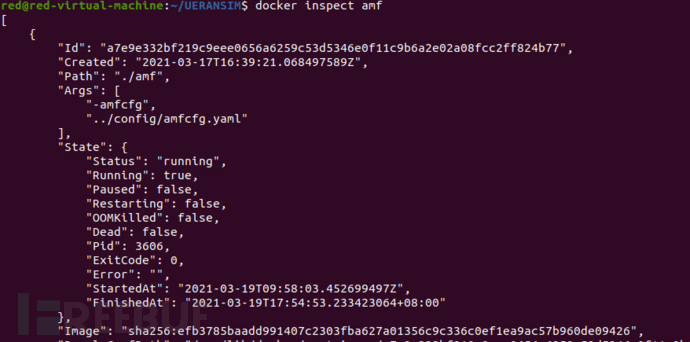
After the environment is set up and the free5gc container is started, we can view some status information of the free5gc single container through the following command:
docker inspect <container name (such as amf)>
The query effect is as follows:
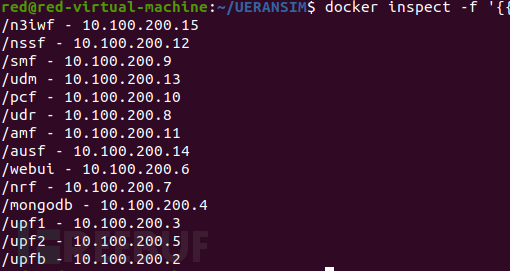
The following command can be used to query all containers and their corresponding IP addresses:
docker inspect -f '{{.Name}} - {{range .NetworkSettings.Networks}}{{.IPAddress}}{{end}}' $(docker ps -aq)
The query effect is as follows:
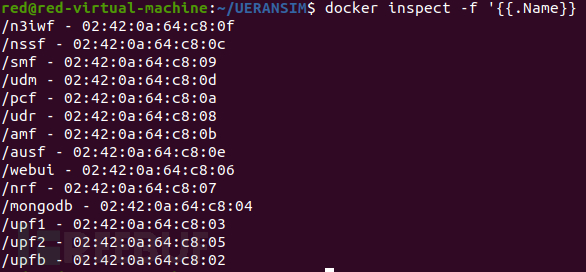
The following command can be used to query all containers and their corresponding MAC addresses:
docker inspect -f '{{.Name}} - {{range .NetworkSettings.Networks}}{{.MacAddress}}{{end}}' $(docker ps -aq)
The query effect is as follows:
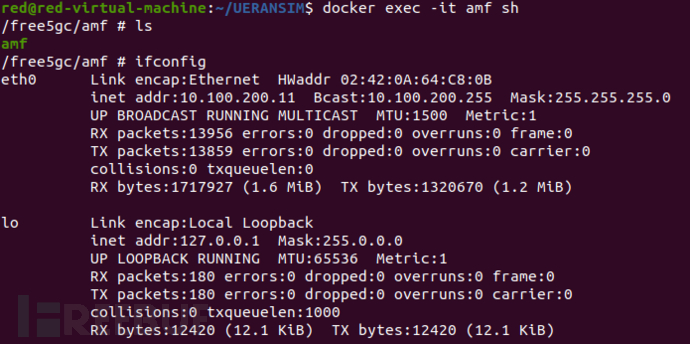
If we want to enter the interactive interface of each container, we can achieve this through the following command:
docker exec -it <container ID or container name (such as amf)> sh
The running effect is as follows:
0x052 Analysis of the basic network structure of the free5gc simulation core network
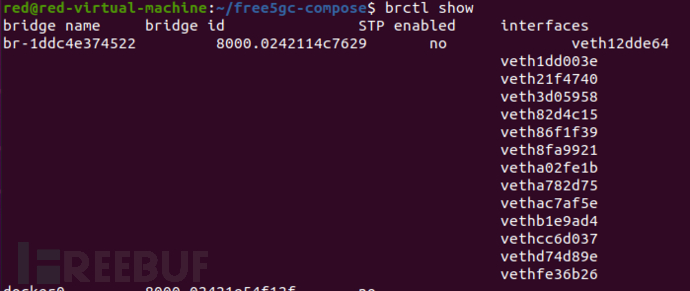
After the free5gc simulation environment is set up, it will virtualize a bridge and several virtual ports corresponding to the network elements. The network elements connect to the bridge and gNB through these ports, and can be installedbridge-utilstool, to usebrctlCommand to view related information:
brctl show
This command can be used to view the current bridge information and corresponding port number. As can be seen, the virtual network interfaces queried by ifconfig are actually virtual ports of the bridge:
The following command can be used to view the MAC address information of the devices connected to the bridge:
brctl showmacs <bridge name>
The query results are as follows, the first few MAC addresses listed are actually the MAC addresses of the network elements, and the following are the MAC addresses of the virtual ports:
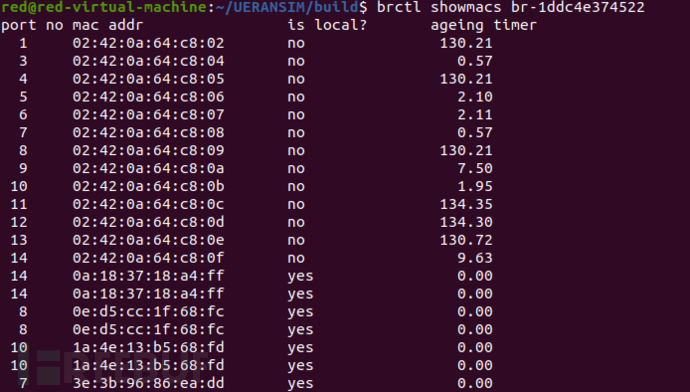
Based on this, after certain analysis, the networking diagram of the current free5gc+ueransim simulated 5G network can be roughly as follows:

0x053 UERANSIM simulates gNB establishment
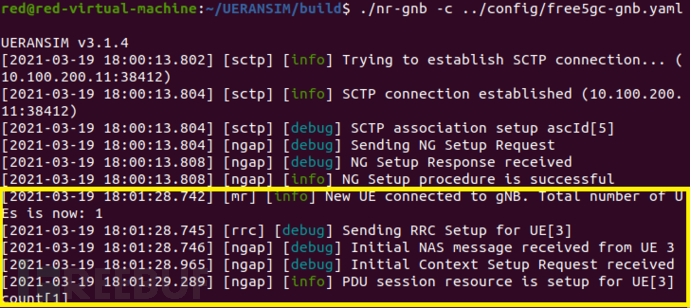
The following command can establish a virtual gNB, and you can see the relevant establishment information in the foreground:
cd ~/UERANSIM/build
https://www.freebuf.com/articles/wireless/nr-gnb -c https://www.freebuf.com/articles/config/free5gc-gnb.yaml
The effect can be seen as follows, and we can see that when the UE accesses (the part in the yellow box in the figure), the gNB prints out relevant information:
0x054 UERANSIM simulates UE establishment and registration, deregistration
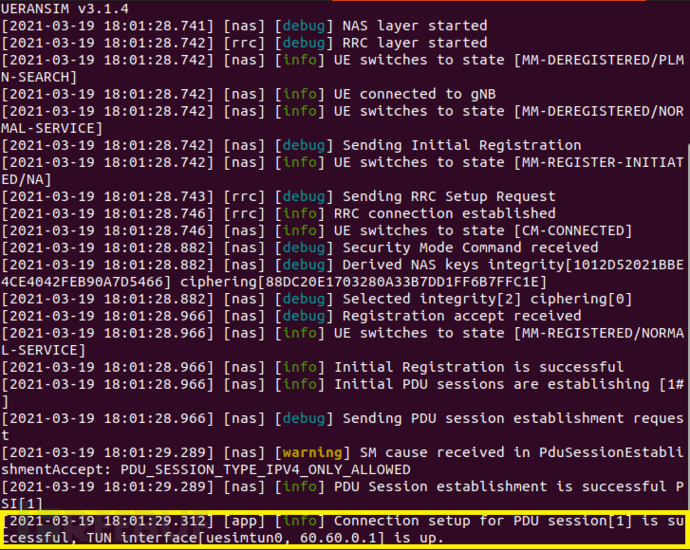
The following command can establish a virtual UE device, and this command will also register the UE device at the core network:
cd ~/UERANSIM/build
sudo https://www.freebuf.com/articles/wireless/nr-ue -c https://www.freebuf.com/articles/config/free5gc-ue.yaml
After running, you can see that the UE has successfully completed registration and has virtualized a virtual network interface card belonging to the UE, therefore, this command must be executed with root privileges:
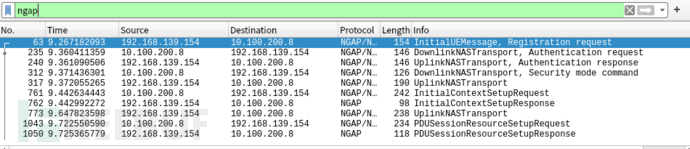
Based on the above analysis, we can see inBridgeCapture as complete a packet as possible before the UE registerswiresharkPacket capture can capture the interaction packets of UE registration (filtered by ngap rules):
After that, we test the deregistration process, and we can enter the UE command-line interactive interface using the following command:
cd ~/UERANSIM/build
#This step can be used to query the names of the currently running gNB and UE
https://www.freebuf.com/articles/wireless/nr-cli -d
#This step specifies the UE name to enter the UE command-line interactive interface, similarly, you can also specify the gNB name to enter the gNB interactive interface
https://www.freebuf.com/articles/wireless/nr-cli imsi-208930000000003
After entering the interactive interface, you can deregister using the following commands:
#This step is used to query available commands
commands
#This step can view the command options for deregistration
deregister
#This step is to register normally
deregister normal
deregister normal

The execution effect is as follows:
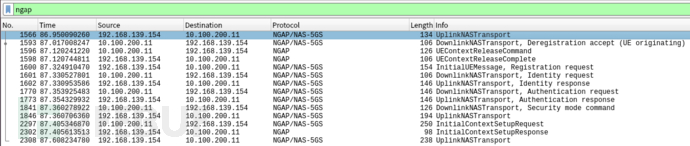
At this time, the Wireshark packet capture can capture some data packets related to de-registration (filtered by ngap rules):
Up to this point, we have completed the test of the simple UE registration and de-registration process in the 5G network and captured some interaction packets for analysis.
0x055 free5gc actual data service simulation
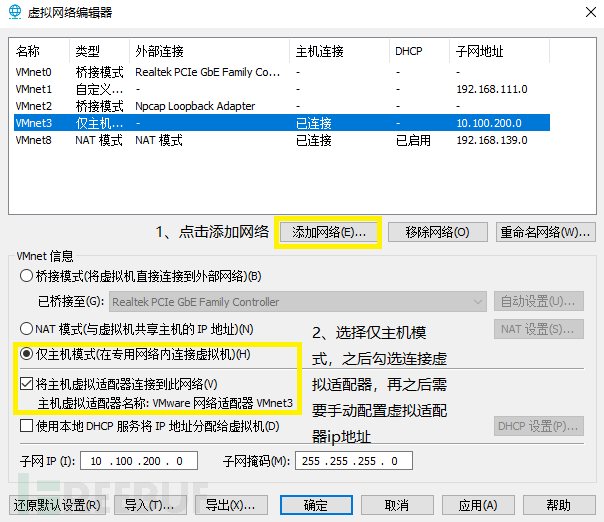
If it is necessary to implement actual data services, it is first necessary to configure the Internet interface of the core network, by using the virtual machine software, a virtual network card (here is Vnet3) is virtualized on the physical machine and used as the interface for the Internet:
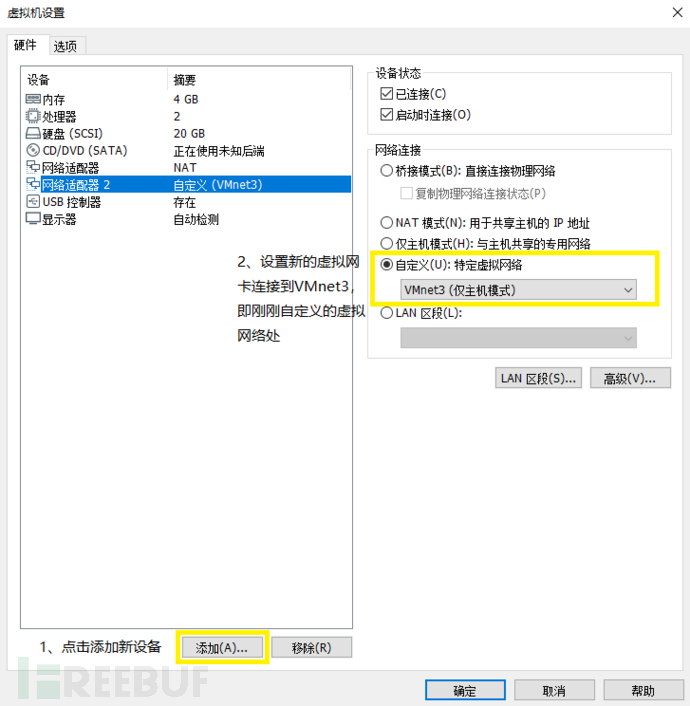
The IP address of this network card is configured to be consistent with the core network segment, and in the virtual machine environment, another network card (here is ens34) is virtualized and bridged with the above network card:

After that, the routing of the UE's network segment needs to be configured on the physical machine, as shown in the figure, the 10.100.200.5 network segment is the address of upf1 (corresponding to UPF anchor-1), and this value is determined by the actual export upf of the data packets:
# In addition, it is also necessary to bridge the newly virtualized network card in the virtual machine with the bridge:
# Before this, the bridge-utils tool needs to be installed
# Check if the addition is successful with the following command
brctl show
After the above configuration is completed, by specifying the UE network card in the virtual machine to send ping packets outward, it can be seen that the ping packets are sent and received normally:
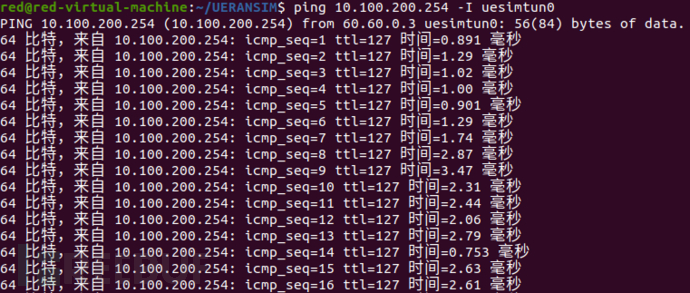
By capturing packets on the bridge and checking the ping packet situation, it can be seen that the data packets are indeed sent after passing through the core network:

By carefully analyzing this part of the ping packets, it can be found that after the original payload is encapsulated at the network element upfb (corresponding to UPF branch), it is sent to upf1 (corresponding to UPF anchor-1) by some routing rules, and then sent to the internet from upf1; the reply packets from the internet are encapsulated by upf1 and then returned to the UE side, and the data payload successfully passes through the core network.
Note: The routing rules mentioned above are reflected in ~/free5gc-compose/config/uerouting.yaml
0x06 Summary and Postscript
The full text introduces the construction of a simulated 5G network environment based on free5gc+ueransim, which achieves a simple study of 5G networks: realizing simulated UE registration, de-registration, and simulated data services.
The actual 5G network situation is naturally much more complex than described in the previous text, but for 5G itself, such a simulation system is sufficient to simulate most situations; this system implements some functions of the 5G core network for the 5G protocol, so it can be used to study some potential problems in the 5G protocol itself.
Finally, the 5G simulation network construction and implementation studied in this paper is actually just a small part of the whole 5G simulation network. The functions of the whole 5G simulation network are far more than this, and there are still many more functions waiting for researchers to explore and discover in depth.
References:
free5gc official website's independent deployment tutorial:
https://www.free5gc.org/installations/stage-3-sim-install-tw/
UERANSIM official github documentation:
https://github.com/aligungr/UERANSIM/wiki/Configuration
free5gc main project github address
https://github.com/free5gc/free5gc
free5gc container deployment project github address:
https://github.com/free5gc/free5gc-compose
free5gc official forum:
https://forum.free5gc.org/search?q=free5gc-compose

评论已关闭