
Due to the limited space, this article mainly introduces the points that need to be checked for the capability validation, and the detailed technical knowledge may not be written in great detail. Those who need it can pay attention to the official account for irregular updates on the technical details of the 2.0 security assessment clauses, such as the detailed explanation of pam modules, Linux file extended permissions ACLs, etc., which will be updated successively. You can also get the 2022 capability validation guidebook and Linux simulation environment image files for free. It is more effective to simulate and reproduce the analysis with the article.
Without further ado, let's get straight to the point.
When conducting evaluations, we first need to determine the criticality of the assets (note: the security strategies for assets of different criticality levels may vary).
Then check the corresponding assets according to the security policy
First, let's take the Linux operating system as an example.
First, identity authentication
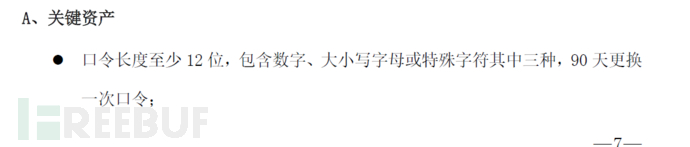
a) Identify and authenticate the login user, with unique identity, and the authentication information has complexity requirements and needs to be changed regularly.
Let's take a look at the answer first, and then reproduce the relevant knowledge points based on the answer.
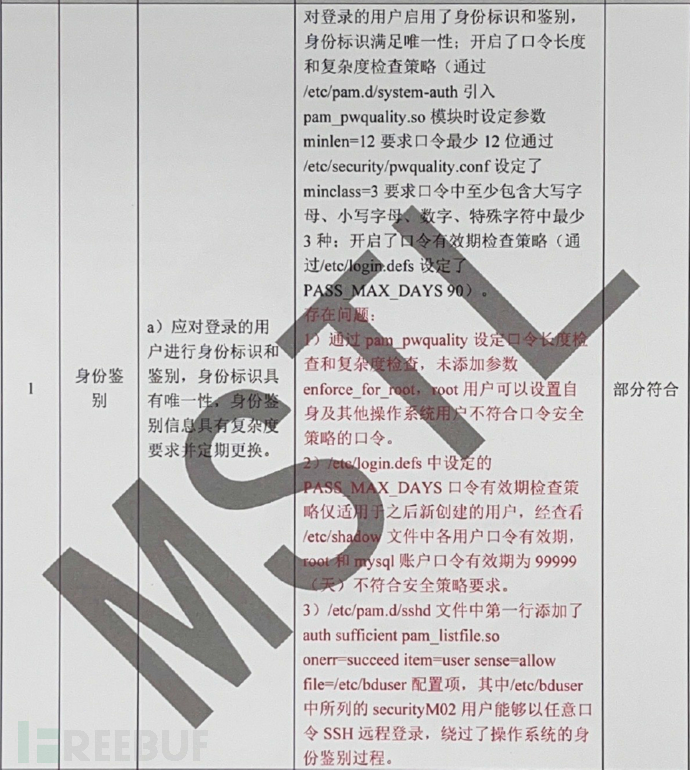
1. Set password length check and complexity check through pam_pwquality, without adding the parameter enforce_for_root, so the root user can set passwords for themselves and other operating system users that do not comply with the password security policy.
On-site situation:
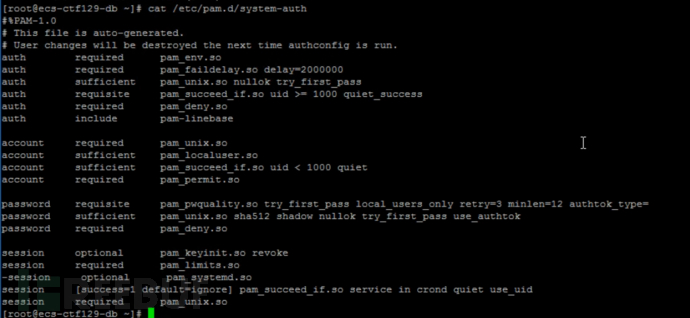
Check /etc/pam.d/system-auth
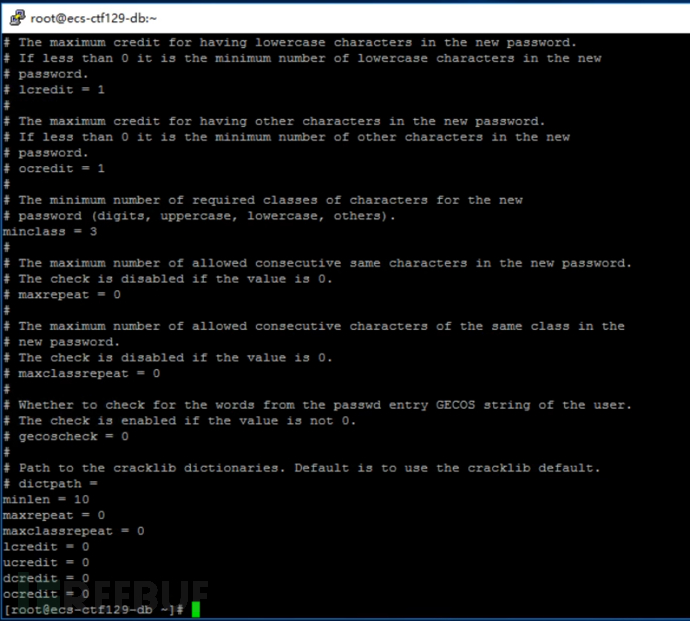
Check /etc/security/pwquality.conf
Determine the corresponding security policy
According to the screenshot, we can judge that the system sets the corresponding password length and complexity through the pam_pwquality module, and find that the 'minlen' parameter in the 'system-auth' file conflicts with the 'pwquality.conf' file. After testing, the conflicting parameters are in accordance with the configuration in the 'system-auth' file, so here minlen=12.
The final configuration is: minlen=12, minclass=3, maxrepeat=0, maxclassrepeat=0, lcredit=0, ucredit=0, dcredit=0, ocredit=0.
Parameter explanation:
minlen=N the minimum length of the password
maxrepeat the maximum number of consecutive identical characters allowed in the new password, if 0 represents disable
maxclassrepeat the maximum number of consecutive characters of the same type allowed in the new password
dcredit=N N >0 the maximum number of digits in the password plus 1;
N<0 the minimum number of digits in the password
lcredit=N number of lowercase letters
ucredit=N number of uppercase letters
ocredit=N number of special letters
minclass=N password composition (uppercase/lowercase letters, numbers, special characters)
authtok_type= enforce_for_root indicates that the root user also needs to comply with this rule
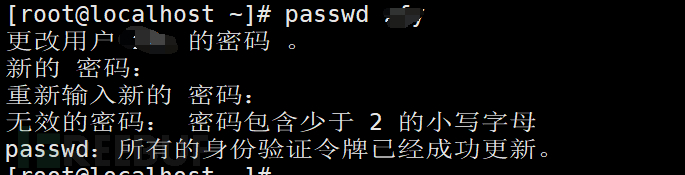
Therefore, it meets the requirements for length and complexity, but lacks means to restrict the root account. However, after testing, the parameter 'authtok_type= enforce_for_root' written in the 'pwquality.conf' file only prompts but does not take effect, and needs to be written in the 'system-auth' file (not sure what the situation is).
So the first point is relatively simple to check, similar ones have been examined before.
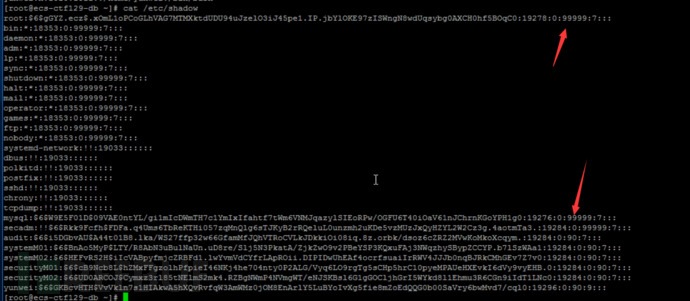
The password validity check policy set by PASS_MAX_DAYS in https://www.freebuf.com/articles/system/etc/login.defs only applies to users created after this setting, and after checking the password validity period of each user in the /etc/shadow file, the root and mysql account passwords are valid for 99999 days, which does not meet the security policy requirements
The second point is even simpler, just directly check the /etc/shadow file, and find that the root and mysql accounts are both set to 99999
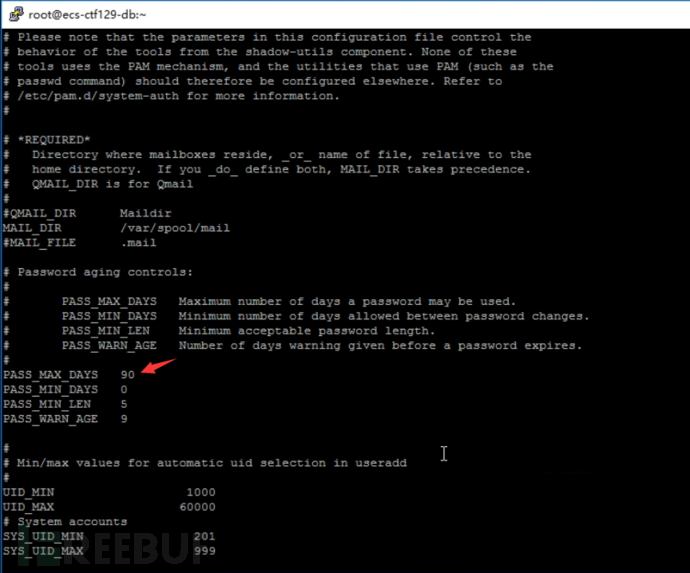
Let's take a look at the /etc/login.defs file. The PASS_MAX_DAYS parameter is only applicable to users added after this setting is made, and the PASS_MIN_LEN parameter is invalid. After the root account is set, the password must also be changed when it expires.
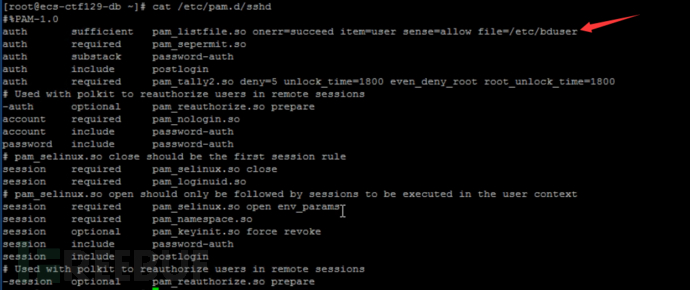
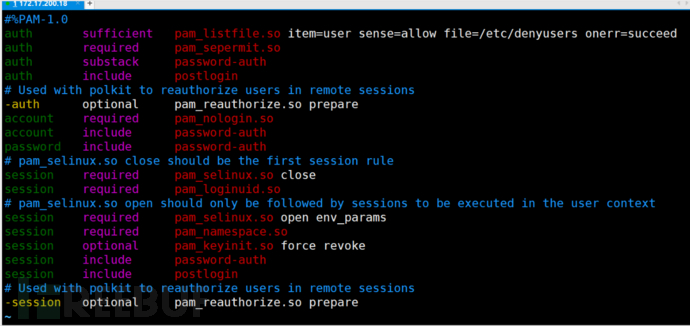
The first line of the /etc/pam.d/sshd file added the configuration item auth sufficient pam_listfile/so onerr=succeed item=user sense=allow file=/etc/bduser, among which the securityM02 users listed in /etc/bduser can log in remotely with any password, bypassing the operating system's authentication process
This section examines the assessor's understanding of the pam authentication module. First, let's look at the corresponding configuration file. Generally, we use ssh for login, so local login may not be required, but it is best to take a look at whether there is any misconfiguration in the system-auth file. Here we check the /etc/pam.d/sshd file
At that time, the author did not investigate this in detail. Although some research has been done on some pam modules, it was felt that it would not be tested this specifically, so it was not delved into. As a result, this time it was tested, and this module was exactly one that had not been recorded, so it was sent directly without being found. There was also no screenshot of /etc/bduser this time. Subsequent local testing found that passwordless login was possible.
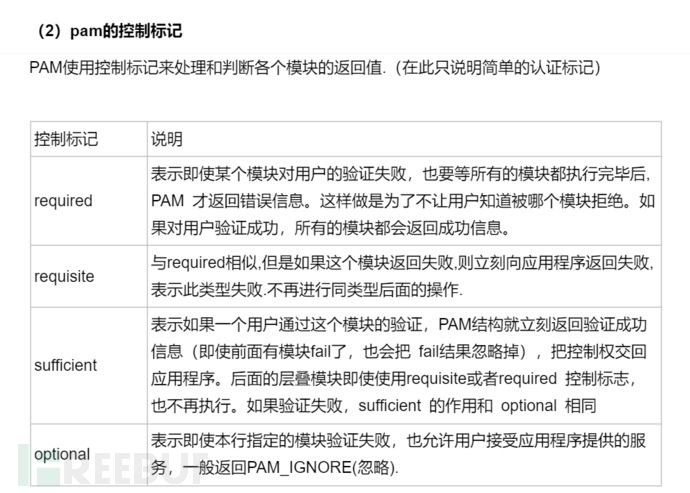
Let's first briefly introduce the pam_listfile.so module:
The pam_listfile.so module is similar in function to the pam_access.so module, with the goal of implementing access control based on user/group, hostname/IP, and terminal. However, its implementation method is slightly different from pam_access.so because it does not have a dedicated default configuration file. Access control is achieved through control options in the pam configuration file and a custom configuration file. Moreover, in addition to controlling the aforementioned access sources, it can also control ruser, rhost, the user group, and the login shell. Therefore, some users believe that its functionality seems more flexible and powerful than pam_access.so.
The format of the configuration of pam_listfile.so module is divided into five parts: item, onerr, sense, file, and apply. Among them: }}
a) item=[tty|user|rhost|ruser|group|shell]: Defines which listed targets or conditions adopt the rule. It is obvious that multiple different conditions can be specified here.
b) onerr=succeed|fail: Defines the default return value when an error occurs (such as unable to open the configuration file).
c) sense=allow|deny: Defines the control method when a project that meets the conditions is found in the configuration file. If no such project is found, the general verification will pass.
d) file=filename: Used to specify the full path name of the configuration file.
e) apply=user|@group: Defines the user type (user or group) to which the rule applies.
As for the writing method of the file, it is simple. Just enter a user or group name per line. Therefore, when similar access control is needed for other services, you can copy the pattern. For example, now it is necessary to implement user-based access control for ssh clients on the SSH server.
Example one:
The zfy account is not allowed to log in via ssh. The method is as follows, add this line:
auth required pam_listfile.so item=user sense=deny file=/etc/denyusers onerr=succeed
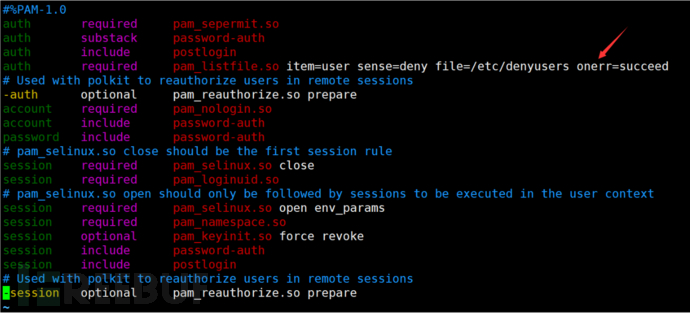
Then add this user to the /etc/denyusers file. This user will be denied login, and the rest of the accounts can log in normally.

Example two:
For example, ability verification, there are plenty of explanations and rules for pam modules on the Internet, so they will not be introduced here. Just paste a simple picture.
After passing, the subsequent authentication is not performed, so the users in /etc/bduser can skip password authentication. This means that once the first one is passed, the auth authentication is not performed again, resulting in any password entered by the users in this file can log in.
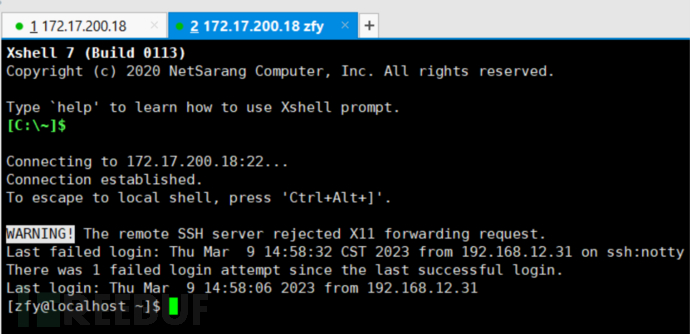
I can log in successfully by entering any password at will.
So, this point may cause more failures. If you haven't studied the pam authentication mechanism yourself, or do not recognize this module, it is easy to ignore it, and the test is quite detailed.
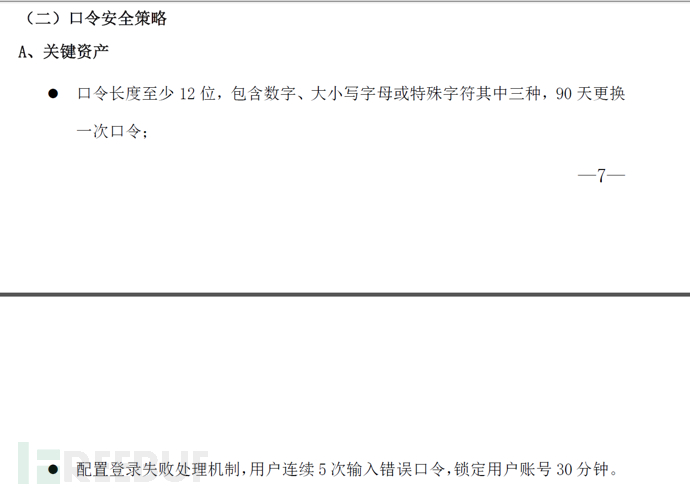
b) It should have the login failure handling function, and should configure and enable measures such as ending the session, limiting the number of illegal logins, and automatically exiting when the login connection times out.
As usual, let's look at the answer first.
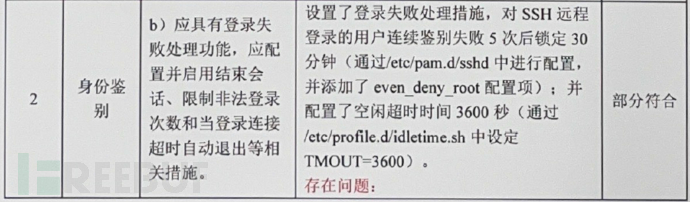
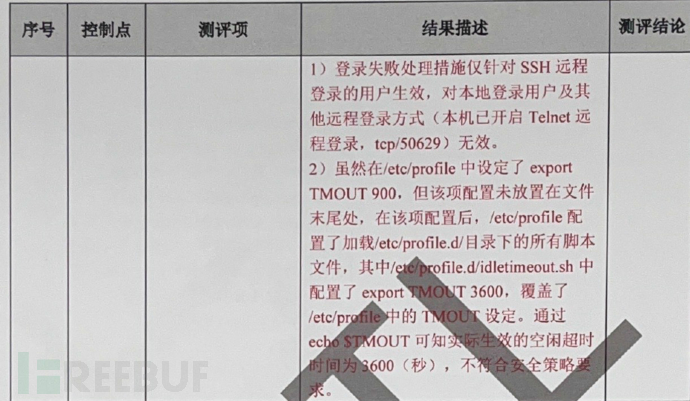
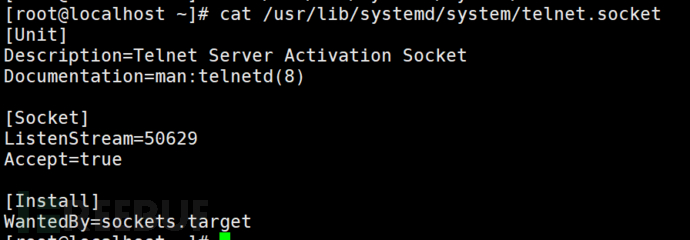
1. The login failure handling measures only take effect for users logging in remotely via SSH, and are invalid for local login users and other remote login methods (the Telnet remote login on this machine is enabled, tcp/50629).
Confirm how the strategy of the login failure handling function for the corresponding key assets is.
For the login failure handling function of ssh, we check the /etc/pam.d/sshd file.
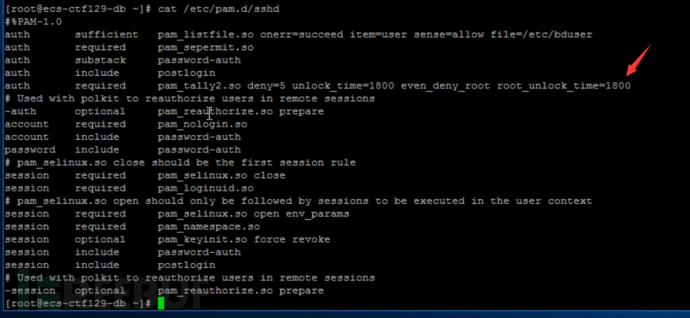
After confirming that the configuration of the login failure handling function for the ssh login method is correct, the pitfall comes next. Does it only have one ssh login method? First, we use the netstat -tuanp command to view the port openness status.

Pay attention to the port with the unknown Program name mentioned above, among which there must be some pitfalls. The author is a bit clumsy and does not know how to install the telnet service successfully on the CentOS 7 version, as I directly installed the telnet program, which is systemd (the telnet service of the 2021 ability verification is this), CentOS 7 no longer uses the xinetd service to start telnet, so it may not be possible to reproduce the success here.

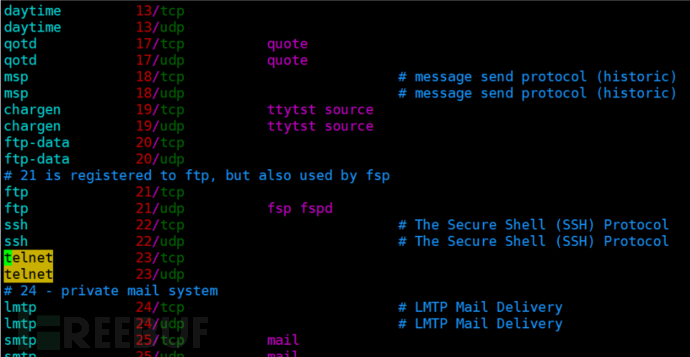
According to the information on the Internet, we can find the port corresponding to the telnet service by viewing the /etc/services file.
For CentOS 7, modify the ListenStream parameter of the /usr/lib/systemd/system/telnet.socket file.

So, if the login failure handling function does not have the telnet module, it cannot meet the requirements.
Although export TMOUT 900 is set in /etc/profile, this configuration is not placed at the end of the file. After this configuration, /etc/profile configures to load all script files under the /etc/profiled/ directory, among which /etc/profiled/idletimeout.sh is configured with export TMOUT 3600, overriding the TMOUT setting in /etc/profile. By echoing $TMOUT, we can know that the actual effective idle timeout time is 3600 seconds, which does not meet the requirements of the security policy.
Check the security policy

Here is usually to view the /etc/profile file, and it was also viewed at the time of the test.

But the most stable way is to output the current TMOUT value of the environment variable, using the echo $TMOUT command

It was very纠结 at that time, I didn't know where he had configured another 3600. At first, I thought it was configured in the .bash_profile file under the user's home directory, but later found out that it was not. So the configuration file may be many kinds, and in the case of uncertainty, directly echo $TMOUT, I think this should also be given points. Since I didn't check the /etc/profiled/idletimeout.sh file at that time, I couldn't reproduce how he configured it.
When performing remote management, necessary measures should be taken to prevent the eavesdropping of authentication information during transmission over the network

This one is very clear, you can directly check the server's port opening status on the day with netstat -tuanp
Then go to the /etc/services file to confirm which service it is. This has been explained above, so there is no need to repeat it here.

评论已关闭