JD Logistics: Kang Rui, Yao Zaiyi, Li Zhen, Liu Bin, Wang Beiying
Note: All the following are based on Elasticsearch 8.1 version
I. Cross-cluster retrieval - ccr
Official document address:
https://www.elastic.co/guide/en/elasticsearch/reference/8.1/modules-cross-cluster-search.html
Background and significance of cross-cluster retrieval

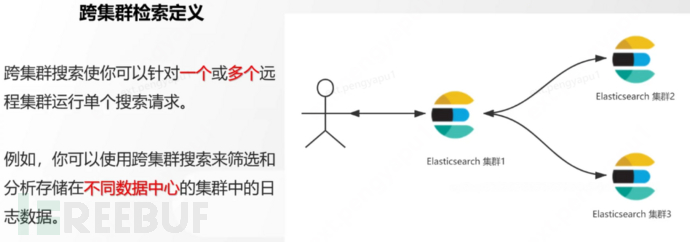
Cross-cluster retrieval definition
Cross-cluster retrieval environment setup
Official document address:
https://www.elastic.co/guide/en/elasticsearch/reference/8.1/modules-cross-cluster-search.html
Step 1: Set up two local single-node clusters, and the security configuration can be omitted for local practice
Step 2: Execute the following command in each cluster
PUT _cluster/settings { "persistent": { "cluster": { "remote": { "cluster_one": { "seeds": [ "172.21.0.14:9301" ] },"cluster_two": { "seeds": [ "172.21.0.14:9302" ] } } } } }
Step 3: Verify if clusters can communicate with each other
Plan 1: Use Kibana visualization to view: stack Management -> Remote Clusters -> status should be connected! And a green check mark must be ticked.
Plan 2: GET _remote/info
Cross-cluster query exercise
Step 1: Add data as follows in cluster 1
PUT test01/_bulk
{"index":{"_id":1}}
{"title":"this is from cluster01..."}

# Step 2: Add data as follows in cluster 2:
PUT test01/_bulk
{"index":{"_id":1}}
{"title":"this is from cluster02..."}

# Step 3: Execute cross-cluster search as follows: Syntax: POST cluster_name1:index_name,cluster_name2:index_name/_search
POST cluster_one:test01,cluster_two:test01/_search
{
  "took" : 7,
  "timed_out" : false,
  "num_reduce_phases" : 3,
  "_shards" : {
    "total" : 2,
    "successful" : 2,
    "skipped" : 0,
    "failed" : 0
  },
  "_clusters" : {
    "total" : 2,
    "successful" : 2,
    "skipped" : 0
  },
  "hits" : {
    "total" : {
      "value" : 2,
      "relation" : "eq"
    },
    "max_score" : 1.0,
    "hits" : [
      {
        "_index" : "cluster_two:test01",
        "_id" : "1",
        "_score" : 1.0,
        "_source" : {
          "title" : "this is from cluster02..."

      },
      {
        "_index" : "cluster_one:test01",
        "_id" : "1",
        "_score" : 1.0,
        "_source" : {
          "title" : ""this is from cluster01...


    ]
II. Cross-cluster Replication - ccs - This feature requires a fee
Official document address:
https://www.elastic.co/guide/en/elasticsearch/reference/current/xpack-ccr.html
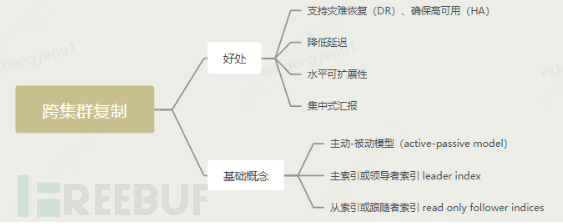
How to ensure high availability of the cluster
- Replication mechanism
- Snapshots and recovery
- Cross-cluster replication (similar to MySQL master-slave synchronization)
Overview of cross-cluster replication
Cross-cluster replication configuration
- Prepare two clusters with network interconnectivity
- Enable license usage, which can be tried for 30 days
- Enable location: Stack Management -> License management.
3. Define which is the Lead cluster and which is the follower cluster
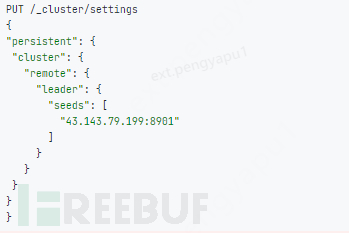
4. Configure the Leader cluster in the follower cluster
5. Configure the index synchronization rules for the Leader cluster in the follower cluster (configuration on the kibana page)
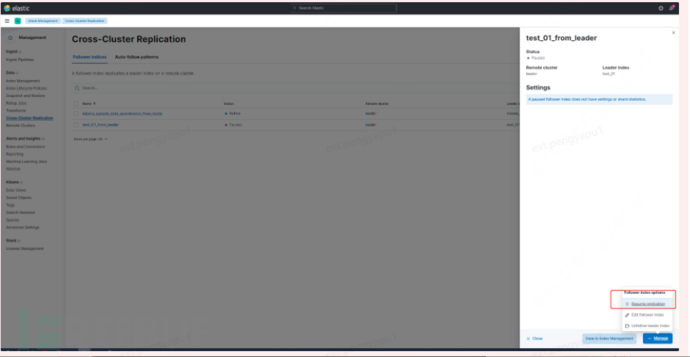
a.stack Management -> Cross Cluster Replication -> create a follower index.
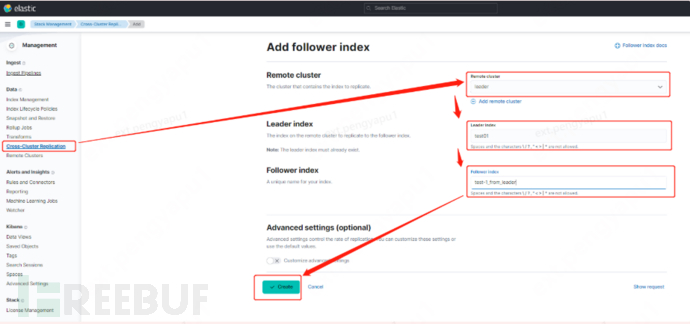
6. Enable the configuration of step 5
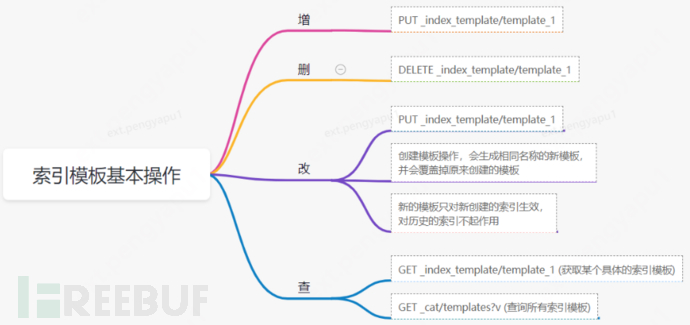
Three Index Templates
Official document address:
https://www.elastic.co/guide/en/elasticsearch/reference/8.1/index-templates.html
8.X Component Templates
1. Create component template - index setting related
# Component template - index setting related
PUT _component_template/template_sttting_part
{
  "template": {
    "settings": {
      "number_of_shards": 3,
      "number_of_replicas": 0
2. Create component template - index mapping related
# Component template - index mapping related
PUT _component_template/template_mapping_part
{
  "template": {
    "mappings": {
      "properties": {
        "hosr_name":{
          "type": "keyword"
        },
        "cratet_at":{
          "type": "date",
          "format": "EEE MMM dd HH:mm:ss Z yyyy"
3. Create component template - configure the association between template and index
// **Note: If there are duplicate configuration items in multiple component templates, the latter will override the former, and it is related to the order of configuration**
# Based on component template, configure the association between template and index
# This expression is related to all tem_* indexes that are created, and the following rules will be used
PUT _index_template/template_1
{
  "index_patterns": [
    "tem_*"
  ],
  "composed_of": [
    "template_sttting_part",
    "template_mapping_part"
  ]
4. Test
# Create test
PUT tem_001
Basic operations of index templates
Practice session
Requirement 1: By default, if Mapping is not explicitly specified, numeric types will be dynamically mapped to long type, but in fact, business numeric values are relatively small, which may cause storage waste. It is necessary to set the default value to Integer
Index templates, official documentation address:
https://www.elastic.co/guide/en/elasticsearch/reference/8.1/index-templates.html
Mapping dynamic template, official document address:
https://www.elastic.co/guide/en/elasticsearch/reference/8.1/dynamic-templates.html
# Combine mapping dynamic template and index template
# 1. Create component template - mapping template
PUT _component_template/template_mapping_part_01
{
  "template": {
    "mappings": {
      "dynamic_templates": [
        {
          "integers": {
            "match_mapping_type": "long",
            "mapping": {
              "type": "integer"


      ]


# 2. Create component template and index association configuration
PUT _index_template/template_2
{
  "index_patterns": ["tem1_*"],
  "composed_of": ["template_mapping_part_01"],


# 3. Create test data
POST tem1_001/_doc/1
{
  "age":18


# 4. View the mapping structure verification
get tem1_001/_mapping
Requirement 2: Fields starting with 'date_' should be matched as 'date' date type.
Index templates, official documentation address:
https://www.elastic.co/guide/en/elasticsearch/reference/8.1/index-templates.html
Mapping dynamic template, official document address:
https://www.elastic.co/guide/en/elasticsearch/reference/8.1/dynamic-templates.html
# Combine mapping dynamic template and index template
# 1. Create component template - mapping template
PUT _component_template/template_mapping_part_01
{
  "template": {
    "mappings": {
      "dynamic_templates": [
        {
          "integers": {
            "match_mapping_type": "long",
            "mapping": {
              "type": "integer"


        },
        {
        "date_type_process": {
          "match": "date_*",
          "mapping": {
            "type": "date",
            "format":"yyyy-MM-dd HH:mm:ss"


      ]


# 2. Create component template and index association configuration
PUT _index_template/template_2
{
  "index_patterns": ["tem1_*"],
  "composed_of": ["template_mapping_part_01"],


# 3. Create test data
POST tem1_001/_doc/2
{
  "age":19,
  "date_aoe":"2022-01-01 18:18:00"


# 4. View the mapping structure verification
get tem1_001/_mapping
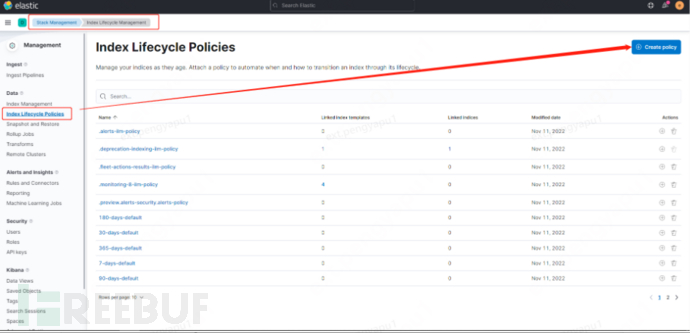
4. LIM Index Lifecycle Management
Official document address:
https://www.elastic.co/guide/en/elasticsearch/reference/8.1/index-lifecycle-management.html
What is the index lifecycle?
Index lifecycle: birth -> old -> sick -> death
Have you ever considered that if an index is created and then no longer managed? What will happen?
What is Index Lifecycle Management?
What happens if the index is too large?
The recovery time for large indexes is much slower than that for small indexes. As indexes grow larger, searches will become slower, and writes and updates will also be affected to varying degrees. Once indexes reach a certain size, when an index has health issues, it can cause the entire cluster's core business to become unavailable
Best Practices
The maximum number of documents per shard in the cluster: 2 to the power of 32 minus 1, which is about 2 billion. Official recommendation: control the shard size between 30GB and 50GB. If the index data volume keeps increasing indefinitely, it will definitely exceed this value
Users do not care about the full amount
In some business scenarios, businesses are more concerned about recent data, such as near 3 days, near 7 days large index will gather all historical data together, which is not conducive to such scenario queries
Historical evolution of index lifecycle management

LIM Prologue - rollover rolling index
Official document address:
https://www.elastic.co/guide/en/elasticsearch/reference/8.1/index-rollover.html
# 0. Self-test premise, LIM lifecycle rollover frequency. Default 10 minutes
PUT _cluster/settings
{
  "persistent": {
    "indices.lifecycle.poll_interval": "1s"


# 1. Create index and specify alias
PUT test_index-0001
{
  "aliases": {
    "my-test-index-alias": {
      "is_write_index": true


# 2. Batch data import
PUT my-test-index-alias/_bulk
{"index":{"_id":1}}
{"title":"testing 01"}
{"index":{"_id":2}}
{"title":"testing 02"}
{"index":{"_id":3}}
{"title":"testing 03"}
{"index":{"_id":4}}
{"title":"testing 04"}
{"index":{"_id":5}}
{"title":"testing 05"}

# 3. Rollover rolling rule configuration
POST my-test-index-alias/_rollover
{
  "conditions": {
    "max_age": "7d",
    "max_docs": 5,
    "max_primary_shard_size": "50gb"


# 4. Create rolling index under the premise of meeting conditions
PUT my-test-index-alias/_bulk
{"index":{"_id":7}}
{"title":"testing 07"}

# 5. Query verification to check if the rolling is successful
POST my-test-index-alias/_search
LIM Prologue - shrink index compression
Official document address:
https://www.elastic.co/guide/en/elasticsearch/reference/8.1/ilm-shrink.html
Core steps:
1. Migrate all data to an independent node
2. Index writing is prohibited
3. Compression can be performed
# 1. Prepare test data
DELETE kibana_sample_data_logs_ext
PUT kibana_sample_data_logs_ext
{
  "settings": {
    "number_of_shards": 5,
    "number_of_replicas": 0


POST _reindex
{
  "source": {
    "index": "kibana_sample_data_logs"
  },
  "dest": {
    "index": "kibana_sample_data_logs_ext"


# 2. Precondition settings before compression
# number_of_replicas : The number of replicas is 0 after compression
# index.routing.allocation.include._tier_preference All data shards are routed to hot nodes
# "index.blocks.write" Compression does not allow data writing to the index after compression
PUT kibana_sample_data_logs_ext/_settings
{
  "settings": {
    "index.number_of_replicas": 0,
    "index.routing.allocation.include._tier_preference": "data_hot",
    "index.blocks.write": true


# 3. Implement compression
POST kibana_sample_data_logs_ext/_shrink/kibana_sample_data_logs_ext_shrink
{
  "settings":{
    "index.number_of_replicas": 0,
    "index.number_of_shards": 1,
    "index.codec":"best_compression"
  },
  "aliases":{
    "kibana_sample_data_logs_alias":{}
LIM practice
Global awareness establishment - Four stages
Official document address:
https://www.elastic.co/guide/en/elasticsearch/reference/8.1/overview-index-lifecycle-management.html
Lifecycle management stages (Policy):
https://www.elastic.co/guide/en/elasticsearch/reference/8.1/ilm-index-lifecycle.html
Hot stage(Born)
Set priority
Unfollow
Rollover
Read-only
Shrink
Force Merge
Search snapshot
Warm stage(Old)
Set priority
Unfollow
Read-only
Allocate
migrate
Shrink
Force Merge
Cold stage(Sick)
Search snapshot
Delete stage(Dead)
delete
Drill
1. Create policy
- HotStage settings, rollover: max_age:3d, max_docs:5, max_size:50gb, Priority: 100
- Warm phase settings: min_age:15s, force merge segments, migrate hot nodes to warm nodes, set replica count to 0, priority: 50
- Cold phase settings: min_age 30s, migrate warm to cold phase
- Delete phase settings: min_age 45s, perform deletion operation
PUT _ilm/policy/kr_20221114_policy
{
  "policy": {
    "phases": {
      "hot": {
        "min_age": "0ms",
        "actions": {
          "set_priority": {
            "priority": 100
          },
          "rollover": {
            "max_size": "50gb",
            "max_primary_shard_size": "50gb",
            "max_age": "3d",
            "max_docs": 5


      },
      "warm": {
        "min_age": "15s",
        "actions": {
          "forcemerge": {
            "max_num_segments": 1
          },
          "set_priority": {
            "priority": 50
          },
          "allocate": {
            "number_of_replicas": 0


      },
      "cold": {
        "min_age": "30s",
        "actions": {
          "set_priority": {
            "priority": 0


      },
      "delete": {
        "min_age": "45s",
        "actions": {
          "delete": {
            "delete_searchable_snapshot": true
2. Create index template
PUT _index_template/kr_20221114_template
{
  "index_patterns": ["kr_index-**"],
  "template": {
    "settings": {
      "index": {
        "lifecycle": {
          "name": "kr_20221114_policy",
          "rollover_alias": "kr-index-alias"
        },
        "routing": {
          "allocation": {
            "include": {
              "_tier_preference": "data-hot"


        },
        "number_of_shards": "3",
        "number_of_replicas": "1"

    },
    "aliases": {},
    "mappings": {}
3. Modify lim rollover refresh frequency for testing
PUT _cluster/settings
{
  "persistent": {
    "indices.lifecycle.poll_interval": "1s"
4. Perform test
# Create index and specify writable alias
PUT kr_index-0001
{
  "aliases": {
    "kr-index-alias": {
      "is_write_index": true


# Add data through alias
PUT kr-index-alias/_bulk
{"index":{"_id":1}}
{"title":"testing 01"}
{"index":{"_id":2}}
{"title":"testing 02"}
{"index":{"_id":3}}
{"title":"testing 03"}
{"index":{"_id":4}}
{"title":"testing 04"}
{"index":{"_id":5}}
{"title":"testing 05"}
# Add data through alias to trigger rollover
PUT kr-index-alias/_bulk
{"index":{"_id":6}}
{"title":"testing 06"}
# View index status
GET kr_index-0001

get _cat/indices?v
Process summary
First step: Configure lim policy
- Horizontal: Phrase stage (Hot, Warm, Cold, Delete) - birth, growth, decline, and death
- Vertical: Action operation (rollover, forcemerge, readlyonly, delete)
Second step: Create a template, bind the policy, and specify the alias
Third step: Create the initial index
Fourth step: The index rolls over based on the policy specified in the first step
Five. Data Stream
Official document address:
https://www.elastic.co/guide/en/elasticsearch/reference/8.1/ilm-actions.html
Feature analysis
Data Stream allows us to store time-series data across multiple indices while providing a unique external interface (data stream name)
- Write and retrieval requests are sent to the data stream
- Data stream routes these requests to the backing index (background index)
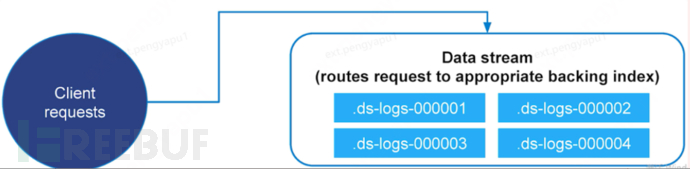
Backing indices
Each data stream is composed of multiple hidden background indices
- Automatically created
- Required template index
The rollover index mechanism is used to automatically generate background indices
- It will become the new write index for data stream
Application scenarios
- Log, event, metric and other business data that are continuously created (rarely updated)
- Two core characteristics
- Time-series data
- Data is rarely updated or not updated at all
Core steps to create a Data Stream

Official document address:
https://www.elastic.co/guide/en/elasticsearch/reference/8.1/set-up-a-data-stream.html
Set up a data stream
To set up a data stream, follow these steps:
- Create an index lifecycle policy
- Create component templates
- Create an index template
- Create the data stream
- Secure the data stream
Drill
1. Create a data stream named my-data-stream
2. The index_template is named my-index-template
3. All indices that meet the index format ["my-data-stream*"] must be applied
4. When data is inserted, it will be in the data_hot node
5. After 3 minutes, it will rollover to the data_warm node
6. In 5 minutes, it will reach the data_cold node
# Step 1: Create lim policy
PUT _ilm/policy/my-lifecycle-policy
{
  "policy": {
    "phases": {
      "hot": {
        "actions": {
          "rollover": {
            "max_size": "50gb",
            "max_age": "3m",
            "max_docs": 5
          },
          "set_priority": {
            "priority": 100


      },
      "warm": {
        "min_age": "5m",
        "actions": {
          "allocate": {
            "number_of_replicas": 0
          },
          "forcemerge": {
            "max_num_segments": 1
          },
          "set_priority": {
            "priority": 50


      },
      "cold": {
        "min_age": "6m",
        "actions": {
          "freeze":{}

      },
      "delete": {
        "min_age": "45s",
        "actions": {
          "delete": {}


# Step 2: Create component template - mapping
PUT _component_template/my-mappings
{
  "template": {
    "mappings": {
      "properties": {
        "@timestamp": {
          "type": "date",
          "format": "date_optional_time||epoch_millis"
        },
        "message": {
          "type": "wildcard"


  },
  "_meta": {
    "description": "Mappings for @timestamp and message fields"
    "my-custom-meta-field": "More arbitrary metadata"


# Step 3: Create component template - setting
PUT _component_template/my-settings
{
  "template": {
    "settings": {
      "index.lifecycle.name": "my-lifecycle-policy"
      "index.routing.allocation.include._tier_preference":"data_hot"

  },
  "_meta": {
    "description": "Settings for ILM"
    "my-custom-meta-field": "More arbitrary metadata"


# Step 4: Create index template
PUT _index_template/my-index-template
{
  "index_patterns": ["my-data-stream*"],
  "data_stream": { },
  "composed_of": [ "my-mappings", "my-settings" ],
  "priority": 500,
  "_meta": {
    "description": "Template for my time series data"
    "my-custom-meta-field": "More arbitrary metadata"


# Step 5: Create data stream and write data for test
PUT my-data-stream/_bulk
{ "create":{ } }
{ "@timestamp": "2099-05-06T16:21:15.000Z", "message": "192.0.2.42 - - [06/May/2099:16:21:15 +0000] \"GET /images/bg.jpg HTTP/1.0\" 200 24736" }
{ "create":{ } }
{ "@timestamp": "2099-05-06T16:25:42.000Z", "message": "192.0.2.255 - - [06/May/2099:16:25:42 +0000] \"GET /favicon.ico HTTP/1.0\" 200 3638" }

POST my-data-stream/_doc
{
  "@timestamp": "2099-05-06T16:21:15.000Z",
  "message": "192.0.2.42 - - [06/May/2099:16:21:15 +0000] \"GET /images/bg.jpg HTTP/1.0\" 200 24736"


Step 6: View the backend index information of the data stream
GET /_resolve/index/my-data-stream*
评论已关闭