Introduction
Unix.Trojan.DDoS_XOR-1 is a common Linux system DDoS Trojan virus. After the system is infected with the virus, it will be controlled by the remote control end, initiate active connections to external IPs, and carry out large flow DDoS attacks.
In severe cases, it can cause the system CPU and public network IP export bandwidth usage to reach 100%, resulting in timeout or interruption problems when connecting to the cloud host via ssh, system operation lag, and inability to use normally.
It is usually recommended that users back up important data before resetting the system to completely remove the virus from the system.
Virus removal steps
If the user's system cannot be reset, you can try to remove the virus as follows (due to the different infection and attack methods of different types of viruses).
The method described in this article is for reference only and does not guarantee that the virus can be completely removed. The safest method is still to reset the system to the official image.
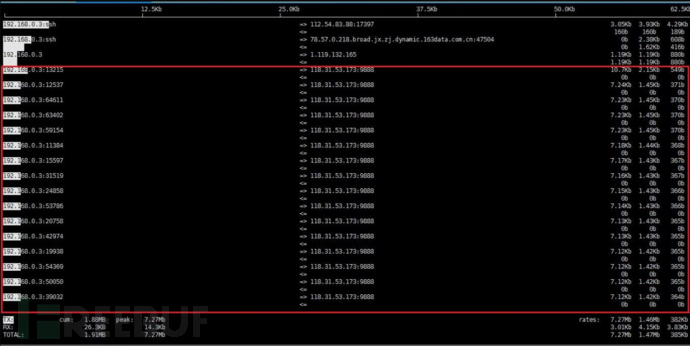
Log in to the cloud host (if the ssh connection is frequently interrupted, you can connect to the cloud host via VNC), execute the iftop command, and you can see that the cloud host initiates a large number of high-bandwidth active connections outward (for the usage of iftop command, please refer to the document 'Linux Traffic Monitoring Tool - iftop').
https://developer.jdcloud.com/article/1729?mid=12), as shown in the figure:
Adjust the security group policy bound to the cloud host, delete all outbound rules, and refuse all outgoing connection requests initiated by the cloud host.
Or you can use the built-in firewall of the cloud host system for interception, taking Ubuntu system as an example (you need to install the ufw module, if it is not installed, execute apt-get install ufw -y to install it).
First, add the rule to allow ssh connections: ufw allow ssh
Add the rule to deny all outbound requests to 0.0.0.0/0: ufw deny out to 0.0.0.0/0 (since this policy is added after the rule to allow ssh connections, the priority is lower than the rules added first, the firewall will first allow ssh connections, and reject connections other than ssh connections)
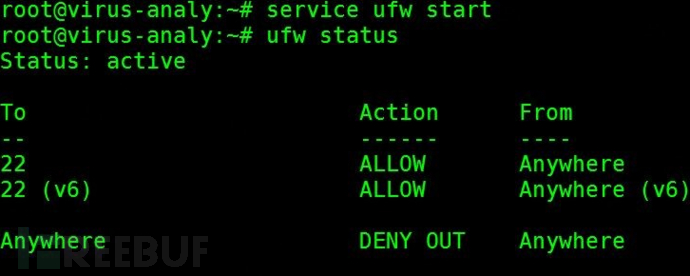
Execute ufw status to confirm the firewall rules, as shown in the figure:
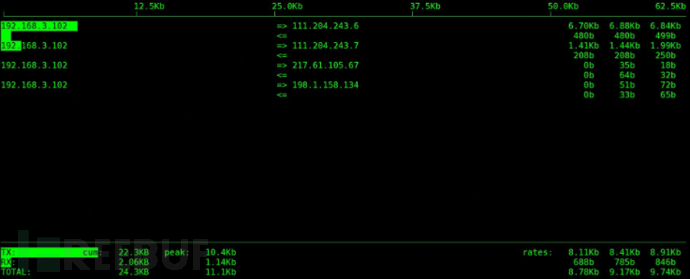
Execute iftop command to see that the abnormal external connections are significantly reduced, as shown in the figure:
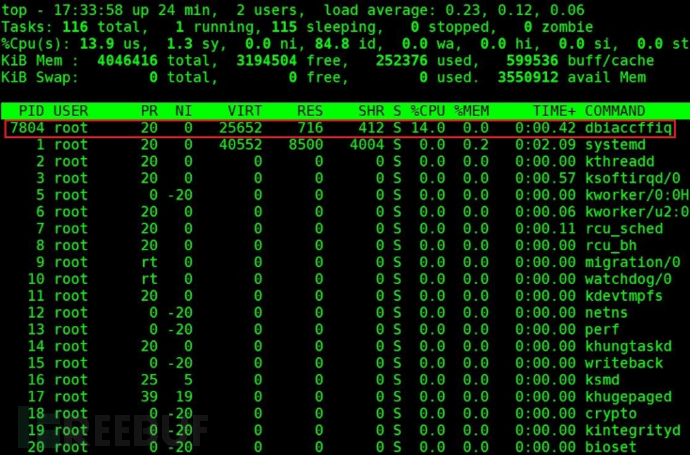
Execute the top command to view the system resource usage, and notice that there is a ten random letter process occupying a high CPU, as shown in the figure:

Suspected to be a virus program, kill the process using kill -9 process number, and then execute the top command again to find that the system has started a new ten random letter process, as shown in the figure:
According to the document(《Linux Cloud Host Security Intrusion Detection Steps》), locate the program that starts the abnormal process under /usr/bin, and the ten random letter file with the same name as the process. After deleting the file, a new file will be generated.
Judged to be a virus program, and there is a daemon process that monitors the existence of system virus files and processes in real time. If they do not exist, the virus file will be created again and the process will be started.
Therefore, we need to locate the daemon process and the virus source file.
Generally, viruses will edit the crontab to make the system automatically run the daemon process script. Execute the command cat /etc/crontab, as shown in the figure:
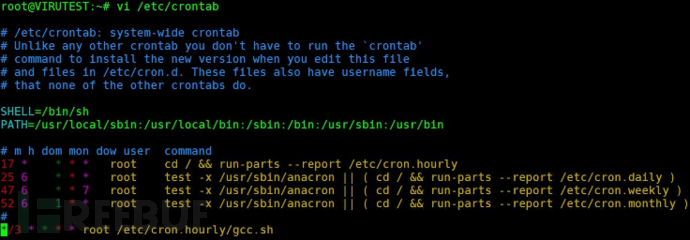
Notice that the last line in the system runs the /etc/cron.hourly/gcc.sh script automatically every 3 minutes
Execute the command cat /etc/cron.hourly/gcc.sh to view the script content, as shown in the figure:

The blue box in the figure starts all network interfaces on the system to prevent the system network interface from being closed, so that the virus cannot communicate with the outside normally
The red box in the figure copies the /lib/libudev.so file to /lib/libudev.so.6 file
The yellow box in the figure executes the /lib/libudev.so.6 file
Enter the /lib directory and check that the libudev.so file appears to be a library file. Use the file command to view that it is actually a 32-bit executable file, as shown in the figure:

According to the document (《Linux Security Scanning Tool ClamAV Installation and Usage》:
Scanning the /lib directory and /usr/bin directory using ClamAV results in the detection of libudev.so and a file with ten random letters as Unix.Trojan.DDoS_XOR-1 malware viruses.
Infer that this file is the source file of the virus. After renaming the file to libudev.so.bak, a new libudev.so file was automatically generated. As shown in the figure, this indicates that there is a guard process present.

Execute the command echo "asdfasdf" > libudev.so to overwrite the content of the libudev.so file with asdfasdf. To prevent the guard process from modifying the file again, execute the command chattr +i libudev.so to lock the file, prohibit modification, as shown in the figure, the file content has been overwritten.

Kill the abnormal processes seen in the top command again and observe for a period of time to ensure no new processes are started.
Indicates that the libudev.so program cannot run normally.
Delete all the virus files found by ClamAV under the /usr/bin directory and observe for a period of time to ensure no new files are generated.
Delete the content of the guard script in the /etc/crontab file and save the file.
Delete the libudev.so file under the /lib directory and observe for a period of time to ensure no new files are generated.
A full disk scan using the ClamAV tool did not find any viruses.
The virus has been completely cleared, and the system's built-in firewall can be turned off or the rules that block all outgoing requests can be deleted, or the security group's outgoing rules can be adjusted.

评论已关闭