Long time ago, in order to diagnose issues on the line, it was desirable to have a tool that could be placed into the line to take effect immediately when problems occurred online, so as to see where the problem lies on the line, which would be a very comfortable thing. Later, as I gradually shifted to the Java field, this ideal also became a reality, from the small changes in the page in IDEA that take effect immediately to the large-scale use of the Althas tool for online data diagnosis, which can be done with ease, greatly facilitating development and diagnosis. Later, after in-depth study, I gradually became dissatisfied with the convenience brought by the framework itself, and the idea of reinventing the wheel gradually lingered in my mind, which is also the reason for this article. Next, you don't need to prepare any prior knowledge, because I have already prepared the ClassLoader dessert, Javassist side dish, JavaAgent soup, hand-written plugin loader framework main course, and SPI knowledge as seasoning. Let's prepare the tableware and start this unique eating show journey.
Delegation model of parents
Before we start, let's talk about the topic of delegation of parents, because whether it is for hot deployment, bytecode enhancement, or daily coding, this is an indispensable topic. First, let's look at the following diagram:
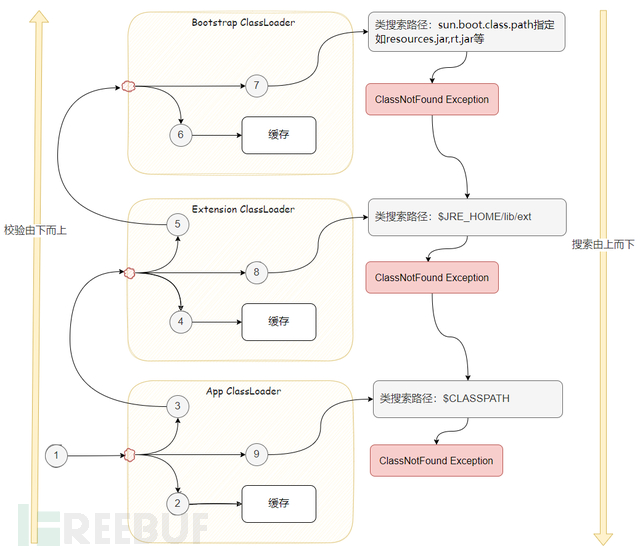
From the diagram as shown above, we can see the overall working mode of the delegation model of parents. The overall explanation is as follows:
The findClass (loadClass) of the class loader is called
- Enter the App ClassLoader, first check if the cache exists, if it exists, return directly
- If the cache does not exist in step 2, it will be delegated to the parent loader, that is, the Extension ClassLoader
- Check if the Extension ClassLoader cache exists
- If the cache does not exist in step 4, it will be delegated to the parent loader, that is, the Bootstrap ClassLoader
- Check if the Bootstrap ClassLoader cache exists
- If the cache does not exist in step 6, look for files under the class search path of the Bootstrap ClassLoader, generally rt.jar, etc. If not found, a ClassNotFound Exception will be thrown.
- The Extension ClassLoader will capture the ClassNotFound error, and then look for files under the class search path of the Extension ClassLoader, generally under the path of the environment variable $JRE_HOME/lib/ext. If not found, a ClassNotFound Exception will be thrown.
- The App ClassLoader will capture the ClassNotFound error, and then look for files under the class search path of the App ClassLoader, generally under the path of the environment variable $CLASSPATH. If found, it will be read into a byte array; if not found, a ClassNotFound Exception will be thrown. If found, the App ClassLoader will call the defineClass () method.
Through the overall process description above, do you feel that the delegation mechanism of parents is not so difficult to understand. The essence is to first check the cache, and if the cache does not exist, delegate to the parent loader to query the cache, until the Bootstrap loader is found. If the Bootstrap loader cannot be found in the cache, an error is thrown, and then this error is captured layer by layer, and after capturing the error, the class search path is checked, and then processed layer by layer.
Custom ClassLoader
After understanding the parent delegation mechanism, if you want to implement class hot swapping or hot deployment of jars, you have to involve custom ClassLoader. In fact, its essence is still to use the parent delegation mechanism of ClassLoader to operate. Following the above process, it is easy to implement the class hot swapping function using a custom ClassLoader:
public class CustomClassLoader extends ClassLoader {

    // The base directory of the class files that need to be directly loaded by this class loader
    private String baseDir;
    public CustomClassLoader(String baseDir, String[] classes) throws IOException {
        super();
        this.baseDir = baseDir;
        loadClassByMe(classes);
    }
    private void loadClassByMe(String[] classes) throws IOException {
        for (int i = 0; i < classes.length; i++) {
            findClass(classes[i]);
        }
    }
    /**
     * Override the findclass method
     *
     * In the ClassLoader, the loadClass method first looks in the cache, if the cache does not have it, it delegates to the parent class to find it. If the parent class also cannot find it, it will call this user-implemented findClass method
     *
     * @param name
     * @return
     */
    @Override
    protected Class findClass(String name) {
        Class clazz = null;
        StringBuffer stringBuffer = new StringBuffer(baseDir);
        String className = name.replace('.', File.separatorChar) + ".class";
        stringBuffer.append(File.separator + className);
        File classF = new File(stringBuffer.toString());
        try {
            clazz = instantiateClass(name, new FileInputStream(classF), classF.length());
        } catch (IOException e) {
            e.printStackTrace();
        }
        return clazz;
    }
    private Class instantiateClass(String name, InputStream fin, long len) throws IOException
        byte[] raw = new byte[(int) len];
        fin.read(raw);
        fin.close();
        return defineClass(name, raw, 0, raw.length);
    }
}
It should be noted that in the custom class loader, we can override findClass and then use defineClass to load the class and return it.
The above code segment has implemented the simplest custom class loader, but how can it map out the parent delegation model?
Firstly, open the ClassLoader class and find this method inside it:
protected Class<?> loadClass(String name, boolean resolve) throws ClassNotFoundException
{
    synchronized (getClassLoadingLock(name)) {
        // First, check if the class has already been loaded
        Class<?> c = findLoadedClass(name);
        if (c == null) {
            long t0 = System.nanoTime();
            try {
                if (parent != null) {
                    c = parent.loadClass(name, false);
                } else {
                    c = findBootstrapClassOrNull(name);
                }
            } catch (ClassNotFoundException e) {
                // ClassNotFoundException thrown if class not found
                // from the non-null parent class loader
            }
            if (c == null) {
                // If still not found, then invoke findClass in order
                // to find the class.
                long t1 = System.nanoTime();
                c = findClass(name);
                // this is the defining class loader; record the stats
                sun.misc.PerfCounter.getParentDelegationTime().addTime(t1 - t0);
                sun.misc.PerfCounter.getFindClassTime().addElapsedTimeFrom(t1);
                sun.misc.PerfCounter.getFindClasses().increment();
            }
        }
        if (resolve) {
            resolveClass(c);
        }
        return c;
    }
}
If compared with the double parent delegation model, the loadClass method corresponds to the previously mentioned steps 1-8. Go into findLoadedClass method, and you can see that the underlying implementation is native. The native final Class<?> findLoadedClass0 method will search for data from the JVM cache. The subsequent analysis methods are similar.
The findClass method in the custom class loader corresponds to step 9:
clazz = instantiateClass(name, new FileInputStream(classF), classF.length());
// Omitted part of the logic
return defineClass(name, raw, 0, raw.length);
Look, isn't it clear overall?
Custom class loader implements class hot swapping
After writing the custom class loader, let's see its specific usage. We create a class with the following content:
package com.tw.client;
public class Foo {
    public Foo() {
    }
    public void sayHello() {
        System.out.println("hello world22222! (version 11)");
    }
}
As the name implies, this class will print out 'hello world22222! (version 11)' when the sayHello method is called.
The hot swap processing process is as follows:
public static void main(String[] args) throws Exception {
        while (true) {
            run();
            Thread.sleep(1000);
        }
    }
    /**
     * ClassLoader is used to load class files and realize class hot swapping
     * Note that it is necessary to establish the directory com/tw/client/ layer by layer under the swap directory, and then put Foo.class inside.
     * @throws Exception
     */
    public static void run() throws Exception {
        CustomClassLoader customClassLoader = new CustomClassLoader("swap", new String[]{"com.tw.client.Foo"});
        Class clazz = customClassLoader.loadClass("com.tw.client.Foo");
        Object foo = clazz.newInstance();
        Method method = foo.getClass().getMethod("sayHello", new Class[]{});
        method.invoke(foo, new Object[]{});
    }
After running, we will replace the prepared Foo.class in advance with the current one to see the result (just copy the new Foo.class class and overwrite it directly):
hello world22222! (version 11)
hello world22222! (version 11)
hello world22222! (version 11)
hello world22222! (version 11)
hello world22222! (version 11)
hello world2222! (version 2)
hello world2222! (version 2)
hello world2222! (version 2)
hello world2222! (version 2)
As can be seen, when we replace the original running class, the output also changes, becoming the output result of the new class. The overall class hot swap is successful.
Did we notice a detail? In the above code, we first create the class object of Object, and then use the Method.invoke method to call the class:
Some people may be puzzled here, why not directly convert to the Foo class and then call the Foo.sayHello method of the class? Like the following method:
Foo foo2 = (Foo) clazz.newInstance();
IFoo foo2 = (IFoo) clazz.newInstance();
This method is not feasible, but do you know why it is not feasible?
We know that the classes we write are generally loaded by AppClassloader, that is to say, all the classes you write in the main startup class will be loaded by AppClassloader as long as you write them. Therefore, if we force the conversion to the Foo type here, it will definitely be loaded by AppClassloader. However, since our clazz object is loaded by CustomerClassloader, such an error occurs here:
java.lang.ClassCastException: com.tw.client.Foo cannot be cast to com.tw.client.Foo那有什么方法可以解决这个问题吗?其实是有的,就是对 Foo 对象抽象出一个 Interface,比如说 IFoo,然后转换的时候,转换成接口,就不会有这种问题了:
What methods can solve this problem? In fact, there are some. It is to abstract an interface from the Foo object, for example, IFoo, and then convert it into an interface when converting, which will not have this problem:
IFoo foo2 = (IFoo) clazz.newInstance();
foo2.sayHello();
Through this interface, we can easily perform class hot swapping on the running components, which is indeed convenient.
It should be noted that the class loader of the main thread is usually AppClassLoader. However, when we create a child thread, its class loader will inherit from the class loader of its creator. But in some business scenarios, I want to use my own class loader in the child thread. How can we do it? In fact, this is where we break the parent-child delegation mechanism.
//Operation to set
Thread t = Thread.currentThread();
t.setContextClassLoader(loader);
//Operation to get
Thread t = Thread.currentThread();
ClassLoader loader = t.getContextClassLoader();
Class<?> cl = loader.loadClass(className);
SPI class hot swapping
After discussing the class hot swapping based on custom ClassLoader, let's talk about the SPI in Java. SPI is believed to be familiar to everyone because it is naturally integrated into Java, and its internal mechanism also uses custom class loaders for good encapsulation and exposure to users. You can read the source code of ServiceLoader by yourself.
Here is a simple example:
public interface HelloService {
    void sayHello(String name);
}
public class HelloServiceProvider implements HelloService {
    @Override
    public void sayHello(String name) {
        System.out.println("Hello " + name);
    }
}
public class NameServiceProvider implements HelloService{
    @Override
    public void sayHello(String name) {
        System.out.println("Hi, your name is " + name);
    }
}
Then, based on the package name + class name of the interface, we create a com.tinywhale.deploy.spi.HelloService file in the resources folder under the META-INF.services folder, and put the following content inside:
com.tinywhale.deploy.spi.HelloServiceProvider
com.tinywhale.deploy.spi.NameServiceProvider
Then run it in the startup class:
public static void main(String...args) throws Exception {
        while(true) {
            run();
            Thread.sleep(1000);
        }
    }
    private static void run(){
        ServiceLoader<HelloService> serviceLoader = ServiceLoader.load(HelloService.class);
        for (HelloService helloWorldService : serviceLoader) {
            helloWorldService.sayHello("myname");
        }
    }
As can be seen, in the startup class, we use the ServiceLoader class to traverse the providers under the META-INF.services folder and then execute them, resulting in the output of two classes. After that, during the execution process, we comment out the NameServiceProvider in the com.tinywhale.deploy.spi.HelloService file in the target folder and then save it, and we can see that only the output of one class is displayed.
Hello myname
Hi, your name is myname
Hello myname
Hi, your name is myname
Hello myname
Hi, your name is myname
Hello myname
Hello myname
Hello myname
Hello myname
This SPI class-based heat exchange is simpler than defining a custom loader and is recommended for use.
Custom Class Loader Implementation for Jar Deployment
The content explained above is generally about class heat exchange, but if we need to perform hot deployment on the entire jar package, how should we do it? Although there are very mature technologies like OSGI, I will explain from the principle level how to perform hot deployment operations on jar packages here.
Since the built-in URLClassLoader itself can operate on jars, we only need to customize a class loader based on URLClassLoader:
public class BizClassLoader extends URLClassLoader {
    public BizClassLoader(URL[] urls) {
        super(urls);
    }
}
Note that the jar package we create should be a fat jar, which is convenient to handle and ensures that nothing is missing:
<plugin>
         <groupId>org.apache.maven.plugins</groupId>
         <artifactId>maven-shade-plugin</artifactId>
         <version>2.4.3</version>
         <configuration>
             <!-- Automatically exclude all unused classes -->
             <minimizeJar>true</minimizeJar>
         </configuration>
         <executions>
             <execution>
                 <phase>package</phase>
                 <goals>
                     <goal>shade</goal>
                 </goals>
                 <configuration>
                     <shadedArtifactAttached>true</shadedArtifactAttached>
                     <shadedClassifierName>biz</shadedClassifierName>
                 </configuration>
             </execution>
         </executions>
     </plugin>
After that, we can use it as follows:
public static void main(String... args) throws Exception {
       while (true) {
           loadJarFile();
           Thread.sleep(1000);
       }
   }
   /**
    * URLClassLoader is used to load jar files, simply place them directly in the swap directory
    *
    * Dynamically change classes in the jar to enable hot loading
    *
    * @throws Exception
    */
   public static void loadJarFile() throws Exception {
       File moduleFile = new File("swap\\tinywhale-client-0.0.1-SNAPSHOT-biz.jar");
       URL moduleURL = moduleFile.toURI().toURL();
       URL[] urls = new URL[] { moduleURL };
       BizClassLoader bizClassLoader = new BizClassLoader(urls);
       Class clazz = bizClassLoader.loadClass("com.tw.client.Bar");
       Object foo = clazz.newInstance();
       Method method = foo.getClass().getMethod("sayBar", new Class[]{});
       method.invoke(foo, new Object[]{});
       bizClassLoader.close();
   }
启动起来,看下输出,之后用一个新的 jar 覆盖掉,来看看结果吧:
I am bar, Foo's sister, can you catch me ?????????????
I am bar, Foo's sister, can you catch me ?????????????
I am bar, Foo's sister, can you catch me !!!!
I am bar, Foo's sister, can you catch me !!!!
I am bar, Foo's sister, can you catch me !!!!
I am bar, Foo's sister, can you catch me !!!!
可以看到,jar 包被自动替换了。当然,如果想卸载此包,我们可以调用如下语句进行卸载:
bizClassLoader.close();需要注意的是,jar 包中不应有长时间运行的任务或者子线程等,因为调用类加载器的 close 方法后,会释放一些资源,但是长时间运行的任务并不会终止。所以这种情况下,如果你卸载了旧包,然后马上加载新包,且包中有长时间的任务,请确认做好业务防重,否则会引发不可知的业务问题。
由于 Spring 中已经有对 jar 包进行操作的类,我们可以配合上自己的 annotation 实现特定的功能,比如扩展点实现,插件实现,服务检测等等等等,用途非常广泛,大家可以自行发掘。
上面讲解的基本是原理部分,由于目前市面上有很多成熟的组件,比如 OSGI 等,已经实现了热部署热交换等的功能,所以很推荐大家去用一用。
说到这里,相信大家对类的热交换,jar 的热部署应该有初步的概念了,但是这仅仅算是开胃小菜。由于热部署一般都是和字节码增强结合着来用的,所以这里我们先来大致熟悉一下 Java Agent 技术。
代码增强 技术拾忆
话说在 JDK 中,一直有一个比较重要的 jar 包,名称为 rt.jar,他是 java 运行时环境中,最核心和最底层的类库的来源。比如 java.lang.String, java.lang.Thread, java.util.ArrayList 等均来源于这个类库。今天我们所要讲解的角色是 rt.jar 中的 java.lang.instrument 包,此包提供的功能,可以让我们在运行时环境中动态的修改系统中的类,而 Java Agent 作为其中一个重要的组件,极具特色。
Now let's consider a scenario, for example, every time a request comes in, I want to report up the JVM data information or the number of invocations. Since the application has been launched and the code cannot be changed, what methods can be used to achieve this? Of course, there are methods, and this is the most擅长 area of Java Agent, of course, not only this kind of scenario, such as the famous hot deployment JRebel, Alibaba's arthas, online diagnostic tools btrace, UT coverage tools JaCoCo, etc., the list is endless.
Before using Java Agent, we need to understand its two important methods:
/**
 * Executed before the main method, the manifest needs to be configured with the property Premain-Class, and loaded with parameter configuration.
 */
public static void premain(String agentArgs, Instrumentation inst);
/**
 * Executed after the program starts, the manifest needs to be configured with the property Agent-Class, and loaded using the Attach method.
 */
public static void agentmain(String agentArgs, Instrumentation inst);
There is also an indispensable thing called the MANIFEST.MF file, which needs to be placed in the resources/META-INF folder. This file usually contains the following content:
Premain-class                : The agent class that is executed before the main method.
Agent-class                  : The agent class that is executed after the program starts.
Can-Redefine-Classes         : A switch indicating whether the agent has the ability to redefine classes, 'true' means it can, and 'false' means it cannot.
Can-Retransform-Classes      : A switch indicating whether the agent has the ability to retransform classes, 'true' means it can, and 'false' means it cannot.
Can-Set-Native-Method-Prefix : A switch indicating whether the agent has the ability to generate a native method prefix, 'trie' means it can, and 'false' means it cannot.
Boot-Class-Path              : This path will be added to the search path of BootstrapClassLoader.
When packaging the jar, it is best to package it as a fat jar, which can reduce a lot of unnecessary trouble, and Maven should add the following packaging content:
<plugin>
       <groupId>org.apache.maven.plugins</groupId>
       <artifactId>maven-shade-plugin</artifactId>
       <executions>
           <execution>
               <phase>package</phase>
               <goals>
                   <goal>shade</goal>
               </goals>
           </execution>
       </executions>
   </plugin>
The MF configuration file can use the following Maven content to be automatically generated:
<plugin>
        <groupId>org.apache.maven.plugins</groupId>
        <artifactId>maven-jar-plugin</artifactId>
        <version>3.2.0</version>
        <configuration>
            <archive>
                <manifestFile>src/main/resources/META-INF/MANIFEST.MF</manifestFile>
            </archive>
        </configuration>
    </plugin>
If you want to do a good job, you must first sharpen your tools. After being prepared, let's write a Java Agent to try it out first, simulating premain call, main call, and agentmain call.
The first is the premain call class, the agentmain call class, and the main call class:
//main execution call before
public class AgentPre {
    public static void premain(String agentArgs, Instrumentation inst) {
        System.out.println("execute premain method");
    }
}
//main method entry
public class App {
    public static void main(String... args) throws Exception {
        System.out.println("execute main method ");
    }
}
//main execution call
public class AgentMain {
    public static void agentmain(String agentArgs, Instrumentation inst) {
        System.out.println("execute agentmain method");
    }
}
It can be seen that the logic is very simple, it outputs the content printed in the method body. After compiling the jar package, a fat jar will be generated. It should be noted that the MANIFEST.MF file needs to be manually created and the following content should be added inside:
Manifest-Version: 1.0
Premain-Class: com.tinywhale.deploy.javaAgent.AgentPre
Agent-Class: com.tinywhale.deploy.javaAgent.AgentMain
Since the code is started in IDEA, in order to execute premain, you need to right-click on the App4a startup class: Run App.main(), after which the App execution configuration will appear at the top of IDEA. We need to click on the Edit Configurations option, and then enter the following command in the VM options:
-javaagent:D:\app\tinywhale\tinywhale-deploy\target\tinywhale-deploy-1.0-SNAPSHOT-biz.jarAfter starting App, the output results can be seen. Note that it is best to use a fat jar to reduce the likelihood of errors.
execute premain method
execute main method
However, we cannot see the output of agentmain here because the execution of agentmain requires an attach operation. Here, we perform an attach on agentmain:
public class App {
    public static void main(String... args) throws Exception {
        System.out.println("execute main method ");
        attach();
    }
    private static void attach() {
        File agentFile = Paths.get("D:\\app\\tinywhale\\tinywhale-deploy\\target\\tinywhale-deploy-1.0-SNAPSHOT.jar").toFile();
        try {
            String name = ManagementFactory.getRuntimeMXBean().getName();
            String pid = name.split("@")[0];
            VirtualMachine jvm = VirtualMachine.attach(pid);
            jvm.loadAgent(agentFile.getAbsolutePath());
        }
            System.out.println(e);
        }
    }
}
After starting the app, the result obtained is:
execute premain method
execute main method
execute agentmain method
As you can see, the entire execution is connected.
By now, I believe you have basically understood the execution order and configuration of Java Agent. The premain execution requires the -javaagent startup parameter, and the agentmain execution requires attaching vm pid.
By now, I believe you have a preliminary understanding of Java Agent. Next, we will implement a plugin system based on Java SPI + Java Agent + Javassist. The special thing about this plugin system is that it can enhance the Spring framework, making it automatically register the path to component-scan, which is a bit domineering (cunning) in meaning. Usage of the Javassist framework.
Plugin framework - Jade in the Mountain
First, let's talk about the main idea of this framework, using Java SPI to do the plugin system; using Java Agent to allow plugins to execute before or after the main entry method; using the Javassist framework for bytecode enhancement, that is, enhancing the Spring framework.
For the plugin part, we can define a common interface contract:
public interface IPluginExecuteStrategy {
    /**
     * Execution method
     * @param agentArgs
     * @param inst
     */
    void execute(String agentArgs, Instrumentation inst);
}
Then, for premain and agentmain, assemble using the strategy pattern as follows:
premain processing strategy class
public class PluginPreMainExecutor implements IPluginExecuteStrategy{


    /**
     * Scan loaded plugins, identify @PreMainCondition and load execution
     */
    @Override
    public void execute(String agentArgs, Instrumentation inst) {
        //Get the pre-execution collection
        List<String> pluginNames = AgentPluginAnnotationHelper.annoProcess(PreMainCondition.class);
        ServiceLoader<IPluginService> pluginServiceLoader = ServiceLoader.load(IPluginService.class);
        // Execute plugins with PreMainCondition only
        for (IPluginService pluginService : pluginServiceLoader) {
            if (pluginNames.contains(pluginService.getPluginName())) {
                pluginService.pluginLoad(agentArgs, inst);
            }
        }
    }
}
Agentmain processing strategy class
public class PluginAgentMainExecutor implements IPluginExecuteStrategy {


    /**
     * Scan loaded plugins, identify @AgentMainCondition, and load for execution
     */
    @Override
    public void execute(String agentArgs, Instrumentation inst) {
        // Get the post-execution collection
        List<String> pluginNames = AgentPluginAnnotationHelper.annoProcess(AgentMainCondition.class);
        ServiceLoader<IPluginService> pluginServiceLoader = ServiceLoader.load(IPluginService.class);
        for (IPluginService pluginService : pluginServiceLoader) {
            // Execute plugins with AgentMainCondition only
            if (pluginNames.contains(pluginService.getPluginName())) {
                pluginService.pluginLoad(agentArgs, inst);
            }
        }
    }
}
The executor factory for premain and agentmain is as follows:
public class AgentPluginContextFactory {
    /**
     * Create the agent pre-execution context
     * @return
     */
    public static PluginExecutorContext makeAgentPreExecuteContext() {
        IPluginExecuteStrategy strategy = new PluginPreMainExecutor();
        PluginExecutorContext context = new PluginExecutorContext(strategy);
        return context;
    }


    /**
     * Create the agent main execution context
     * @return
     */
    public static PluginExecutorContext makeAgentMainExecuteContext() {
        IPluginExecuteStrategy strategy = new PluginAgentMainExecutor();
        PluginExecutorContext context = new PluginExecutorContext(strategy);
        return context;
    }


}
Write the class specified by Premain-Class and Agent-Class:
public class AgentPluginPreWrapper {
    public static void premain(String agentArgs, Instrumentation inst) {
        AgentPluginContextFactory.makeAgentPreExecuteContext().execute(agentArgs, inst);
    }


}


public class AgentPluginMainWrapper {
    public static void agentmain(String agentArgs, Instrumentation inst) {
        AgentPluginContextFactory.makeAgentMainExecuteContext().execute(agentArgs, inst);
    }
}
Specify the corresponding class in the configuration file:
Manifest-Version: 1.0
Premain-Class: org.tiny.upgrade.core.AgentPluginPreWrapper
Agent-Class: org.tiny.upgrade.core.AgentPluginMainWrapper
Permissions: all-permissions
Can-Retransform-Classes: true
Can-Redefine-Classes: true
After the framework is set up, write the plugin part. For the plugin, it needs to inherit from org.tiny.upgrade.sdk.IPluginService and implement:
@AgentMainCondition
@Slf4j
public class CodePadPluginServiceProvider implements IPluginService {


    @Override
    return "Enhanced Plugin";
        public void pluginLoad(String agentArgs, Instrumentation inst) {
    }


    @Override
    // Get all loaded classes
        Class<?>[] classes = inst.getAllLoadedClasses();
        if (classes == null || classes.length == 0) {
        // It is necessary to retransform the business class to avoid the situation where this class cannot be found during the execution of transform
            return;
        }
        for (Class<?> clazz : classes) {
        if (clazz.getName().contains(entity.getClassName())) {
            inst.retransformClasses(clazz);
                try {
                    catch (UnmodifiableClassException e) {
                }
                    log.error("retransform class fail:" + clazz.getName(), e);
                }
            }
        }
        // Enhancement operation
        inst.addTransformer(new ByteCodeBizInvoker(), true);
    }


    @Override
    public void pluginUnload() {


    }
}
It is important to note that when the plugin is loaded, we performed a class retransform operation. The reason for this operation is that sometimes, when the program starts, some classes may start before the JavaAgent, which can cause some classes to fail during enhancement. Therefore, it is necessary to traverse and operate on them to avoid unexpected situations.
The following are specific enhancement operations:
@Slf4j
public class ByteCodeBizInvoker implements ClassFileTransformer {
    /**
     * Load tprd-ut here and use the class loader to load
     *
     * @param loader
     * @param className
     * @param classBeingRedefined
     * @param protectionDomain
     * @param classfileBuffer
     * @return
     * @throws IllegalClassFormatException
     */
    @Override
    public byte[] transform(ClassLoader loader
                            , String className
                            , Class<?> classBeingRedefined
                            , ProtectionDomain protectionDomain
                            , byte[] classfileBuffer) throws IllegalClassFormatException {
        //Do not process java's built-in methods
        if (loader == null) {
            return null;
        }
        //Enhance spring5's componetscan, insert org.tiny path
        if (className.contains("ComponentScanBeanDefinitionParser")) {
            try {
                System.out.println("Enhance spring");
                ClassPool classPool = new ClassPool(true);
                classPool.appendClassPath(ByteCodeBizInvoker.class.getName());


                CtClass ctClass = classPool.get(className.replace("/", "."));
                ClassFile classFile = ctClass.getClassFile();
                MethodInfo methodInfo = classFile.getMethod("parse");
                CtMethod ctMethod = ctClass.getDeclaredMethod("parse");
                addComponentScanPackage(methodInfo, ctMethod);
                return ctClass.toBytecode();
            }
                log.error("handle spring 5 ComponentScanBeanDefinitionParser error", e);
            }
        }
    }
    /**
     * Traverse method until the ReportTracer marked class is found
     *
     * @param ctMethod
     */
    private void addComponentScanPackage(MethodInfo methodInfo, CtMethod ctMethod) throws CannotCompileException {
        final boolean[] success = {false};
        CodeAttribute ca = methodInfo.getCodeAttribute();
        CodeIterator codeIterator = ca.iterator();
        //Iterate through the method body
        while (codeIterator.hasNext()) {
            ExprEditor exprEditor = new ExprEditor() {
                public void edit(MethodCall m) throws CannotCompileException {
                    String methodCallName = m.getMethodName();
                    if (methodCallName.equals("getAttribute")) {
                        //Add org.tiny to the list
                        m.replace("{ $_ = $proceed($$); $_ = $_ + \",org.tiny.upgrade\";  }");
                        success[0] = true;
                    }
                }
            };
            ctMethod.instrument(exprEditor);
            if (success[0]) {
                break;
            }
        }
    }
}
As can be seen from above, we have modified the ComponentScanBeanDefinitionParser class in Spring and automatically registered the scanning path of the org.tiny.upgrade package in the parser method. This way, when others integrate our framework, they do not need to scan the framework to execute it.
By now, I believe you have a general understanding of the overall framework. However, this framework has a defect, that is, after my plugin jar is written, it must be placed in the project's maven dependency and then packaged and deployed. In fact, sometimes after my project is launched online, there is no opportunity to repack and redeploy. So, next, we will use a custom Classloader to allow our plugin not only to be locally integrated but also to be integrated from the network.
Firstly, we need to define the custom class loader:
public class TinyPluginClassLoader extends URLClassLoader {
    /**
     * Parameterized constructor
     * @param urls
     */
    public TinyPluginClassLoader(URL[] urls, ClassLoader parent) {
        super(urls, parent);
    }
    /**
     * Add URL path
     * @param url
     */
    public void addURL(URL url) {
        super.addURL(url);
    }
}
This class loader, doesn't it look familiar, similar to what was discussed before, but with a parent classloader tag? Why is this tag? The meaning of this tag is that the parent classloader of the current custom TinyPluginClassLoader is who, so that this custom class loader can inherit information from the parent class loader, avoid problems, this detail everyone should pay attention to.
It should be noted that whether loading from a local jar file or a network jar file, it is essentially the same, because TinyPluginClassLoader is based on URL.
For local jar files, we can construct the following URL:
URL url = new URL("jar:file:/D:/project/tiny-plugin-hello/target/tiny-plugin-hello-1.0-SNAPSHOT.jar!/")For network jar files, we can construct the following URL:
URL url = new URL("jar:http://111.111.111.111/tiny-plugin-hello-1.0-SNAPSHOT.jar!/")In this way, we only need to define the custom class loader loading logic:
/**
     Extract the corresponding plugin class from the jar file.
     *
     * @param pluginClass
     * @param jarFile
     * @return
     */
    public static Set<Class> loadPluginFromJarFile(Class pluginClass, JarFile jarFile, TinyPluginClassLoader tinyPluginClassLoader) {
        Set<Class> pluginClasses = new HashSet<Class>();
        Enumeration<JarEntry> jars = jarFile.entries();
        while (jars.hasMoreElements()) {
            JarEntry jarEntry = jars.nextElement();
            String jarEntryName = jarEntry.getName();
            if (jarEntryName.charAt(0) == '/') {
                jarEntryName = jarEntryName.substring(1);
            }
            if (jarEntry.isDirectory() || !jarEntryName.endsWith(".class")) {
                continue;
            }
            String className = jarEntryName.substring(0, jarEntryName.length() - 6);
            try {
                Class clazz = tinyPluginClassLoader.loadClass(className.replace("/", "."));
                if (clazz != null && !clazz.isInterface() && pluginClass.isAssignableFrom(clazz)) {
                    pluginClasses.add(clazz);
                }
            } catch (ClassNotFoundException e) {
                log.error("PluginUtil.loadPluginFromJarFile fail", e);
            }
        }
        return pluginClasses;
    }
After that, we can load a specific jar path using the following code:
/**
     * Load plugins
     *
     * @return
     */
    @Override
    public Set<Class> loadPlugins(URL jarURL) {
        try {
            JarFile jarFile = ((JarURLConnection) jarURL.openConnection()).getJarFile();
            getTinyPluginClassLoader().addURL(jarURL);
            return PluginUtil.loadPluginFromJarFile(IPluginService.class, jarFile, getTinyPluginClassLoader());
        } catch (IOException e) {
            log.error("LoadPluginViaJarStrategy.loadPlugins fail", e);
            return null;
        }
    }
Finally, we only need to use SPI for dynamic loading:
/**
     * Execute plugin
     */
    public void processPlugins(URL... urls) {
        if (urls == null || urls.length == 0) {
            log.error("jar url path empty");
            return;
        }
        for (URL url : urls) {
            pluginLoadFactory.loadJarPlugins(url);
        }
        ServiceLoader<IPluginService> serviceLoader = ServiceLoader.load(IPluginService.class, pluginLoadFactory.getPluginLoader());
        for (IPluginService pluginService : serviceLoader) {
            pluginService.Process();
        }
    }
In this way, we not only achieved pluginization, but also our plugins support loading from local jar files or network jar files. Since we have enhanced the code using agentmain, when the system detects this jar of mine, the code will be enhanced and take effect again on the next execution.
Summary
In fact, the technology of this article, from the parent delegation model to the custom class loader, to the class exchange implemented based on the custom class loader, to the class exchange implemented based on Java SPI, and finally to the plugin framework and framework support for remote pluginization based on Java SPI + Java Agent + Javassist, is presented step by step to the readers to show the knowledge points involved. Of course, due to the limited knowledge of the author, there may be omissions, please forgive me. I sincerely hope that my humble brick can lead to your precious jade words.

评论已关闭