This article is a record and understanding of some of the use when a novice contacts this product, due to the limited information found on the Internet at the time of purchase, and the translation of documents into Chinese is even rarer, no good guidance documents were found (it may also be incorrect posture). Therefore, this article was created, recording the problems and insights encountered in the process of use and testing, including a simple introduction to different modules, and simple examples of certain module tests for beginners like me. If you want to carry out some attacks completely, you need to be proficient in using different modules, understand the principles and mechanisms, and keep trying to achieve the goal. Due to my extremely limited level, there may be some misunderstandings, descriptive deviations, or even errors in the article, and any criticism is not accepted (hahaha, welcome to correct QAQ)
1. Introduction
The WiFi Pineapple is a wireless security testing tool developed and sold by the foreign wireless security audit company Hak5 (commonly known as Big Pineapple), which has been released to the sixth generation since 2008. The current main product is The WiFi Pineapple NANO and WiFi Pineapple TETRA (supporting 5GHz band)

This one in hand is the WiFi Pineapple NANO
Product specifications:
· CPU: 400 MHz MIPS Atheros AR9331 SoC
· Memory: 64 MB DDR2 RAM
· Disk: 16 MB ROM + Micro SD (6G)
· Wireless: Atheros AR9331 (wlan0) + Atheros AR9271 (wlan1), both are IEEE 802.11 b / g / n
· Port: (2) RP-SMA antenna, USB network card (ASIX AX88772A)
· USB 2.0 host, Micro SD card reader
· Power: USB 5V 1.5A, including Y-type USB power cord
· Configurable status indicator LED
· Configurable reset button
Two Usage Background
For this kind of hacker 'peripheral', it is no different from other peripherals, all of which are money-consuming things. So, when is it more appropriate to start using this thing?
1 Security Research
For those who are engaged in security research and plan to focus on Wi-Fi security, this 'peripheral' can be used as an entry and advanced part, which can lead us to understand some common Wi-Fi security issues, principles, and attack methods. Further, it can analyze the principles, implementation methods, and combined attack methods of these exploitation tools
2 Security Demonstration
If you are a member of the information security team, don't always bring your self-built target field when demonstrating to customers. Don't do outdated things like SQL injection or Blue Keep for your leaders! Even if you cooperate with Cobalt Strike for a host to go online, it can only be a visual stimulation. Why not bring a wifipineapple, do a man-in-the-middle attack on the spot, set up a sheep wall, capture passwords, isn't it beautiful?
3 Money
If you have spare money, why not buy one to play with!
Three Management
The installation and configuration process is not elaborated here, as there are relevant guidance articles on the Internet, and they can also be found in the 'Reference Links' chapter in this article. USB network cards or wifi can be used for network access
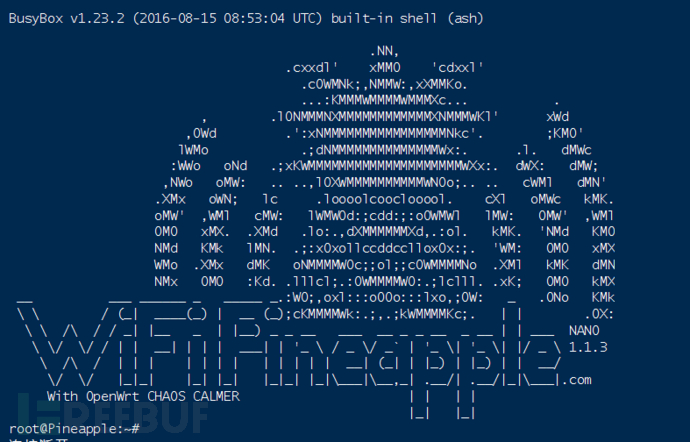
Web management address:http://172.16.42.1:1471

The first login will be in root identity, and the password will be configured during installation, which will also be used as the root password for ssh connection
Four Features
a. Used as a Wi-Fi man-in-the-middle attack testing platform
b. A complete set of penetration testing suite for AP
c. Based on the web application management interface
d. Based on embedded Linux system
e. Various software updates at irregular intervals, which can customize modules and payloads
Five Overview of Management Page
1 Dashboard dashboard
The dashboard displays an overview of some status, statistical information, notifications, and announcements, including:
CPU usage rate, device running time, number of client connections
Landing Page browsing status, announcements
Bulletins obtain the latest project information from wifipineapple.com
2 Recon reconnaissance
The Recon module uses a passive scanning method, during which the network card is automatically set to monitor mode to listen to various data packets emitted from different channels (clients) around. It can scan out information such as SSID, MAC address, encryption method, whether WPS is enabled, channel, and signal strength, and even scan out clients that are not connected to any AP.
From the dropdown list, select the scan duration. Increasing the scan time allows more potential traffic to be seen on each channel. Checking the 'Continuous' box enables ongoing scanning. The scan will be performed at regular intervals and the scan results list will be updated until the scan stops
The scan results will be displayed in the table view
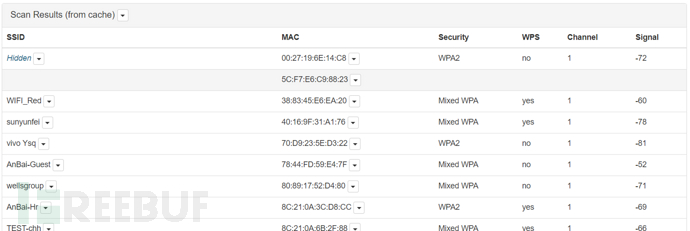
Unassociated clients only display MAC addresses. These clients have active radio but are not associated with the access point

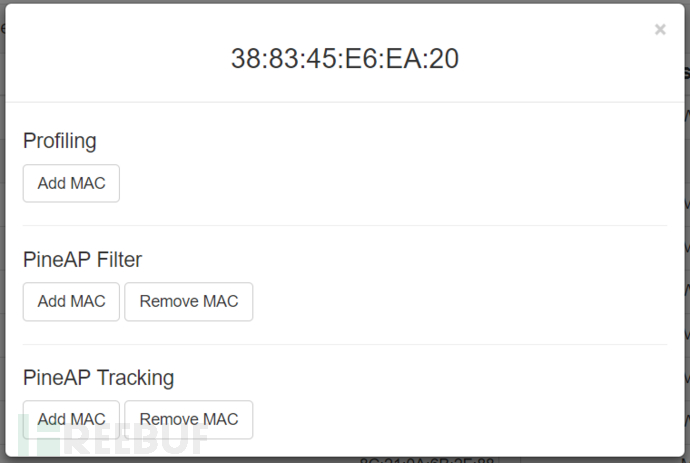
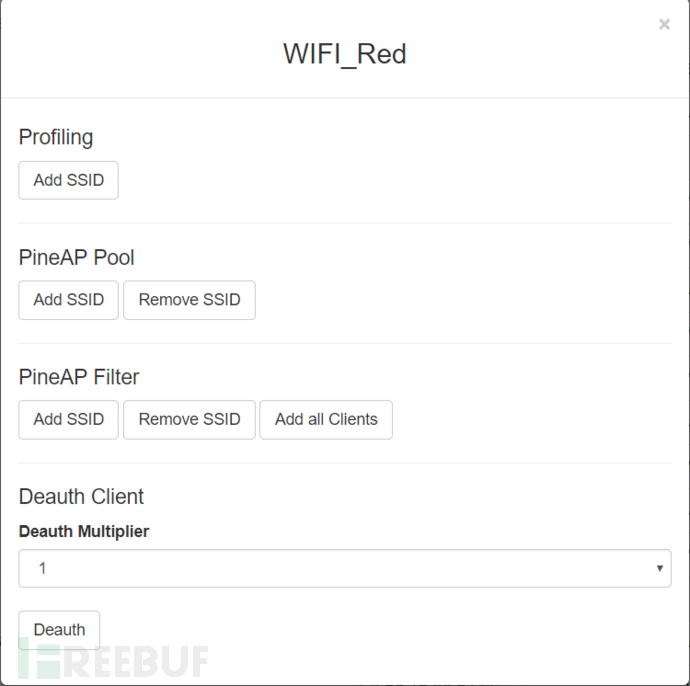
Clicking on the dropdown menu next to SSID and MAC address will display the following two menu images, used for the Filter and Tracking functions of the PineAP module, as well as for setting the multiple parameters for sending deauthentication frames in Deauth flood attacks
It should be noted that using the Recon module for scanning will disconnect existing connections
3 Clients Clients
If 'Allow Associations' is checked in PineAP, the WiFi Pineapple will allow clients to connect
Connected clients will be listed in the 'Clients' view with their respective MAC addresses, IP addresses, the SSID they are connected to (if Log Probes feature is enabled in PineAP), and hostname
The Kick button can remove clients from the Wi-Fi Pineapple network
The dropdown menu button next to MAC address and SSID is used for the Filter and Tracking functions of the PineAP module
The Refresh button can refresh the Clients table view
4 Filters Filters
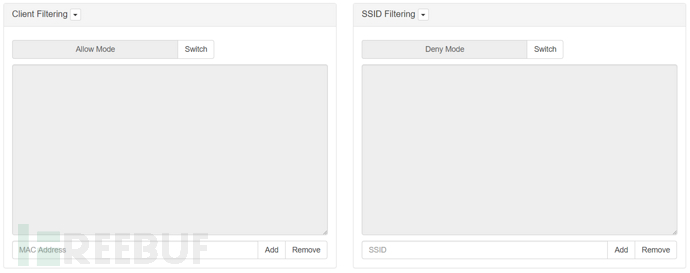
Filtering can be performed by client MAC address or SSID. It supports 'Deny' and 'Allow' modes, and can be toggled using the Swith button
Client Filtering Client filtering
Under Deny Mode, clients with MAC addresses listed in the client filter will not be able to connect to the WiFi Pineapple
Under Allow Mode, only clients with MAC addresses listed in the client filter can connect
When performing WI-FI security tests, it is best to use 'Allow Mode' to ensure that only clients within the participating range are targeted
SSID Filtering SSID filtering
Under Deny Mode, if the client attempts to connect to the SSID listed in the filter, the client will not be able to associate with the WiFi Pineapple
Under Allow Mode, if the SSID they try to connect to is listed in the filter, the client can only associate with WiFi Pineapple
SSIDs can be added to the filter from the menu buttons associated with each list in Recon, or manually add or delete entries from the filter
5 PineAP Pine access point
PineAP responds to surrounding clients (possibly laptops, mobile phones, pads, etc.) by伪造Probe Response response packets, making clients believe that there are wireless APs that have been successfully connected around them, and tricks clients into connecting to our Pineapple Nano device
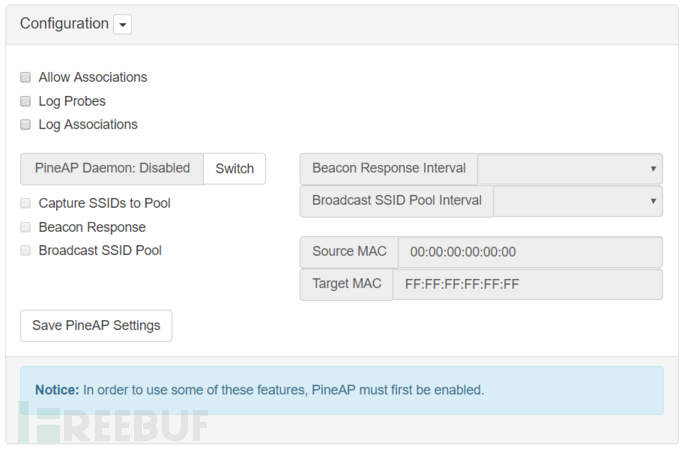
Allow Associations Allow association
When this option is checked, clients can connect to Pineapple through any requested SSID
When disabled, clients will not be allowed to connect. It is equivalent to the previous karma
Log Probes Log probe
After enabling, the probe requests of the client will be recorded. It can be viewed and analyzed from the Logging module
Log Associations Log association
After enabling, the connection information of the client will be recorded. It can be viewed and analyzed from the Logging module
After disabling, the successful connection information will not be recorded and will not appear in the SSID column of the Clients module
PineAP Daemon PineAP daemon
This process must be enabled
Beacon response can be used to capture SSIDs into the pool and to broadcast SSIDs
This setting will take effect on wlan1, and wlan1 cannot be used in Client mode to bridge the external network
Beacon Response Beacon response
After opening, the target beacons will be sent to the client device to respond to the client's SSID probe request
These beacons will not be broadcasted but will be sent to the client devices that sent the probe request. This can prevent beacons from being seen by other devices. If Allow Associations is enabled and there is a client connection, the target beacon response will continue to be sent to the client device for a period of time
Beacon response will use the source MAC address for setting and will also share the broadcast SSID pool feature
The interval of beacon response will determine the frequency of transmission
Capture SSIDs to Pool Capture SSID to pool
After opening, the SSID captured in the probe request will be saved to the SSID pool
Broadcast SSID Pool Broadcast SSID Pool
After starting, the SSID pool will broadcast beacons at the set time intervals and source and target addresses
The SSID pool can also be manually managed, which is equivalent to the previous Dogma
Source MAC Source MAC Address
By default, it is the MAC address of Pineapple wlan0, which can be set in Networking
Target MAC Target MAC Address
By default, the broadcast MAC address is FF:FF:FF:FF:FF:FF
The broadcast frame data will be recognized by nearby clients. If set to a fixed MAC address, it will be targeted at that address itself as PineAP's unique attack target
Similar to beacon response, only the SSID broadcast in the pool will be seen by the target client
If Filters are used, it will be more accurate to locate the target device
Broadcast SSID Pool Interval specifies the time interval for broadcasting SSID
The smaller the interval, the higher the CPU usage
Beacon Response Interval specifies the time interval for beacon response
The smaller the interval, the higher the CPU usage
Save as Default on Boot Save as Default Boot Configuration
The settings will be saved, and the system will continue to execute at startup
SSID Pool SSID Pool
When the Capture SSID Pool feature is enabled, captured SSIDs will be automatically recorded, and they can also be manually added or deleted
6 Tracking Tracking
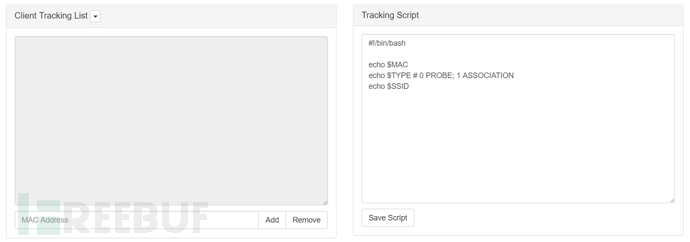
The tracking feature will continuously scan the specified client by MAC address and execute a customizable tracking script
This feature requires enabling at least one option in PineAP's Log Probes and Log Associations
Clients can be manually added, or MAC addresses associated in the Clients or Recon views can be added to this module using the PineAP Tracking Add MAC button
Custom scripts will be executed when the client is recognized
7 Logging Log Record
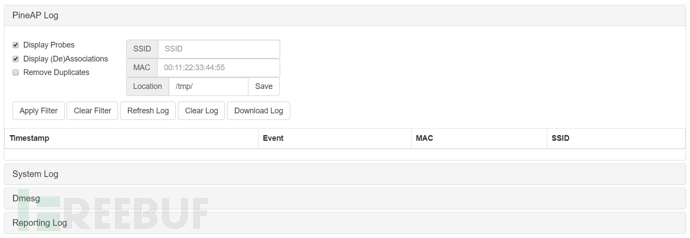
The Logging module records four types of logs: PineAP Log, System Log, Dmesg, and Reporting Log
PineAP Log
If Log Probes and Log Associations are enabled, PineAP events are displayed in chronological order. Each event includes a timestamp, event type (probe request or association), the MAC address of the client device, and the SSID of the device being probed or associated
Results can be filtered, the filter will not take effect before pressing 'Apply Filter'. By default, the PineAP log is located at /tmp, and it will not be saved after a restart
PineAP Log
System logs, nothing much to say
Dmesg
Diagnosis of device failure, hardware connection disconnection and other information
Reporting Log
Generate report log
8 Reporting
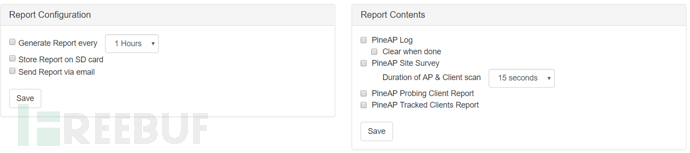
This feature can generate reports at specified intervals. Reports can be sent via email or locally saved on the SD card
Report content is optional, including PineAP logs (which can be deleted after generating the report), PineAP Site Survey (scan time can be specified), PineAP detection and tracking client reports.
9 Networking
In the Networking module, you can change the route, access point, MAC address, hostname, and connect to the access point using WiFi client mode
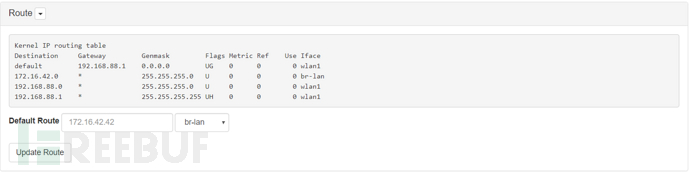
Route
Display the kernel IP routing table, which can be modified for the selected interface, with the default gateway set to 172.16.42.42
When using the WiFi Pineapple Connector Android application, the IP routing will be automatically updated to use usb0 as the default gateway
The dropdown menu can restart the DNS service
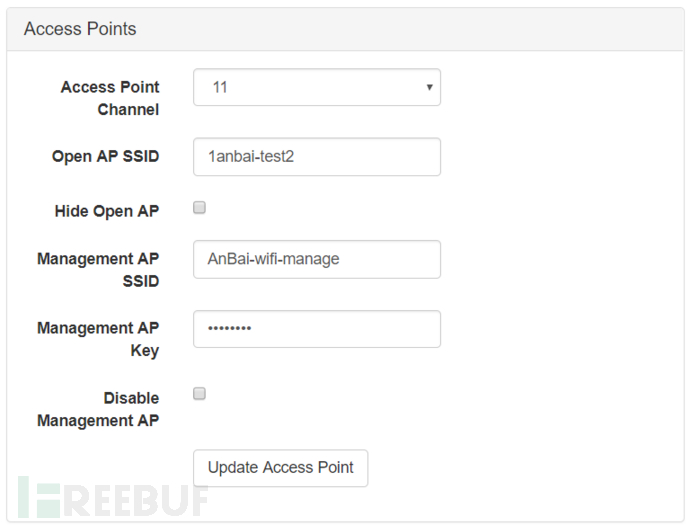
Access Points
Can configure the main open access point and management access point of WiFi Pineapple. The open and management access points share the same channel
Can hide open access points and disable management access points
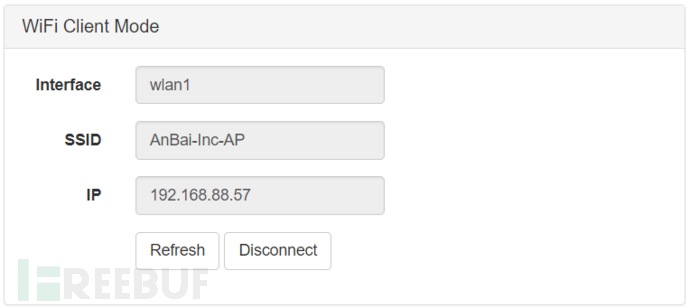
WiFi Client Mode
Can connect WiFi Pineapple to another wireless access point for Internet or local network access
MAC Addresses
You can manually change the MAC address, or set a random MAC address; changing the MAC address may disconnect the client's connection with WiFi Pineapple
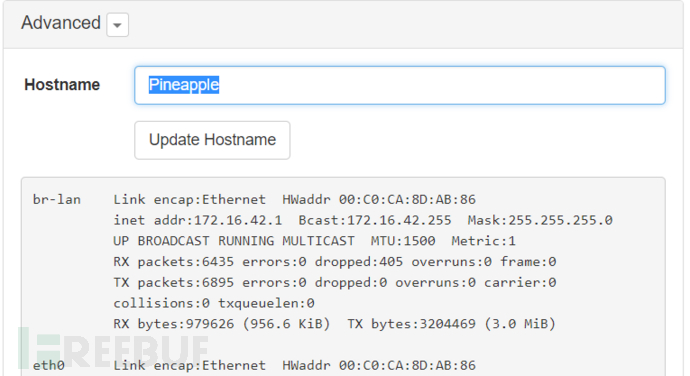
Advanced
Can update the hostname
In the dropdown menu, you can restore the default WiFi configuration
Display the output of ifconfig
10 Configuration
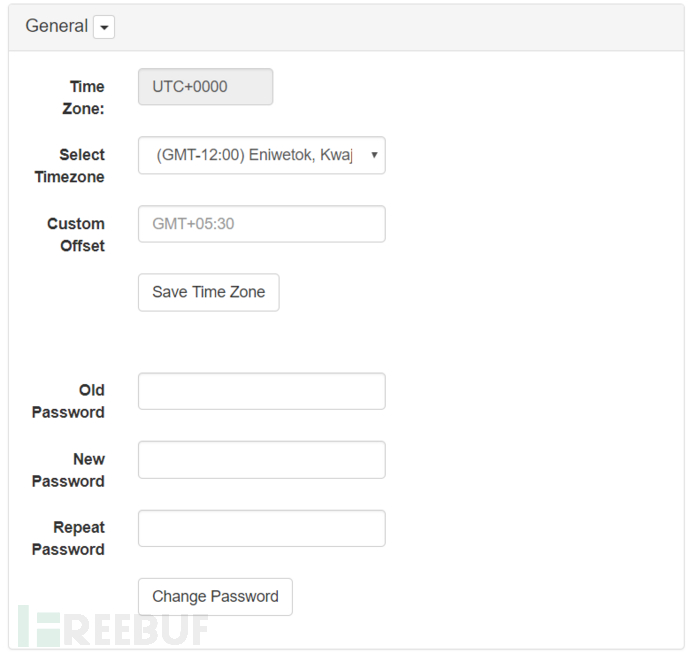
General
Routine settings for some devices, such as setting time zones, changing passwords, shutting down, restarting, and restoring factory settings
Landing Page (Phishing)
After startup, all client connections will be forcibly directed to this page, and the statistics of page visits will be displayed on the Dashboard
The page can be PHP or HTML
This page will only be displayed when the WiFi Pineapple has an Internet connection
For example, the figure below is a phishing page that imitates Taobao that was written before

11 Advanced Advanced
The advanced view provides information about system resources, USB devices, file system table, CSS, and the function of upgrading the WiFi Pineapple firmware
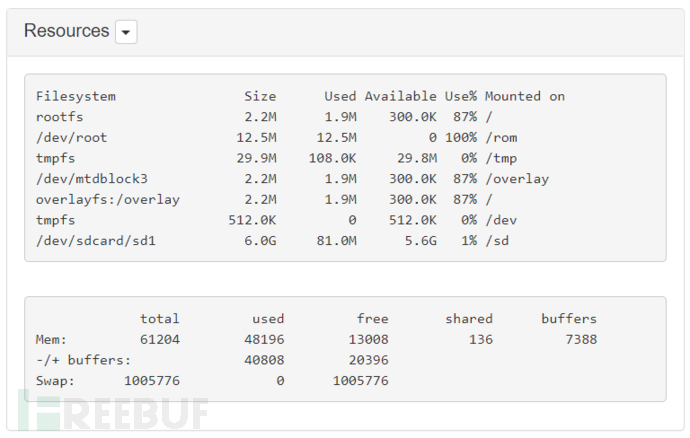
Resources Resources
Display the usage status of the file system disk and memory, and the dropdown menu button can clear the page cache
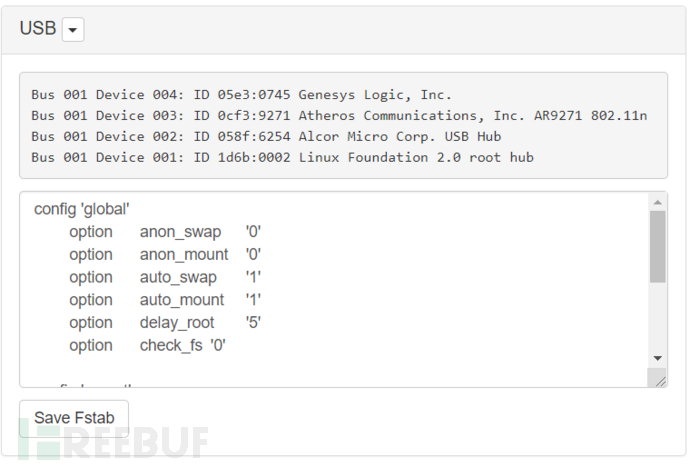
USB
Display external USB, set the file system table (fstab). The dropdown menu button can format the SD card
CSS Cascading Style Sheets
You can modify the style sheet of the WiFi Pineapple Web interface
Firmware Upgrade Firmware Upgrade
Firmware upgrade will replace all data (excluding SD cards or USB and other external storage devices)
Important non-system data should be backed up before upgrading
Six Common Modules
Dwall Sheep Wall
DWall is a plugin that can capture http data in real-time and can be displayed on the web page in real-time
Enable module, Start Listening to start listening
All http connections to the Pineapple client will be captured
The page displays the client, URL, Cookies, data content, and images

Deauth Cancel Authentication Flood Attack
De-authentication Flood Attack, also known as Cancel Authentication Flood Attack or Authentication Blocking Flood Attack, is commonly abbreviated as Deauth attack, and is a form of wireless network denial-of-service attack. It aims to convert the client to an unassociated/unauthenticated state by欺骗ing the cancel authentication frames from AP to the unicast address of the client

In normal mode, after selecting the network card and clicking Start, the attack begins. Network authentication within the same subnet will fail during the attack (due to NANO not supporting 5G, the attack only supports 2.4G), and it is not possible to authenticate and connect
To target a specific WI-FI attack, you can select the network card in the Editor, scan WI-FI, and Add to Blacklist (add to the blacklist), and also select blacklist in Mode, input Channels, which can be checked in SiteSurvey

During the test, it was found that the blacklist mode does not take effect, the Pineapple does not send data packets; the normal mode can be used, but connections that have been authenticated and communicated cannot be blocked, only connections in the process of authentication can be attacked
DNS/DNSMasq Spoof DNS欺骗
This plugin will start the DNSMasq service and redirect the domains accessed by the client
Fill in the domain name to be redirected in the Hosts section, following the same format as other Hosts files
You can fill in the phishing server configured in the internal network here, or point to Pineapple and build services on it
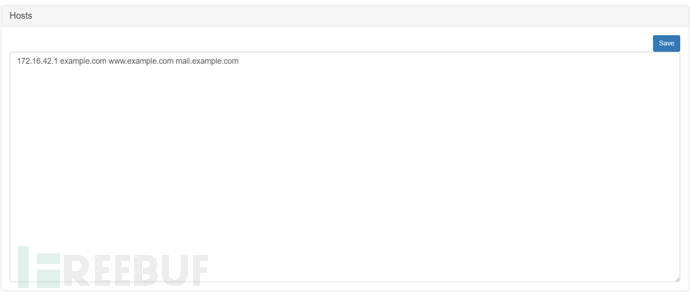
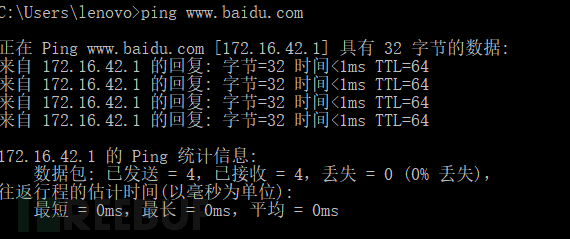
After clicking Start, redirection begins, and pinging the domain name can find that it has been redirected to an internal network IP
For phishing pages, you can modify the Landing Page or write your own page, and the storage location of the web page is located in /www

Supports php and html
![]()
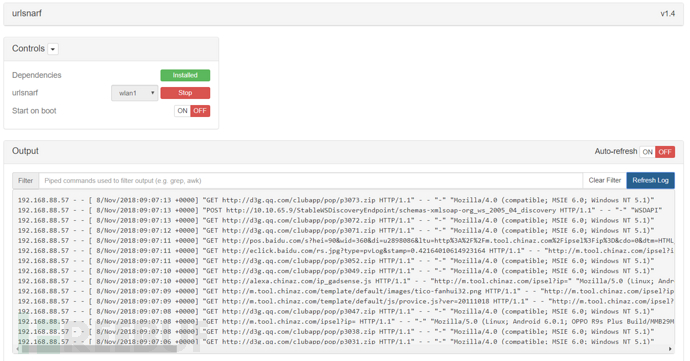
urlsnarf URL Capture
After selecting the network port and clicking Start, the module will capture all HTTP traffic, and GET and POST data will be displayed
Display format is web access log type
Evil Portal Malicious Portal Authentication
The module is mainly composed of the following parts:
Controls (Control): Enable module and set automatic startup;
Word Bench (Create Working Directory): Contains php files for portal pages, etc.;
White List (Whitelist): List of IP addresses that do not need to jump through the portal authentication page;
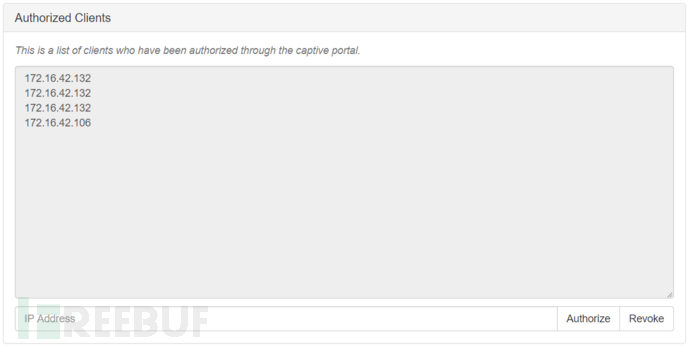
Authorized Clients (Authenticated Clients): List of IP addresses that have passed through portal page authentication and jump;
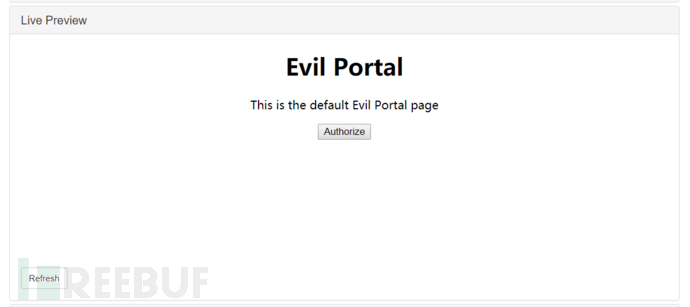
Live Preview (Preview): Preview the malicious portal page.
The Evil Portal module is very similar to the built-in Landing Page feature, the difference being that Landing Page can only provide a forced jump display page effect and does not have authentication, whitelist, and more free portal page customization features. Evil Portal can achieve the same effect as the current commercial WiFi access, providing a customized authentication page by us to guide the client users to complete the authentication and jump function
Create a new project named test1, and the system will automatically generate three pages
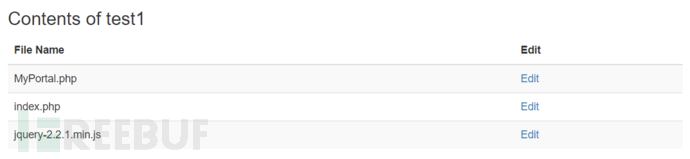
You can freely modify the three pages to achieve the desired effect, or you can SSH into the Nano system, find the configuration folder of Evil Portal, and directly copy the edited pages into it
To start this project, you need to click the Activate button to activate it, and you can see the page status under the Live Preview feature
After enabling the module, all clients connecting to Pineapple wifi need to be authenticated before connecting to the network
Let's go through a simple example, we modify the source code
index.php
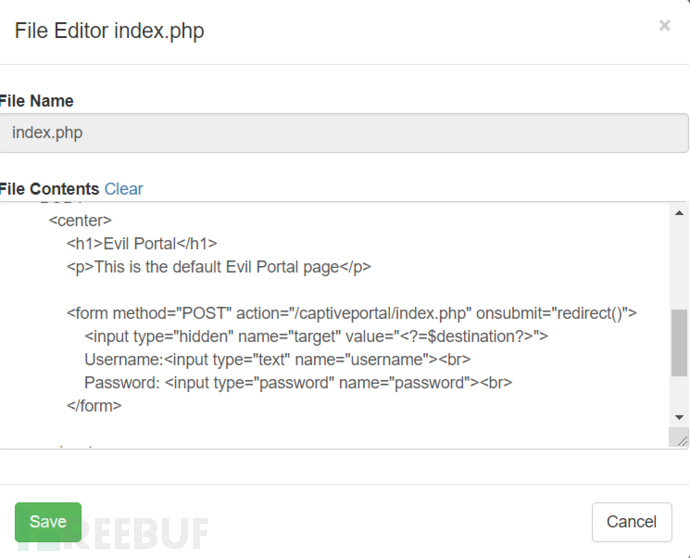
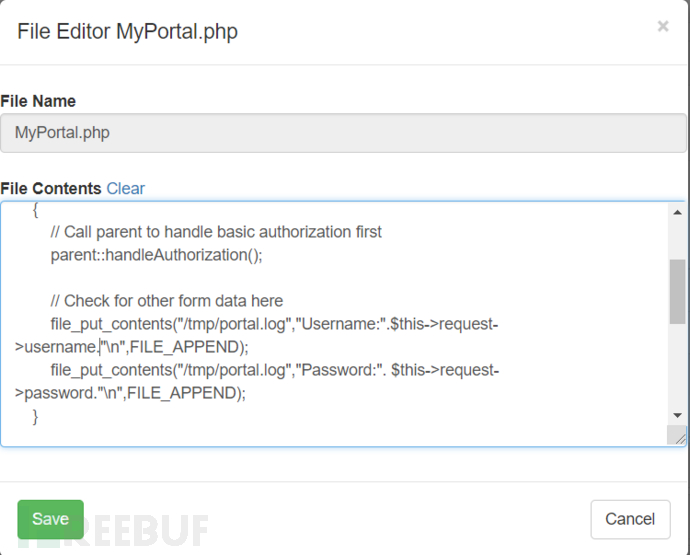
MyPortal.php
Pay attention to the write permission of the directory, otherwise the save may not be successful
SSH to Pineapple or use the Cabinet module to manage files, and create a portal.log under the module path
Verify and see if the newly created log file records
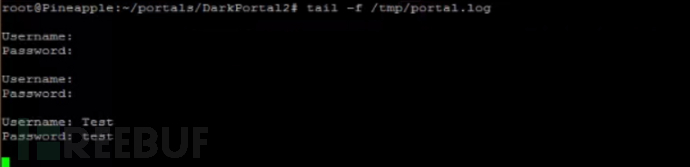
The client connected after the connection will also be recorded
ettercap man-in-the-middle attack
This module is equivalent to calling the tool ettercap for man-in-the-middle deception, converting parameters to a web page, and returning the output to the page

SSLsplit SSL separation
SSLsplit can act as an intermediary to listen to SSL information and HTTP information. While acting as an SSL proxy, it needs to establish a connection with the server, and at the same time, forge a certificate to establish a connection with the client, that is, a double connection. Based on the obtained client information, communication with the server is carried out, thereby achieving the monitoring of plaintext data
No changes are required to the configuration, the default can be used
When communicating with HTTPS on the client side, SSLsplit will act as an intermediate proxy
The implementation of SLLsplit needs to be combined with other deception methods. If Clients connect to Pineapple, the attack can be carried out directly. If the target to be attacked is in the same subnet, the target traffic needs to be directed to the listening port of this module, usually in conjunction with deception software such as ettercap
If the website has HSTS (HTTP Strict Transport Security), the website will not display normally, and it will not be possible to attack
tcpdump network data collection
tcpdump can completely capture the data packets transmitted in the network for analysis. It supports filtering for network layer, protocol, host, network, or port, and provides logical statements such as and, or, not to remove unnecessary information, and is a very advanced network data analysis tool
Like many other modules on the Pineapple, it provides a selectable web management interface
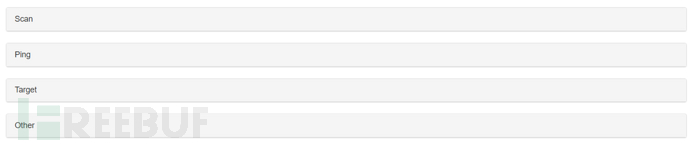
Options provide the basic option module
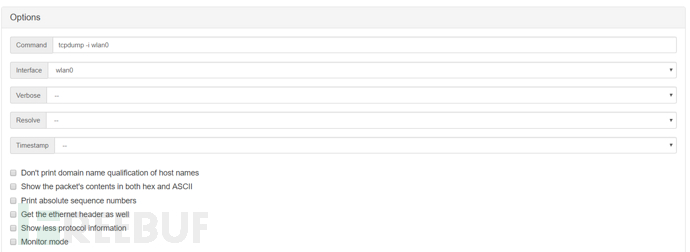
The parameters selected or checked below will be formatted into the Command field
Interface is the port that needs to be monitored
Verbose corresponds to the -v option, indicating the level of detail of the message information output
Resolve corresponds to the -n option, do not convert host names to IP addresses, and do not perform port name conversion
Timestamp corresponds to the -t option, specifying whether to output the timestamp or the timestamp format
Don't print the domain name qualification of host names: Corresponding to the -N option, do not output the domain name part of the host name. For example, 'wiki.ver007.org' only outputs 'wiki'
Show the packet's contents in both hex and ASCII: Corresponding to the -X option, when parsing and printing, in addition to printing the header of each packet, the data of each packet is also printed in hexadecimal and ASCII (usually used for analyzing a protocol)
Print absolute sequence numbers: corresponds to the -S option, outputs the tcp sequence number in absolute value form
Get the ethernet header as well: corresponds to the -e option, prints the data link layer header information in the output line
Show less protocol information: corresponds to the -q option, quick output. Only output less protocol information
Monitor mode: corresponds to the -I option, makes the standard output become buffered line form, can export data to files
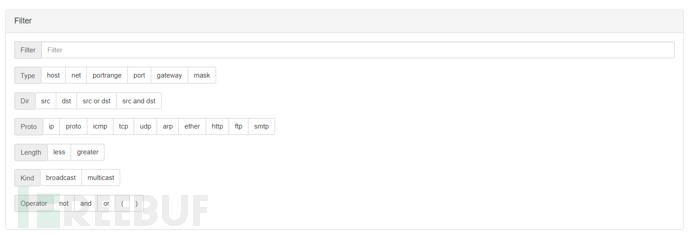
Filter provides some filtering rules, we can use Filter to write filtering expressions to match the desired results, after selecting the parameters, manually enter the parameter values, and then click the next parameter, similarly, if you are familiar with tcpdump, you can fill in manually, similar to the filtering syntax of wireshark and others
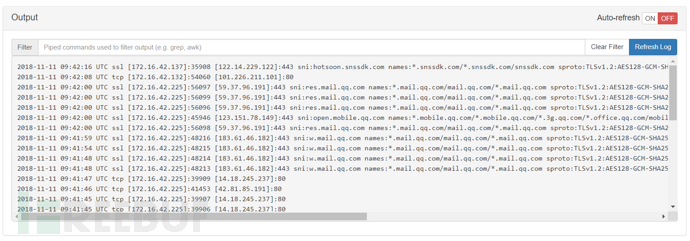
Output is the system echo, while History can be used to view and manage the entire tcp data packets captured
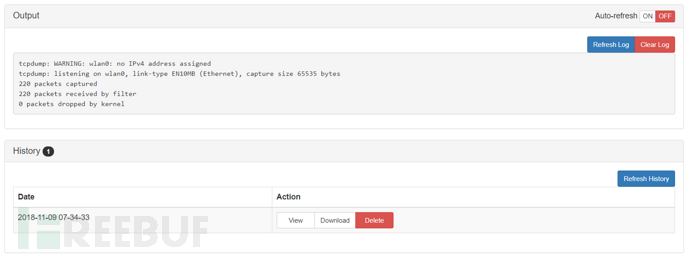
For example, I want to view the communication between 172.16.42.225 and m.tool.chinaz.com on port 80

Some information is output in Output

The captured packets can be seen in history
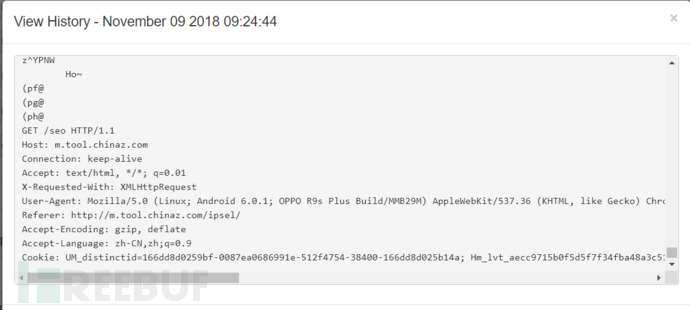
Here you can download the captured packets, get a pcap file, which can be used in other tools such as wireshark, networkminer, and Coli
The specific usage method is customized according to different needs, and it is necessary to be familiar with the writing of filter expressions
It should be noted that tcpdump can only capture packets passing through the local machine, so make sure that the Client is connected to the Internet
Since the page only provides some commands, if you want to achieve the same effect as the command line, you can SSH to Pineapple and directly run tcpdump.sh, the path is /pineapple/modules/tcpdump/scripts
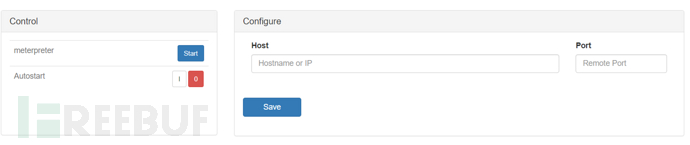
Meterpreter vulnerability attack
The well-known Meterpreter, after configuring the host port, can receive sessions without further introduction
nmap network map
A famous network scanning tool, with the same usage
Options (Options) are similar to the graphical Nmap page, enter the target, and select some preset rules in the Profile
Various parameter settings can be manually selected below
Parameters can also be manually entered at the Command
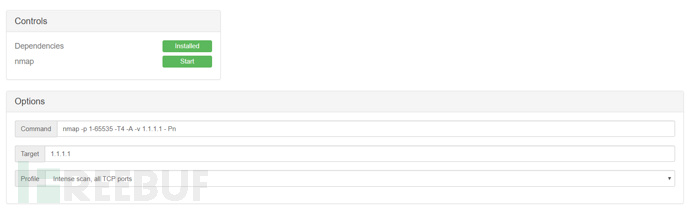
The results will be displayed in Output, and can also be viewed in the Log Manager module for recorded results

The test found that the process is relatively slow for both internal and external network scanning, and there are often cases of process exit, so the effect is not very good
APITokens API tokens
/api allows remote calls to the Pineapple module, stored at /pineapple/api
The generated API tokens are stored in the local database of Pineapple, located at /etc/pineapple/pineapple.db
The role of this module is to provide access control for API calls
Pineapple will return the result only when an APIToken is generated in this module and passed as a JSON parameter
autossh reverse SSH connection
autossh is a program that starts an ssh copy and monitors it. If the process is interrupted or the traffic transmission stops, it will restart as needed
The idea comes from rstunnel, but it is written in C and uses port forwarding loop or remote echo service for connection monitoring
When faced with rapid failures such as connection rejection, it can reduce the rate of connection attempts
In most cases, the program is used for reverse SSH and to solve connection instability and other problems. With this module, we can connect to Pineapple under the VPS with a public IP at any time and anywhere for operations
For example, if the VPS user is root, the IP is 1.1.1.1, the SSH port is 22, and the port to be logged in when reversing the connection to Pineapple is 8888
Then it should be filled out as follows
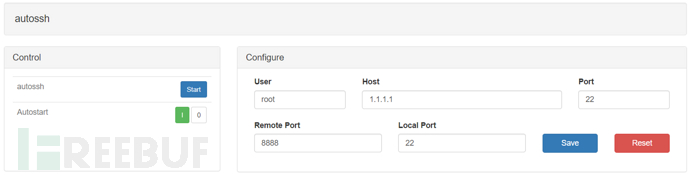
After filling in, click Save to the command line below
![]()
Generate the public key in Additional Configuration (Additional Configuration)
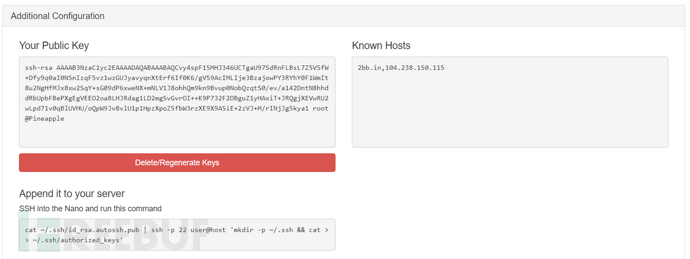
SSH to Pineapple and execute
cat ~/.ssh/id_rsa.autossh.pub | ssh -p 22 root@1.1.1.1 'mkdir -p ~/.ssh && cat >> ~/.ssh/authorized_keys'Enter the VPS password and import the Pineapple public key into the authorized_keys of the VPS
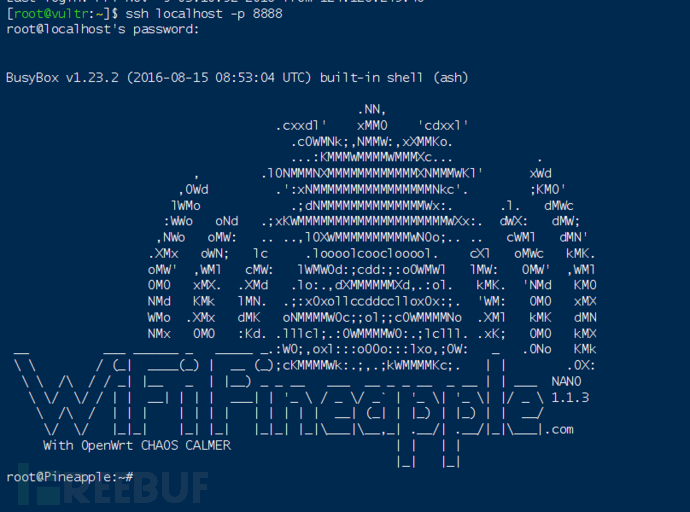
Click Start
At this point, the SSH reverse connection has been established, and you can connect to Pineapple via ssh on the VPS at any time and anywhere
Enter in the VPS
ssh localhost -p 8888After entering the password for Pineapple NANO, you can log in successfully
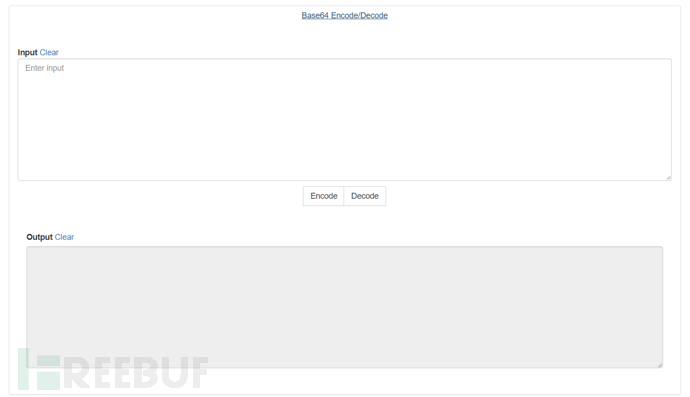
base64encdec BASE64 encoding/decoding
A common base64 encoding/decoding module
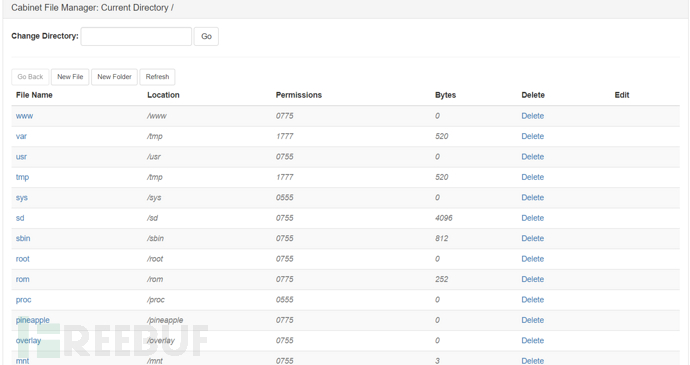
Cabinet file management
It can be understood as a webshell for file management (-_-||)
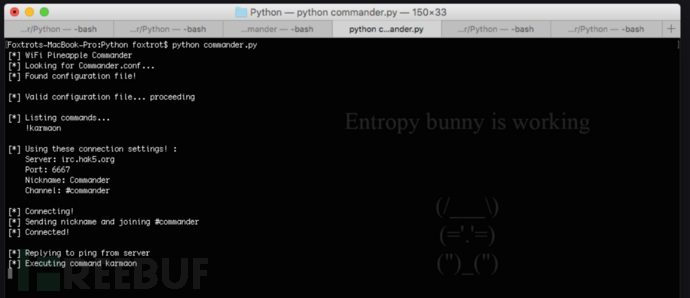
Commander commander
This module allows us to control Pineapple through IRC
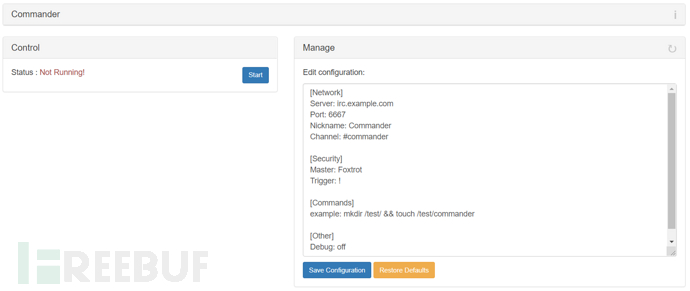
The following image is taken from the official forum. I have never used IRC and may never use it in this lifetime, so this module is skipped
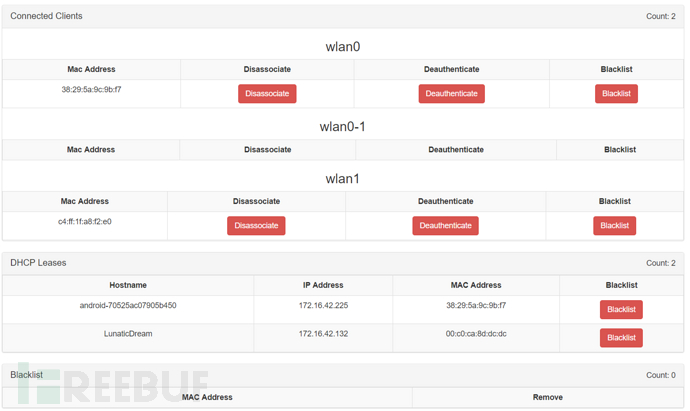
ConnectedClients connected clients
This module visually displays different clients connected through different network interfaces
Including hostname, IP address, MAC address
You can perform operations such as Disassociate (dissociate), Deauthenticate (dissolve authentication), and Blacklist (blacklist) on the client
CursedScreech command execution
This is a remote control module
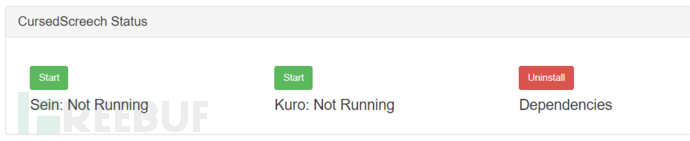
Sein: Information collection function, when a vulnerable system appears in the monitored network, the module's target list will be updated
Kuro: Attack function, automatically attempts to connect to the target machine discovered by the Sein function and connect

Listening Interface (Listening Port): The interface used for the multicast socket. If the target connects directly to Pineapple, you can use br-lan
Multicast Group (Multicast Group): The address for sending and receiving the target heartbeat. For Sein and the target machine, the group needs to be the same
Multicast Port (Multicast Port): The port from which Sein receives messages from the target. This port needs to be in the startMulticaster() method of the payload
Heartbeat Interval (Heartbeat Interval): The interval at which the payload sends broadcasts. If Sein does not receive a broadcast packet within 3 heartbeat intervals, it will be judged that the target is offline
Kuro Keys/Target Keys (Keys): Used as keys for TLS communication. You can use the Papers module to create keys
You can download the payload templates for C# and Python from the two download buttons below
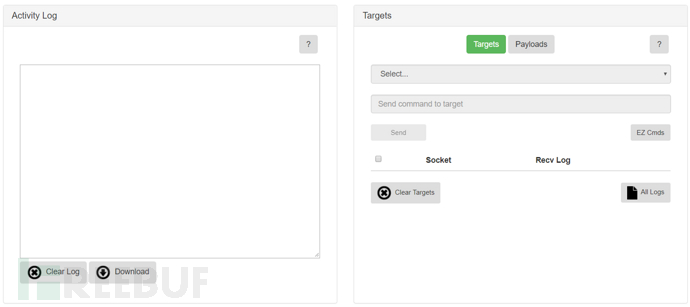
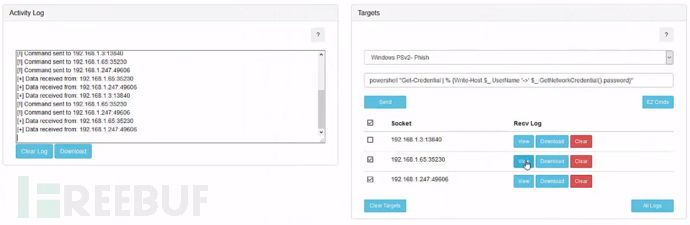
Activity Log (Activity Log): Records all records generated during the execution of Kuro functions. Most of the time, you use the module by looking at this
The Targets on the right is a list of machines that have been launched, as well as a command execution function
If there is a target machine, you can select the machine through Select and execute the command
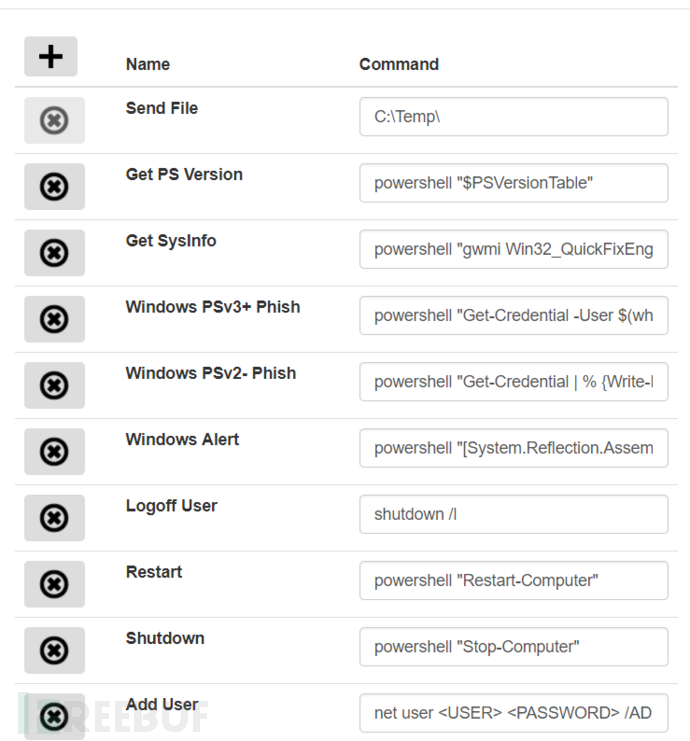
EZ Cmds has pre-set some cmd commands that can be added and deleted
After setting it up, write the payload according to the downloaded template and run it on the target machine
After running, click Sein to start listening. During testing, it was found that the Python version of the payload needs to wait a little longer after listening before it can be launched. Please be patient and wait a while, and then you can start Kuro and wait a little longer again
After the log shows Kuro is ready, you can execute the command
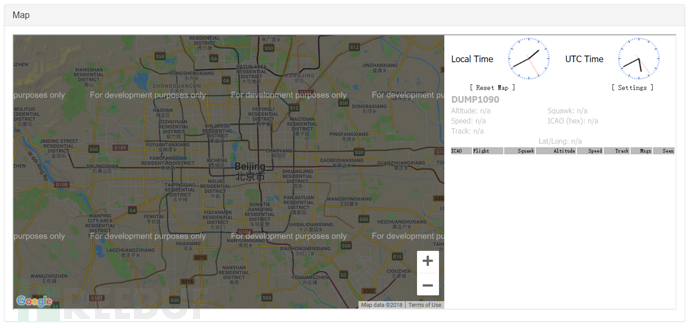
dump1090 Receiving/Decoding Wireless Signal
This module can receive and decode radio signals at 1090MHz. By calling google-API and other methods, the flight track can be depicted on the web map. Of course, the frequency can also be manually changed, such as:
Radio frequency used by civil aviation in our country: 1090MHz
Radio frequency used by civil walkie-talkies: 408-409MHz
Public safety frequency: 350-390MHz
And so on
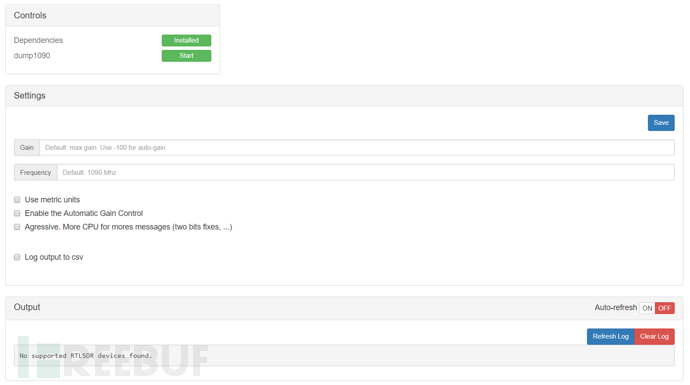
The software has many parameters, but only Gain is displayed on the interface
Checkbox parameters can switch to metric units, switch to automatic acquisition, increase power, and output the results in csv format
This module requires RTL-SDR (TV Stick) to receive radio signals. After inserting the module, a map will be displayed
get Obtain
The get module is used to obtain client connection information, including browsers and related plugins
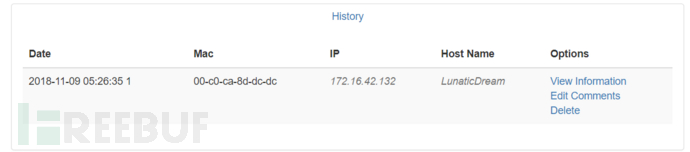
Can obtain the information of Clients connected to Pineapple, click View Information to view the detailed information obtained

The identification library is relatively old, and the number of plugins identified is also relatively small. It is quite surprising to be able to obtain the screen size, but it is generally used in practical combat
HackRF Radio Attack
This module needs to be used with HackRF hardware. After connecting to HackRF, a simple setting interface will appear
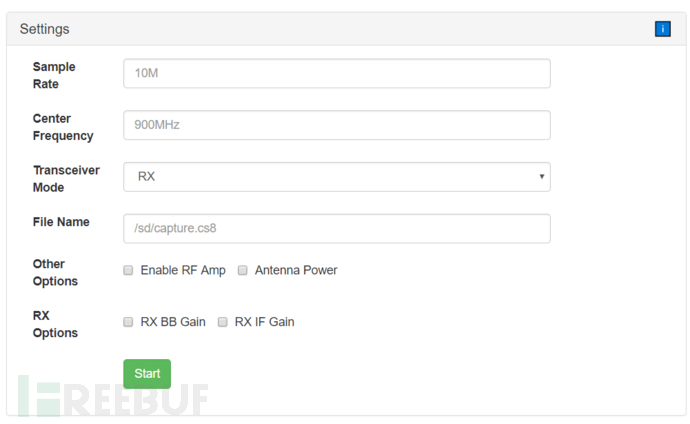
Module options are equivalent to the relevant parameters of hackrf_transfer
Sample Rate (Sample Rate): The number of samples sent or received per second. It is limited by the system's computing power, and setting it too high may cause system instability. It is recommended to set the default to 10M or lower, equivalent to -s
Center Frequency (Center Frequency): The frequency at which HackRF starts to tune, equivalent to -f
Transceiver Mode (Transceiver Mode): HackRF operates in half-duplex mode, so it must be specified whether it is TX (transmit) or RX (receive), equivalent to -t or -r
File Name (File Name): Target file path, can record received signals or send signals from the file
RF Amp & Antenna Power (Radio Frequency Amplifier & Antenna Power): Enable RF AMP can specify whether to turn on the radio frequency amplifier, Antenna Power can specify whether the power is transmitted to the antenna port
RX IF Gain & RX BB Gain (RX Intermediate Frequency Gain & RX Baseband Gain): Select the gain mode according to the different levels of db and step
Repeat Transmission & TX IF Gain (Repeated Transmission & TX Intermediate Frequency Gain): Whether to repeat playback and set the transmission gain
First record and save it to a file
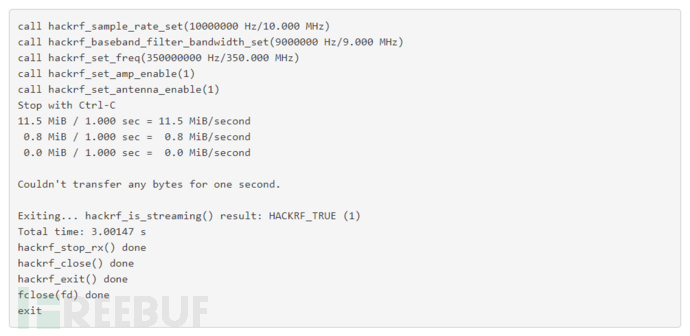
Then perform the replay, and the attack will be successful. If the replay fails, you can adjust the amplifier gain
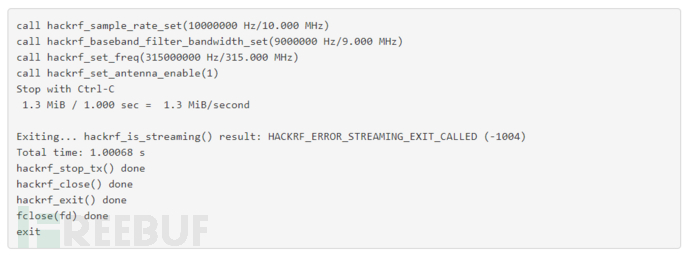
During the actual test process, it will report errors as shown in the figure above, and after debugging for a while, it is still not possible to achieve the function
This module is just a simple capture/replay, if you want to decode/encode and replay, it is not achievable by itself, and it is still impossible to use without knowing the radio working frequency, so it is still defined as a demonstration module
Key Manager key management
As the title suggests, this module is used for SSH key management
After generating SSH Key Pair, customize the Remote Host (remote host) hostname, port, account, and password
The two buttons below are to copy your public key to the other host, or add the other host's public key to your host
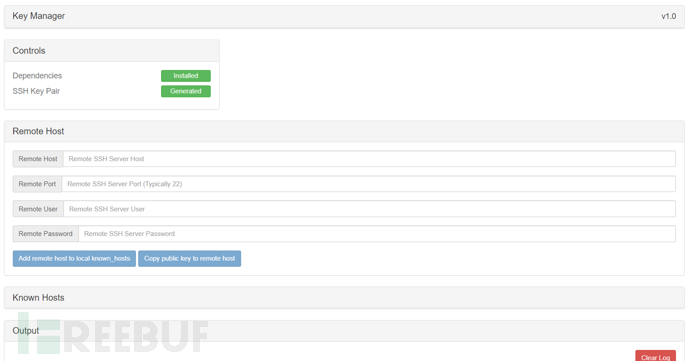
You can view and manage some public keys saved so far in Known Hosts (known hosts)
LED Controller LED light control
As the title suggests, it is a module to control LED lights
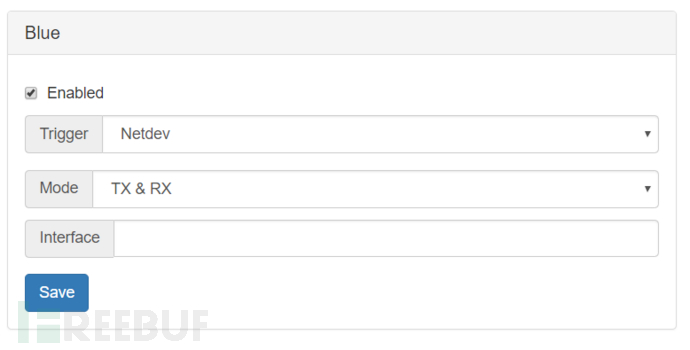
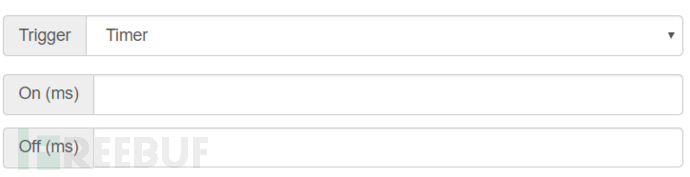
Trigger (trigger) has three options
Netdev: It will flash during network transmission, Mode (mode) TX represents sending, RX represents receiving, Interface is the network port to be monitored
Timer (timer): Will alternate between on and off according to the set On and Off time, it is almost a breathing light, the unit is ms (milliseconds)
When set to None, it will be constantly lit, the test effect does not have a picture, but the module is still useful
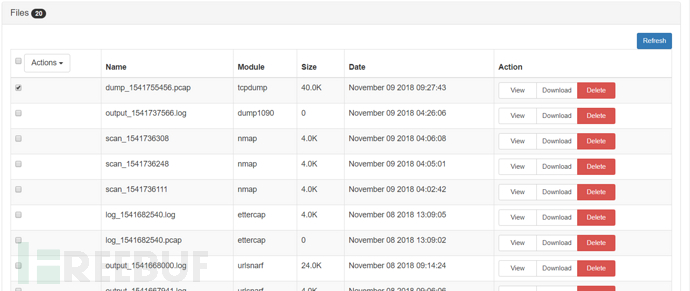
Log Manager log management
This module can view and manage logs generated by various modules
Can display name, module, size, date, and can view, download, and delete
Modem Manager modem management
This module allows Pineapple to connect to the internet through 3G and 4G USB modems
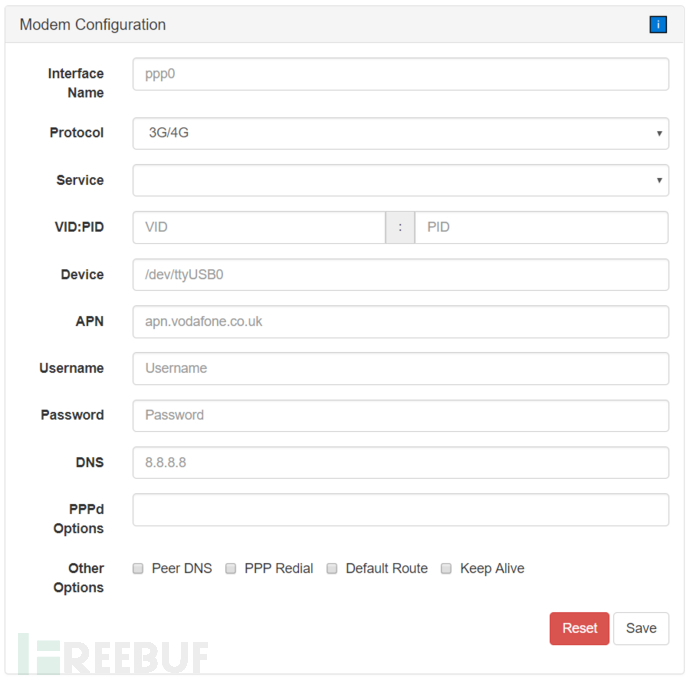
This module is not known how to use, skip
Module Maker module production
Can generate and manage modules
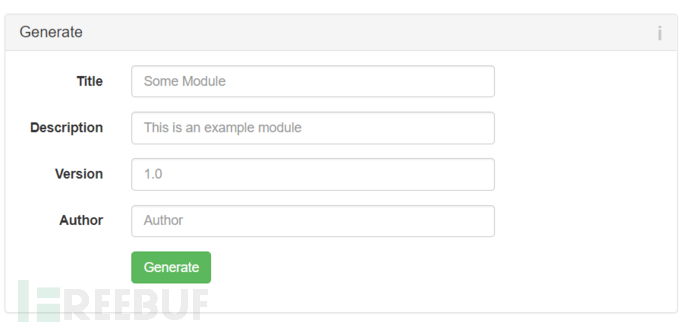
And provides the patterns needed for the module
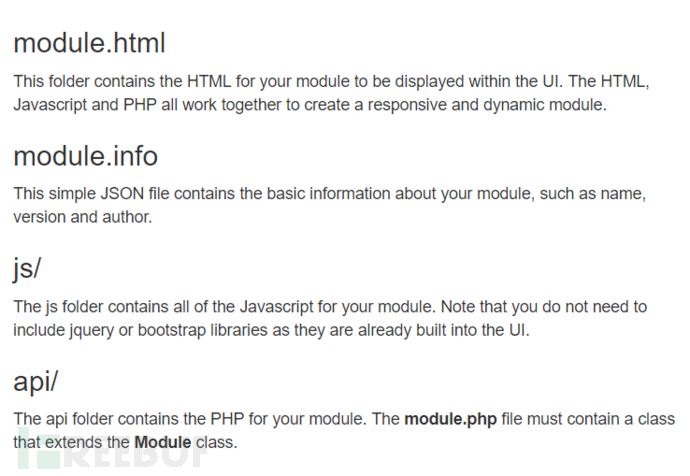
It is a web interface for developers to write new modules
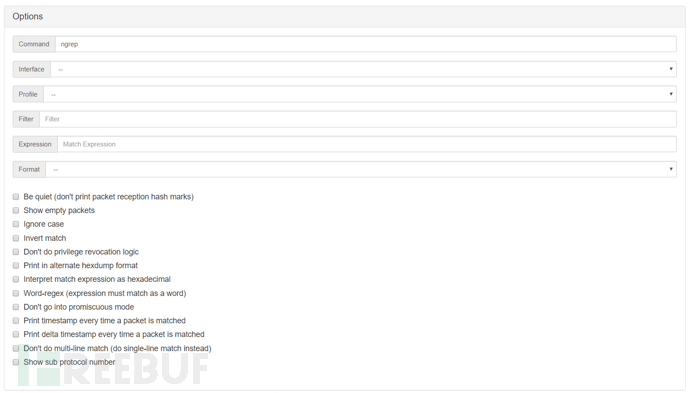
ngrep network capture
ngrep is equivalent to the network version of grep, supporting a large number of operating systems and network protocols. It can identify TCP, UDP, and ICMP packets and understand the filtering mechanism of bpf. Similar to tcpdump
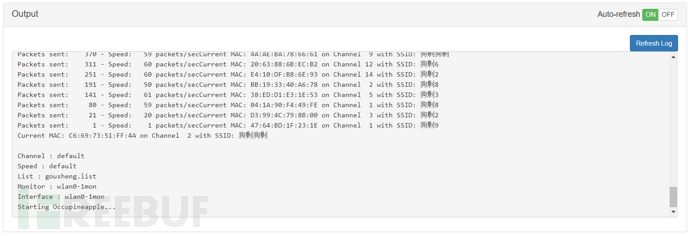
Occupineapple occupation
Occupineapple is an interference module that can generate various random or custom SSIDs around
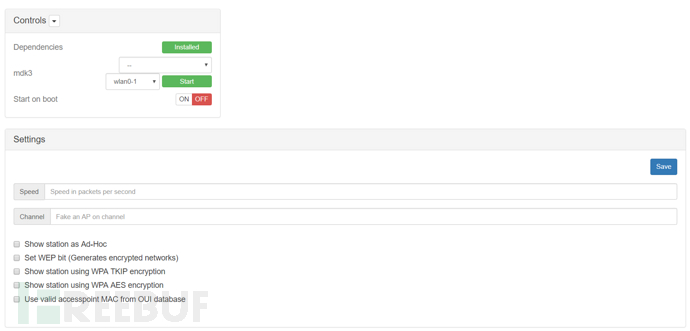
Speed: The number of packets sent per second
Channel: On which channel to generate fake AP
Show station as Ad-Hoc: Display the station as a point-to-point
Set WEP bit (Generates encrypted networks): Set WEP bit (Generates encrypted networks)
Show station using WPA TKIP encryption: Show stations using WPA-TKIP encryption
Show station using WPA AES encryption: Show stations using WPA-AES encryption
Use valid accesspoint MAC from OUI database: Use valid Access from the OUI database
In the Editor parameter, you can select, edit, or create a List, which stores SSID names and MAC addresses
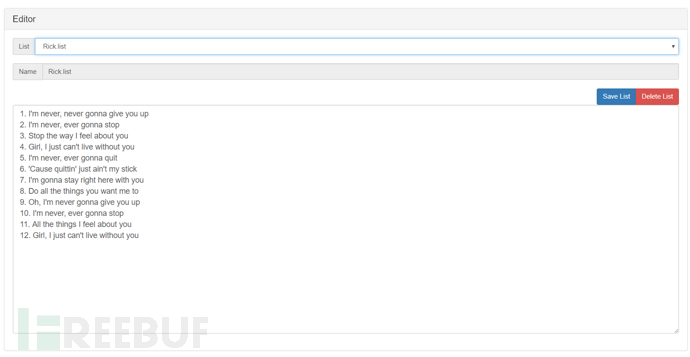
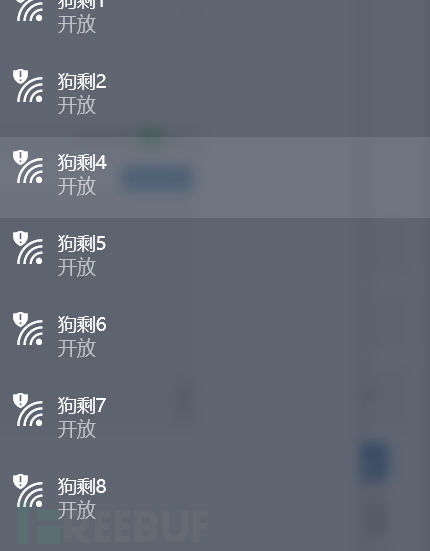
After configuring the parameters, click Start to generate the SSID named in the list around
You can see that the preset SSID has been generated
The current function of this module can only be thought of as two, the first is SSID advertising, which can be used to publish some advertising information, and the second is to cause the wireless network card to generate a denial-of-service attack.
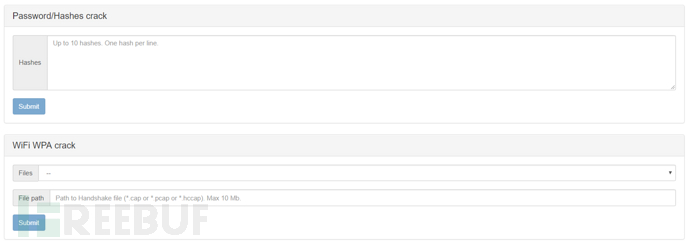
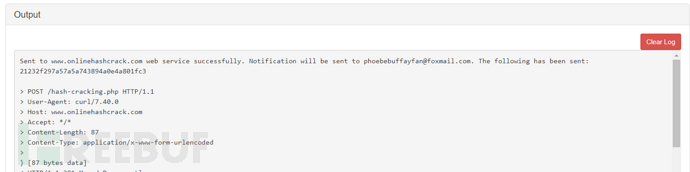
Online Hash Crack online hash cracking
The module callswww.onlinehashcrack.comThe website interface can take the Hash value or the handshake packet with the suffix .cap/.pacp/.hccapd for WPA
Pass the module for cracking
First set the Email, click Save to save, and the result will be output to the echo and sent to the email.
p0f passive network fingerprint recognition
p0f is a universal passive operating system fingerprint tool that uses SYN data packets to implement passive detection technology of the operating system, and can correctly identify the type of target system. Unlike other scanning software, it does not send any data to the target system, but only passively receives data from the target system for analysis. Therefore, a major advantage is that it is almost undetectable, and p0f is a dedicated system identification tool with a very detailed fingerprint database and fast updates, suitable for installation on gateways.
It is still a commonly used information collection software in KALI, and the page only provides the option to set the network port, without providing other parameter options.
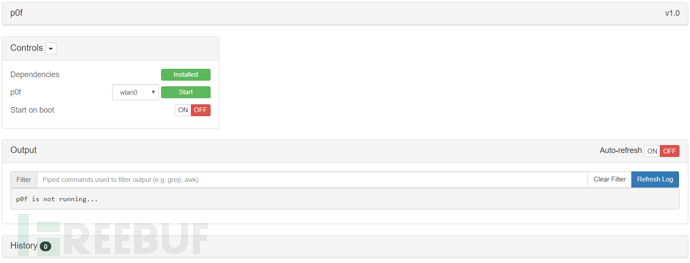
The service could not be started during the test, so it is omitted for the time being.
Papers certificate
The function of the Papers module is to generate public/private key pairs, X.509 digital certificates, and can generate self-signed certificates for deployment.
With this module, we can manage Pineapple over HTTPS, and we can also deploy our phishing pages over HTTPS, which is more deceptive.
We can generate certificates in this module, allowing our management ports 1471, 80, and other ports to be forwarded through 443, or we can download and deploy them on other servers.
First, we use Build Certificates to generate certificates
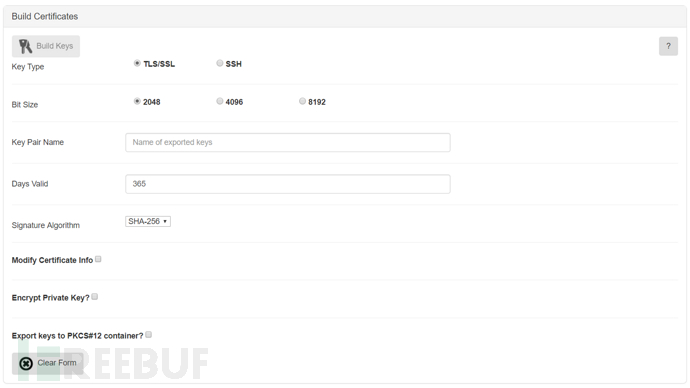
Modify Certificate info (Define Certificate Information): Contains some description information, which can be filled in custom
Encrypt Private Key (Encrypt Private Key): After checking the option, the browser will wait for input when accessing, it should be checked when deployed on other website applications, but it is not recommended to check on Pineapple
Export keys to PKCS#12 container: Export the key to the PKCS#12 user key storage
After filling in, click Build Keys to generate the key pair, and we can view and manage it in the Certificate Store

The location of the generated certificate /pineapple/modules/Papers/includes/ssl/

Copy the generated two files to /etc/nginx/ssl/
Next, we will configure nginx, modify the nginx configuration file /etc/nginx/nginx.conf
Add listen port 443 ssl
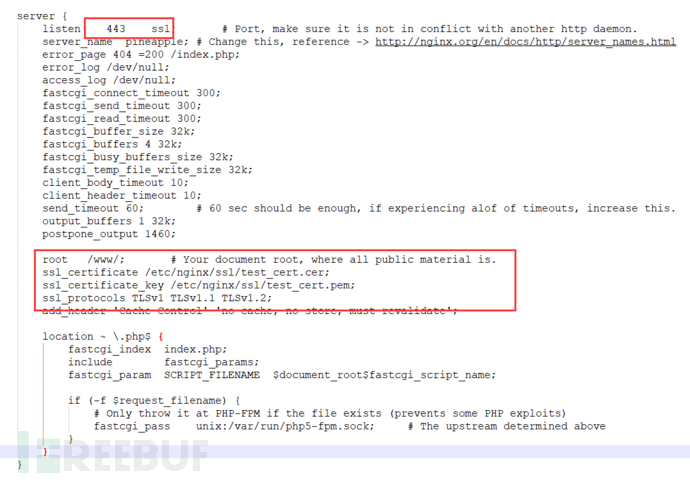
After setting up, restart nginx, click the small lock button in the Actions option, Pineapple will automatically forward port 1471 to 443, at this time, it can be accessed through HTTPS
Since the certificate is self-signed, it will still be marked as Not Secure (insecure) by the browser, so it is somewhat useless, but it still has a certain effect
Portal Auth Portal Authentication
To be continued
RandomRoll Random Roll
This module is a slightly whimsical module, after enabling the module, all http connections will be redirected to the built-in black pages
These are the rolls checked below, each corresponding to a black page, and randomly selected to appear
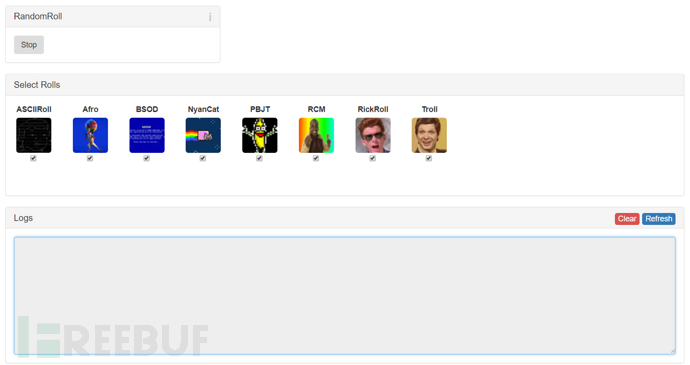
After the module is enabled, the client machine will randomly appear the selected black page


Different black pages have different dynamic graphics, and some even have background music, which is quite interesting
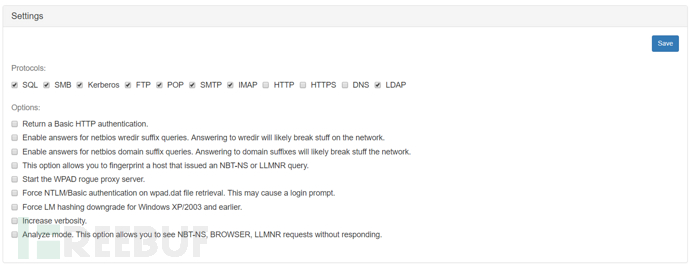
Responder Responder
It is still a very famous LLMNR spoofing tool, and can also forge multiple services such as HTTP/s, SMB, SQL Server, FTP, IMAP, POP3, etc., so as to obtain service authentication information such as username and password through phishing
The usage is the same as other embedded software, select the network card and check the parameters
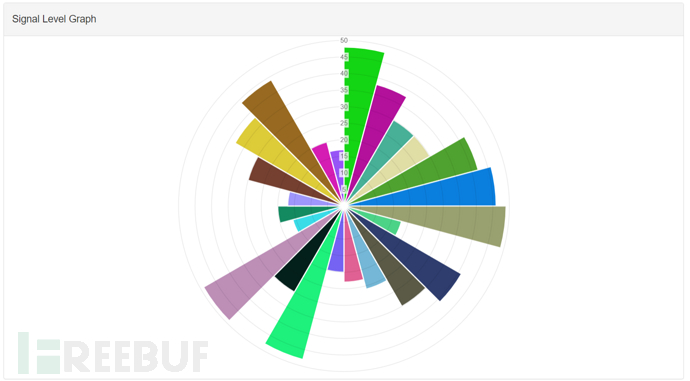
SignalStrength Signal Strength
Select a network card and scan to obtain a list of nearby WiFi signal strengths, the principle is to collect signal strength and quality information from the iwlist command
It can display the results in a list format
And draw it into a pie chart for viewing
During the scanning process, it was found that wlan0 can scan faster, while wlan1 can achieve a larger scanning range
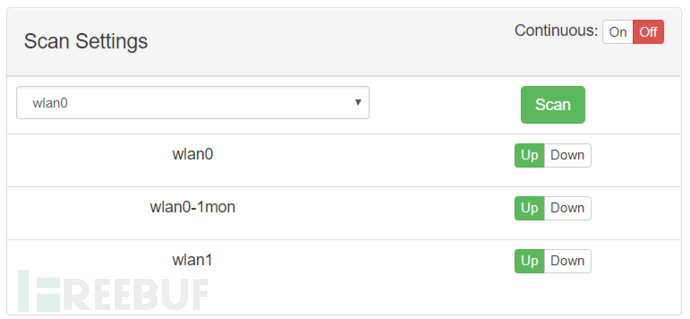
Site Survey Field Survey
As the title suggests, this is a module for scanning and surveying the surrounding area

Interface and Monitor require two network cards, one for communication and one for listening

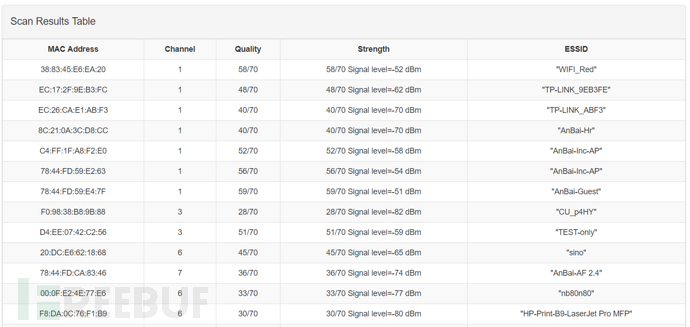
After clicking Scan, you can perform a scan, and the results will be returned in the form of a list
For SSID and MAC, you can put them into PineAP through the dropdown menu for the next operation
For different networks, you can click Capture to capture packets, or click Deauth to perform deauthentication attacks
The module uses airodump-ng to capture using the ssid parameter, record the coordinates of the discovered access points, and write them into a text file

In actual testing, using Deauth here will cause the system to hang, especially when using wlan1 as the monitoring network card. The official response to this is: Why do you want to carry out a large-scale flooding attack at the preliminary survey? Alright, I have nothing to say
And when testing WPA handshakes, it always reports No, tries many times and reports No, feeling that the function is not very useful. If you want to implement this function on the Pineapple, it is recommended to use Aircrack
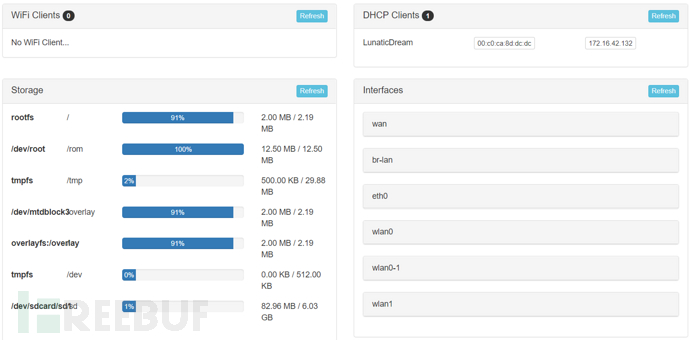
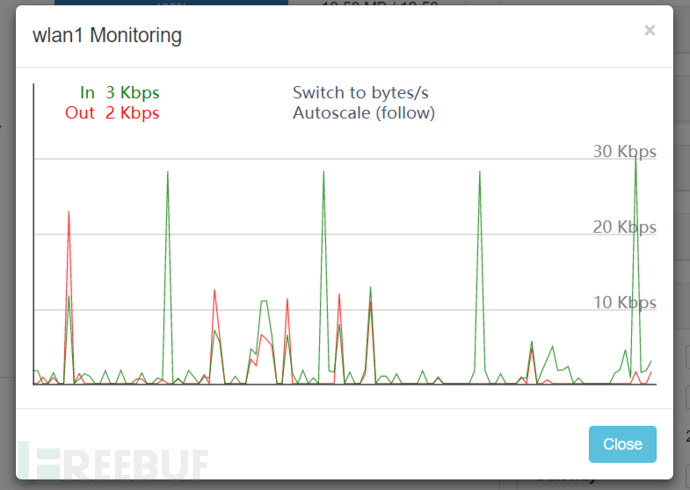
Status Status
Status module is a display module that shows the operation of the system in all aspects
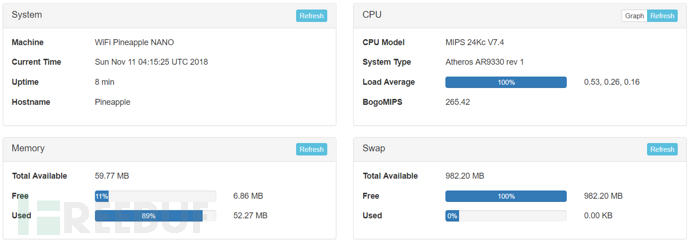
At the network port, the up and down traffic status in a period of time can be displayed in real time in a graphical form
wps wps attack
This module integrates reaver and bully, using the WPS vulnerability of the router to crack WI-FI passwords
Seven Attack Scenarios
If we have a Pineapple and some related devices, what kind of attacks can we carry out? This chapter will list some attack scenarios and list the modules used in the attack scenarios
1 Simple Fun
If you want to make fun of the people around you simply, without engaging in malicious destruction or complex attack behavior, you can use the Occupineapple or RandomRoll modules
Use Occupineapple to generate some interesting SSID names around, such as 'XXX is a little idiot', 'XXX is a little dummy', etc., which is very interesting
You can also use RandomRoll. When a client connects to the Pineapple network, you can redirect HTTP web pages to the default humorous web pages to surprise people
2 Technical Demonstration
If you want to demonstrate some simple WI-FI attacks to people around you, no special technical preparation is required, you can use Dwall, DNS/DNSMasq Spoof, and urlsnarf
Dwall is the famous 'Sheep Wall', which can display captured URLs, cookies, images, and is very convenient for demonstrations
DNS/DNSMasq Spoof can redirect user DNS, combined with Landing Page or other web applications, it can be used for phishing, sniffing, and other purposes
urlsnarf displays http packets within the network, the captured urls are also displayed intuitively
With HackRF hardware, it can simply replay radio attacks and perform some demonstrations
3 Password Snatching
If you want to steal passwords generated by other clients on the same network, maybe some website account passwords, or other WiFi passwords, there are several ways to achieve this purpose
To obtain the nearby WiFi password, you can use Site Survey to capture WPA handshake packets, and then use Online Hash Crack to try to crack them
The wps module can be used directly to crack WiFi passwords
To obtain the passwords of the client on other websites, you can use Landing Page, Evil Portal, Portal Auth to create phishing pages, combine them with ettercap for deception, or let the client connect to the Pineapple network, enter the password on the phishing page, and record it
Ettercap can also be used for network deception, becoming a gateway to obtain traffic, which can intercept plaintext transmitted passwords, and SSLsplit can be used to capture passwords transmitted via https
Responder can be used for deception to steal passwords or hash values from certain protocols
4 Vulnerability Exploitation
Pineapple also provides some vulnerability exploitation modules that can be used to attack vulnerabilities within the network
Through ettercap deception, replace the target download file, can change js to exploit browser vulnerabilities, can change documents to exploit office vulnerabilities, can change exe to exploit various vulnerabilities
CursedScreech payload can be used for listening and executing commands
Session can also be received using Meterpreter
This can be summarized as, I am your gateway, I have control over all your network traffic, and I can play as I like
5 Data Collection and Display
If using Pineapple to collect data within the network for display or further analysis, some capture modules can be used
tcpdump can capture and filter network data, and can be used to display it with other software
ngrep has the same function as above, for capturing and displaying data within the network
nmap is used for device discovery and scanning within the network
p0f passive network fingerprint identification, passively collects system fingerprints within the network
The get module can capture client browser information.
When used with a TV stick, dump1090 can obtain radio information and display information such as aircraft routes.
6 Malicious destruction
If you just want to cause trouble, the Pineapple can also implement some functions.
You can use ettercap for network欺骗, posing as a gateway, which can cause network disconnection.
The Deauth module can cause authentication failure within the network, resulting in the inability to establish an authentication connection.
Operation Tips
During the process of use, it was found that the root user does not have write permissions, such as being unable to change configuration files, where the files modified on the page do not take effect, etc. In this case, you should remount the disk and grant write permissions.
Sometimes you may want to back up the entire Pineapple, all modules at the same time, and then restore it with one click. However, the Pineapple itself does not provide this feature, so the solution is to copy the entire file under /etc/config, which can solve most problems.
To quickly determine if the Pineapple is connected to the network, just click the button to load information on the home page. If you can obtain official website information, it has already connected to the internet.

The WI-FI Pineapple can be used on mobile devices. If sniffing in public places, you can use an Android phone to manage it without attracting attention.
After changing the module configuration, do not forget to click Save, otherwise, even after testing the module a thousand times, it will not work (it is full of tears).
During the testing process, it is not necessary to rely solely on the Pineapple itself; you can also use some common tools and platforms for further penetration, such as Kali.
Overall impression
After playing for about a week, the most intuitive feeling is that this thing is really a scam (one word is enough to summarize).
In essence, it is just a Linux system machine + several network cards + some very powerful software.
It is just that some people have put these things together, created a PHP web interface, and shrunk the hardware, and then sold it.
So learning to use this tool has become learning how to use many software applications.
The process of using it is also not very pleasant, with frequent occurrences of network disconnection, inability to connect to wifi, system crashes, and inability to refresh pages, etc.
Some modules are indeed not very user-friendly, with most modules being very famous software online (also included in Kali), but simply made into a web page. The selection process is complex, and it cannot cover all parameters.
However, there is no doubt that the WI-FI Pineapple can indeed implement some types of network attacks, and there are some interesting modules available for selection. The modules are updated quickly, and custom modules can also be created.
Therefore, for this WI-FI Pineapple NANO in hand, it is still okay for learning, research, and demonstration purposes, but if used in actual environment attacks, large-scale network sniffing, and other relatively complex environments, due to the limitations of computing power and other aspects, it may not perform very well.
And when implementing some penetration tests that are close to the actual environment, certain skills such as shell programming/php programming/python programming/network traffic analysis are required. Different modules involve different knowledge areas, and multi-faceted learning is needed
It is recommended for students who have a good command of the language, a certain programming foundation, and want to start learning and studying Wi-Fi penetration
During testing, if you have a wide range of thinking, you can achieve many combinations of attacks, such as using ettercap with BeEF, XSS platform, with metasploit, with CobaltStrike, with Evil Portal for real-time two-factor authentication phishing, network sniffing with passive scanning, and so on. Below is a picture for you to experience:

The specific implementation requires everyone to think out of the box and study
Ten Reference Links
Official wiki:https://wiki.wifipineapple.com/#!index.md
Official forum:https://forums.hak5.org/
Modules library:https://github.com/hak5/wifipineapple-modules
Chinese user manual:http://www.wifipi.org:8080/WiFiPineapple-%E7%94%A8%E6%88%B7%E6%89%8B%E5%86%8C-V1.3.pdf
Building video:https://www.youtube.com/watch?v=Nv1eiIwOPKo
Module writing video:https://www.youtube.com/watch?v=Lvf2At3G1C0
SSLsplit module:https://www.roe.ch/SSLsplit
ettercap module:https://github.com/Ettercap/ettercap
autossh module:https://blog.csdn.net/fanwenjieok/article/details/53033317
dump1090 module:http://www.satsignal.eu/raspberry-pi/dump1090.html
tcpdump module:http://www.tcpdump.org/
ngrep module:https://www.trustauth.cn/wiki/10824.html
CursedScreech module:https://github.com/sud0nick/CursedScreech
Reaponder Module:https://github.com/SpiderLabs/Responder
Combination Case Demonstration Video:https://www.youtube.com/watch?v=Bvo43JvmeW0
Author: An Bai Technology, please indicate the source from FreeBuf.COM when转载

评论已关闭