1. Why use Starter?
- Now let's recall that before the Spring-boot framework was introduced, when we used Spring to develop projects, if we needed a framework such as mybatis, our general steps were:
- Go to the Maven repository to find the required mybatis jar package, and select the appropriate version (easily conflicting)
- Go to the Maven repository to find the jar package for mybatis-spring integration, and select the appropriate version (easily conflicting)
- Configure dataSource and mybatis-related information in the spring's applicationContext.xml file
- If everything is in place, it can usually be done in one go; but often, a lot of time is spent resolving jar conflicts, missing configuration items, and other problems such as not being able to start up at all.
So in October 2012, a person named Mike Youngstrom created a feature request in the Spring Jira, asking for support for a containerless Web application architecture in the Spring Framework, proposing to configure Web container services within the main container when initializing the Spring container; this event should have played a certain role in the birth of SpringBoot.
Therefore, the design goal of SpringBoot is to simplify complex configurations and quickly establish Spring applications.
- Then, when developing Spring-boot applications, it is often seen that our pom files include dependencies such as spring-boot-starter-web, spring-boot-starter-data-redis, and mybatis-spring-boot-starter. With almost no configuration, we can use the features of these dependencies, truly feelingOut-of-the-box usageThe feeling of satisfaction.
- Let's try to develop a Starter ourselves first.
2. Naming Convention
When using spring-boot-starter, you will find that some project names are XX-spring-boot-starter, and some are spring-boot-starter-XX. What is the significance of the project name? Quoted from the official Spring Boot documentation:
The general meaning of this sentence is that it is requested to follow this naming convention:
Official Spring naming format is: spring-boot-starter-{name}
Non-official Spring naming format: {name}-spring-boot-starter
3. Development Example
Here, I will take a component for logging as an example to describe the process of developing a starter.
3.1 Create Project
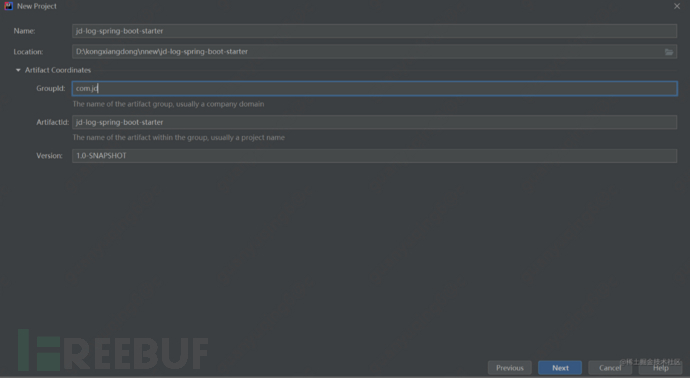
Firstly, create a Maven project named jd-log-spring-boot-starter
3.2 Pom Import Dependencies
<?xml version="1.0" encoding="UTF-8"?>
<project xmlns="http://maven.apache.org/POM/4.0.0" xmlns:xsi="http://www.w3.org/2001/XMLSchema-instance"
  xsi:schemaLocation="http://maven.apache.org/POM/4.0.0 http://maven.apache.org/xsd/maven-4.0.0.xsd">
  <modelVersion>4.0.0</modelVersion>
  <parent>
    <groupId>org.springframework.boot</groupId>
    <artifactId>spring-boot-starter-parent</artifactId>
    <version>2.5.13</version>
    <relativePath/> <!-- lookup parent from repository -->
  </parent>
  <groupId>com.jd</groupId>
  <artifactId>jd-log-spring-boot-starter</artifactId>
  <version>1.0-SNAPSHOT</version>
  <name>jd-log-spring-boot-starter</name>
  <url>http://www.example.com</url>
  <properties>
    <project.build.sourceEncoding>UTF-8</project.build.sourceEncoding>
    <maven.compiler.source>1.8</maven.compiler.source>
    <maven.compiler.target>1.8</maven.compiler.target>
  </properties>


  <dependencies>
    <!-- It provides automatic configuration capabilities-->
    <dependency>
      <groupId>org.springframework.boot</groupId>
      <artifactId>spring-boot-autoconfigure</artifactId>
    </dependency>
    <!-- Conditions of configuration classes are automatically collected during compilation and written to a META-INF/spring-autoconfigure-metadata.json-->
    <dependency>
      <groupId>org.springframework.boot</groupId>
      <artifactId>spring-boot-configuration-processor</artifactId>
    </dependency>
    <!-- Logging aspects are used, so this needs to be introduced-->
    <dependency>
      <groupId>org.springframework.boot</groupId>
      <artifactId>spring-boot-starter-aop</artifactId>
    </dependency>
    <dependency>
      <groupId>org.projectlombok</groupId>
      <artifactId>lombok</artifactId>
    </dependency>
  </dependencies>
  <build>
    <plugins>
      <plugin>
        <groupId>org.apache.maven.plugins</groupId>
        <artifactId>maven-source-plugin</artifactId>
        <version>2.2.1</version>
        <executions>
          <execution>
            <id>attach-sources</id>
            <goals>
              <goal>jar-no-fork</goal>
            </goals>
          </execution>
        </executions>
      </plugin>
    </plugins>
  </build>
</project>
Here is a brief explanation of these dependencies:
spring-boot-autoconfigure: It provides automatic configuration capabilities for Spring Boot applications across various modules; that is, by adding the corresponding pom, the corresponding configuration will take effect; therefore, to enable automatic configuration, we need to introduce this dependency.
spring-boot-configuration-processor: Generates configuration from the custom configuration classMetadataTherefore, when referencing the YML file of the project of the custom STARTER, there will be property name prompts when initializing the custom configuration; ensure that configuration information can be read gracefully when using the @ConfigurationProperties annotation; after compilation, a spring-configuration-metadata.json file will be generated under META-INF, which is roughly the metadata of the defined configuration; the effect is as shown in the screenshot.

spring-boot-starter-aop: This does not need explanation, because the example is to record logs, we use the aspect feature, so we need to introduce it.
3.3 Define property configuration
/**
 * @author kongxiangdong2
 * @Title: LogProperties
 * @ProjectName jd-log-spring-boot-starter
 * @Description: TODO
 * @date 2022/9/11 10:04
 */
@ConfigurationProperties(prefix = "jd")
@Data
public class LogProperties {


    /**
     * Whether to enable logging
     */
    private boolean enable;


    /**
     * Platform: Different services use the distinction, the default is taken from spring.application.name
     */
    @Value("${spring.application.name:#{null}}")
    private String platform;
@ConfigurationProperties: This annotation is similar in function to the @Value annotation, used to obtain properties defined in the configuration file and bind them to Java Bean or properties; in other words, it encapsulates the configuration in the configuration file into a JAVA entity object, which is convenient for use and management.
Here we define two properties, one is whether to turn on the log switch, and the other is the name of the platform identifier.
3.4 Define the automatic configuration class
/**
 * @author kongxiangdong2
 * @Title: JdLogAutoConfiguration
 * @ProjectName jd-log-spring-boot-starter
 * @Description: TODO
 * @date 2022/9/11 10:06
 */
@Configuration
@ComponentScan("com.jd")
@ConditionalOnProperty(prefix = "jd",name = "enable",havingValue = "true",matchIfMissing = false)
@EnableConfigurationProperties({LogProperties.class})
public class JdLogAutoConfiguration {


   //
}
This class is the most critical, as it is the most important class in the starter, which automatically loads the configuration into spring-boot; how it is implemented will be discussed in detail when explaining the principle, but let's complete the example first.
@Configuration: This is to declare that this class is a configuration class
@ConditionalOnProperty: Its function is to specify the prefix.name configuration file property value to determine whether the configuration is injected into Spring. Taking the above code as an example, it will judge whether to load the JdLogAutoConfiguration class based on whether jd.enable is configured in the configuration file. If the configuration file does not exist or the configuration is equal to false, it will not load. If it is configured as true, it will load; if havingValue is specified, the value of the configuration item must be compared with havingValue, and if they are consistent, the Bean will be loaded. If the configuration file is missing, but matchIfMissing = true is configured, the Bean will be loaded, otherwise it will not.
Let's expand on the commonly used Condition here
| Annotation | Type | Description |
|---|---|---|
| @ConditionalOnClass | Class Conditions class condition annotation | Load only when there is a specified class in the current classpath |
| @ConditionalOnMissingClass | Class Conditions class condition annotation | Load only when there is no specified class in the current classpath |
| @ConditionalOnBean | Bean Conditions Bean annotation | Load only when there is a specified bean in the current container |
| @ConditionalOnMissingBean | Bean Conditions Bean annotation | Load only when there is no specified bean in the current container |
| @ConditionalOnProperty | Property Conditions environment variable conditions annotation (including configuration file) | prefix prefix name name havingValue used for matching the configuration item value matchIfMissing default value when the specified configuration item is not found |
| @ConditionalOnResource | ResourceConditions resource condition annotation | Only load if there is a specified resource |
| @ConditionalOnWebApplication | Web Application Conditions web annotation | Only load if it's a web application |
| @ConditionalOnNotWebApplication | Web Application Conditions web annotation | Only load if it's not a web application |
| @ConditionalOnExpression | SpEL Expression Conditions | Only load if it matches the SpEL expression |
@EnableConfigurationProperties makes the class annotated with @ConfigurationProperties effective.
3.5 Configure EnableAutoConfiguration
Create a new file named spring.factories in the resources/META-INF/ directory, and configure the content as follows;
org.springframework.boot.autoconfigure.EnableAutoConfiguration=com.jd.JdLogAutoConfiguration
Alright, up to this point, the custom Starter framework is basically ready, and the next is our logging function.
3.6 Business Function Implementation
Firstly, let's define an annotation Jdlog
/**
 * @author kongxiangdong2
 * @Title: Jdlog
 * @ProjectName jd-log-spring-boot-starter
 * @Description: TODO
 * @date 2022/9/11 10:04
 */
@Target(ElementType.METHOD)
@Retention(RetentionPolicy.RUNTIME)
public @interface Jdlog {
}
Define the aspect execution logic, here we simply print the property values of the configuration file + the target execution method + the time taken.
import com.jd.annotation.Jdlog;
import com.jd.config.LogProperties;
import lombok.AllArgsConstructor;
import lombok.extern.slf4j.Slf4j;
import org.aspectj.lang.ProceedingJoinPoint;
import org.aspectj.lang.annotation.Around;
import org.aspectj.lang.annotation.Aspect;
import org.aspectj.lang.annotation.Pointcut;
import org.springframework.stereotype.Component;


/**
 * @author kongxiangdong2
 * @Title: LogAspectjProcess
 * @ProjectName jd-log-spring-boot-starter
 * @Description: TODO
 * @date 2022/9/11 11:12
 */
@Aspect
@Component
@Slf4j
@AllArgsConstructor
public class LogAspectjProcess {


    LogProperties logProperties;


    /**
     * Define the cut point
     */
    @Pointcut("@annotation(com.jd.annotation.Jdlog)")
    public void pointCut(){}


    /**
     * Aspect around notification
     *
     * @param thisJoinPoint
     * @param jdlog
     * @return
     */
    @Around("pointCut() && @annotation(jdlog)")
    public Object around(ProceedingJoinPoint thisJoinPoint, Jdlog jdlog){


        //Execution method name
        String taskName = thisJoinPoint.getSignature()
                .toString().substring(
                        thisJoinPoint.getSignature()
                                .toString().indexOf(" "),
                        thisJoinPoint.getSignature().toString().indexOf("(");
        taskName = taskName.trim();
        long time = System.currentTimeMillis();
        Object result = null;
        try {
            result = thisJoinPoint.proceed();
        catch (Throwable throwable) {
            throwable.printStackTrace();
        }
        log.info("{} -- method:{} run :{} ms",logProperties.getPlatform(), taskName,
                (System.currentTimeMillis() - time));
        return result;
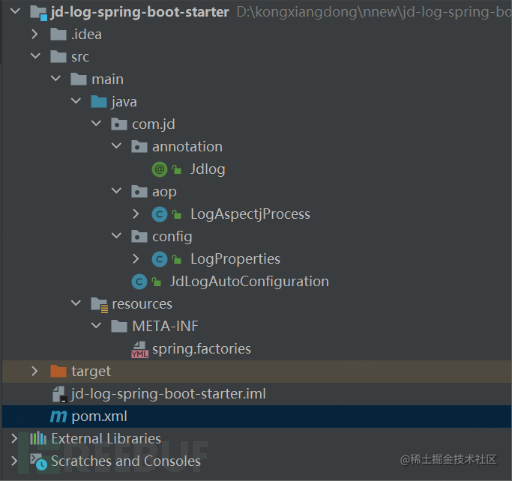
The overall project structure is like this
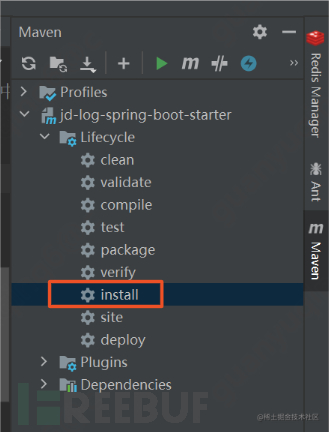
OK, now you can package, compile, and install
3.7 Test Usage
Then you can introduce and use it in other projects. Below, let's test with a simple spring-boot web project, and introduce the following dependency configuration in the pom.
<dependency>
      <groupId>com.jd</groupId>
      <artifactId>jd-log-spring-boot-starter</artifactId>
      <version>1.0-SNAPSHOT</version>
    </dependency>
Add an HTTP access method and annotate it with @Jdlog
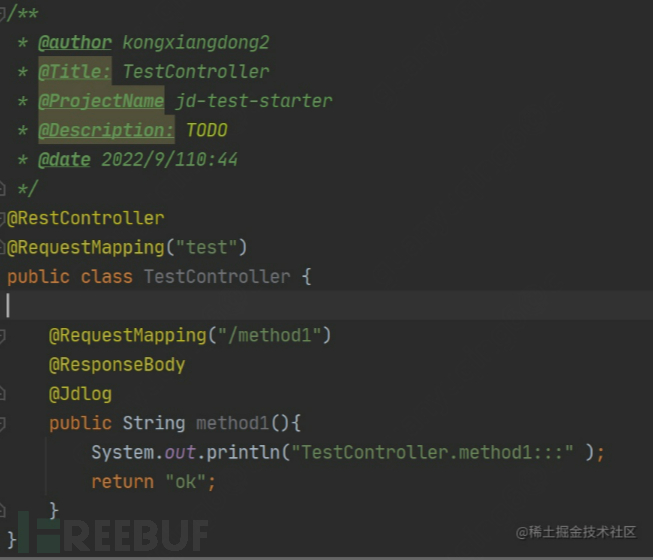
Configure in the application.yaml file
jd:
  enable: true
  platform: "Test Project"
Start test, access addresshttp://localhost:8080/test/method1, the console prints as follows:
![]()
How about it, isn't the custom Starter very simple? Try it out quickly!
Above, we have discussed how to develop a starter, but why do we need to do it this way, and how does spring-boot implement it? Are you still not clear? Below, we will explain this.
4. Principle Explanation
We have seen a starter above, just need to introduce it to the pom file, and configure it (in fact, it can be not configured) jd.enable=true, and we can use the logging function directly. How does Spring-boot achieve this?
As mentioned at the beginning, the advantage of Spring-boot is that it can be automatically configured. Below, I will explain the principle of automatic configuration.
Compared to traditional Spring applications, when we set up a SpringBoot application, we only need to introduce one annotation (precondition: introduce the springBoot y dependency) @SpringBootApplication, and we can run directly; so let's start with this annotation and see what it actually does?
SpringBootApplication annotation
By clicking on the @SpringBootApplication annotation, you can see that it includes the three annotations @SpringBootConfiguration, @EnableAutoConfiguration, and @ComponentScan.
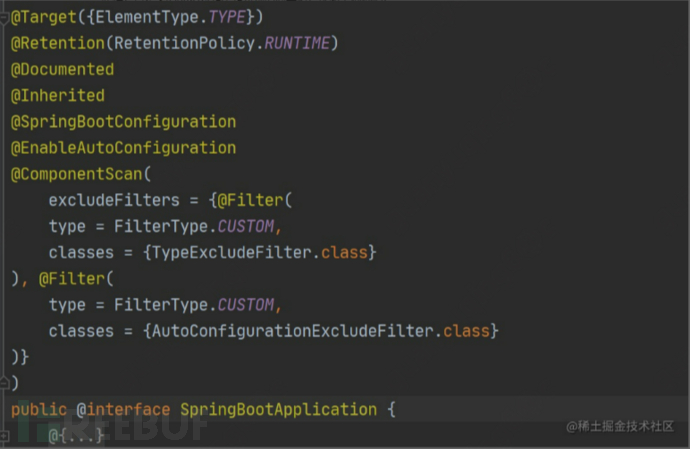
The first four annotations do not need to be described in detail, as they are the most basic definitions of annotations. The key is the three annotations after them: @SpringBootConfiguration, @EnableAutoConfiguration, @ComponentScan. In fact, it means that if @SpringBootApplication, the composite annotation, is not used on the startup class, using these three annotations alone can achieve the same effect.
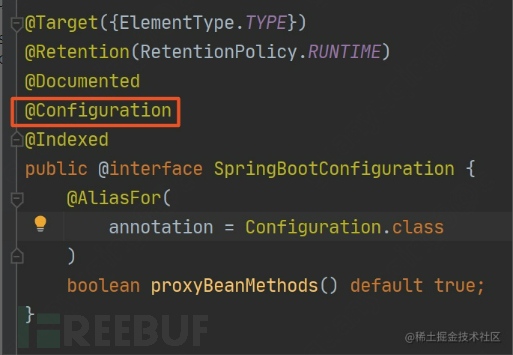
The @SpringBootConfiguration annotation: If we click into this annotation again, we will find that it is actually a @Configuration annotation.
The @ComponentScan annotation
The @ComponentScan annotation: It configures the scanning path defined by package scanning, and assembles classes that meet the scanning rules into the Spring container
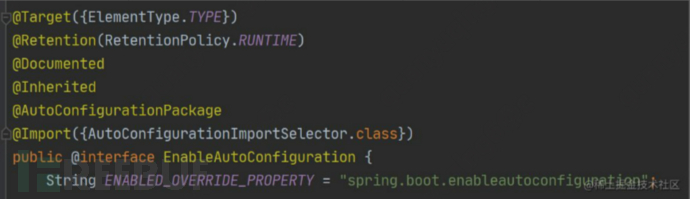
The @EnableAutoConfiguration annotation
@EnableAutoConfiguration enables automatic assembly (focus on this annotation for automatic configuration)
| Annotation | Function | Explanation |
|---|---|---|
| @SpringBootConfiguration | Mark the current class as a configuration class | Adding this annotation is to make the current class a configuration class managed by Spring's IOC container, because as we mentioned earlier, SpringBoot is essentially still Spring, so the original Spring annotation @Configuration can also be directly applied in SpringBoot |
| @ComponentScan | Configure the scanning path defined by package scanning, and assemble classes that meet the scanning rules into the Spring container | Used to define Spring's scanning path, equivalent to configuring in an XML file context:component-scanIf the scanning path is not configured, Spring will default to scanning all classes annotated with @Component, @Service, @Controller, and other annotations in the package and its sub-packages where the current class is located. |
| @EnableAutoConfiguration | Open automatic assembly | The following section will focus on explaining |
We click on @EnableAutoConfiguration again to enter and view it, which is a composite annotation composed of @AutoConfigurationPackage and @Import annotations;
First, let's take a look at the @Import annotation, which is a very key annotation;}}
Before we talk about this annotation, let's take an example. Suppose we have a class Demo that is not under the directory of the startup configuration class, which means it will not be scanned, and Spring will not be aware of its existence. Then if we need it to be scanned, can we import the Demo class through the @Import annotation, as follows in the code
@Configuration
@Import(Demo.class)
public class MyConfiguration {
}
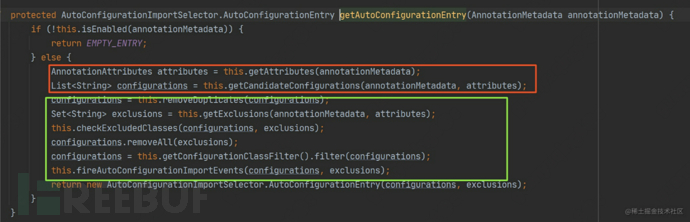
Therefore, we can know that the @Import annotation is actually used to import a class. So here @Import({AutoConfigurationImportSelector.class}) is to import the AutoConfigurationImportSelector class, and let's continue to look at this class, which AutoConfigurationImportSelector implements isDeferredImportSelectorinterface, which is a class with deferred import; on closer inspection, there is a method that is quite prominent, which selects the imported components based on annotation metadata. If the annotation metadata is empty, it directly returns an empty array; otherwise, it calls getAutoConfigurationEntry, in which the AutoConfigurationEntry's getConfigurations() method is used, where configurations is aList<String>So let's take a look at how AutoConfigurationEntry is generated.

Entering the getAutoConfigurationEntry method, we can see that it mainly gets the candidate Beans through getCandidateConfigurations and stores them as a collection; the subsequent methods are operations such as deduplication and verification.
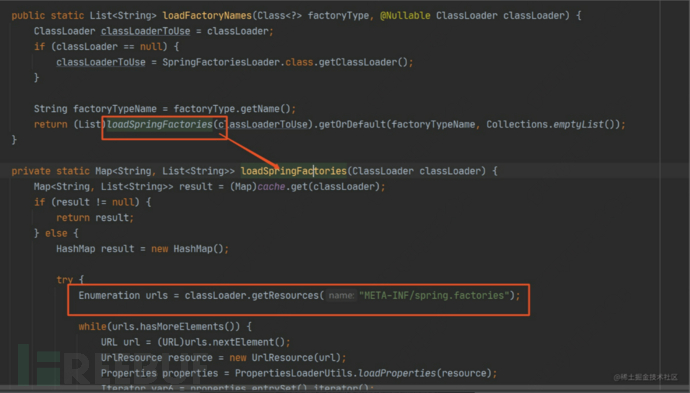
We continue to look inside the getCandidateConfigurations method, ultimately obtaining the final configurations through SpringFactoriesLoader.loadFactoryNames, and it can be found by assertion that the META-INF/spring.factories file is used. Then we enter the SpringFactoriesLoader.loadFactoryNames() to see the final implementation.

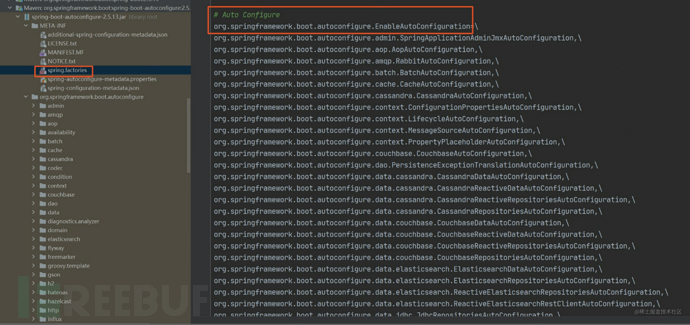
The SpringFactoriesLoader.loadFactoryNames() method reads the contents under the META-INF/spring.factories file into a Map, and then combines it with the factoryType=EnableAutoConfiguration.class, so it will get the values of XXAutoConfiguration corresponding to the key org.springframework.boot.autoconfigure.EnableAutoConfiguration, and then springboot combines the code in each starter to complete the loading action of Beans in XXAutoConfiguration.
Let's expand on this content, the way to read the configuration file from the configuration file spring.factories through SpringFactoriesLoader is a SPI thought.
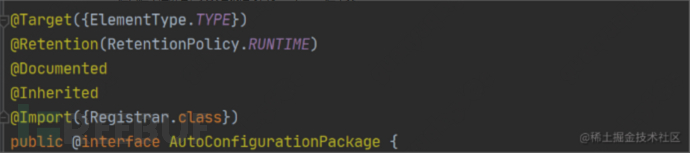
@AutoConfigurationPackage annotation
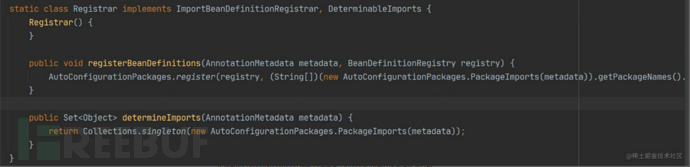
Enter this annotation and see, it is actually the import of the Registrar class
Enter this class and see, it is actually an inner class. The general meaning of the code is to read the scanning path configured in the outermost @SpringBootApplication annotation (if not configured, the default is the current package), and then register the Beans under the scanning path to the container;
Summary
Alright, let's roughly go through the entire process of automatic assembly:
- The automatic assembly function is realized through the use of @SpringBootApplication in the startup class;
- The actual annotation @SpringBootApplication is based on the functionality of @EnableAutoConfiguration.
- In the annotation @EnableAutoConfiguration, there are two annotations, @AutoConfigurationPackage and @EnableAutoConfiguration.
- Through @AutoConfigurationPackage, the loading of Beans in the current project is realized;
- @EnableAutoConfiguration realizes the loading of XXAutoConfiguration in the starter introduced in Pom through @Import({AutoConfigurationImportSelector.class});
- In the @AutoConfigurationImportSelector class, the values corresponding to the key org.springframework.boot.autoconfigure.EnableAutoConfiguration in the META-INF/spring.factories are read through SpringFactoriesLoader, and then SpringBoot completes the loading action for the Beans in XXAutoConfiguration by combining the code in each start;
By now, isn't it already clear to us about the definitions we made in the starter we developed before? Go ahead and try it out quickly!

评论已关闭