This article is the second part of docker security, discussing dockerfile and image security
Part one: Dockerfile practice
Avoid unnecessary installation packages
One container, one process
Minimize the number of layers
Sort multi-line parameters
Part two: Dockerfile example
#Base images base image
FROM centos
#MAINTAINER maintenance information
MAINTAINER lorenwe
#ENV sets the environment variable
ENV PATH /usr/local/nginx/sbin:$PATH
#ADD files are placed in the current directory, and they will be automatically unpacked
ADD nginx-1.13.7.tar.gz /tmp/
#RUN execute the following command
RUN rpm --import /etc/pki/rpm-gpg/RPM-GPG-KEY-CentOS-7 \
    && yum update -y \
    && yum install -y vim less wget curl gcc automake autoconf libtool make gcc-c++ zlib zlib-devel openssl openssl-devel perl perl-devel pcre pcre-devel libxslt libxslt-devel \
    && yum clean all \
    && rm -rf /usr/local/src/*
RUN useradd -s /sbin/nologin -M www
#WORKDIR is equivalent to cd
WORKDIR /tmp/nginx-1.13.7
RUN https://www.freebuf.com/articles/es/configure --prefix=/usr/local/nginx --user=www --group=www --with-http_ssl_module --with-pcre && make && make install
RUN cd / && rm -rf /tmp/
COPY nginx.conf /usr/local/nginx/conf/
#EXPOSE Map the port
EXPOSE 80 443
#ENTRYPOINT Run the following command
ENTRYPOINT ["nginx"]
#CMD Run the following command
CMD ["-h"]
ENV is used to set environment variables. Simply put, it is to set the environment that can help the system find the software that needs to be run. For example, the one I wrote above is 'ENV PATH /usr/local/nginx/sbin:$PATH', which means to tell the system that if a program without a specified path is run, it can be found in the path /usr/local/nginx/sbin. Only by setting this can the ngixn command be used to start nginx directly; otherwise, the system will prompt that the application cannot be found.
ADD is used to add files. The source file can be a file or a URL. If the source file is a compressed package, it will be automatically unpacked when building the image. For example, ADD nginx-1.13.7.tar.gz /tmp/, where nginx-1.13.7.tar.gz is a compressed package that must be in the directory of the dockerfile.
RUN is used to execute commands. RUN can execute multiple commands, separated by &&. If a command is too long and needs to be wrapped, you can add '\' at the end to wrap the command. For example, 'yum clean all' clears all yum caches, which can reduce the size of the image built, and 'rm -rf /usr/local/src/' clears the user source code files, all of which can reduce the size of the built image. Each time a RUN command is used, a new layer of image is generated.
When both ENTRYPOINT and CMD exist, the commands in CMD will be started as parameters of the command in ENTRYPOINT to start the container. For example, in the above dockerfile example, the container will be started with the command nginx -h. Unfortunately, this cannot keep the container running, so it can be started like this: docker run -it lorenwe/centos_nginx -c /usr/local/nginx/conf/nginx.conf. Then, the command running when the container starts will be nginx -c /usr/local/nginx/conf/nginx.conf, and you can customize the startup parameters.
If a service does not require any permissions to run, you can use the USER instruction to change it to a non-Root user, just add a RUN instruction in the Dockerfile: RUN groupadd -r postgres && useradd -r -g postgres postgres
The VOLUME instruction is used to expose the database storage area, configuration, files, or folders created by the docker container, it is recommended to use VOLUME to maintain the variable parts of the user service, that is, to expose the variable data to external storage.
3. Dockerfile Security
3.1 Run containers using a non-root user
Docker uses the root user to run containers by default. When the namespace is mapped to the root user in the running container, this means that the container may have root access to the Docker host. If the container itself has vulnerabilities, running applications on the container by the root user can further expand the attack surface and provide an easy way for privilege escalation. To minimize exposure as much as possible, choose to create a dedicated user and a dedicated group for the application in the Docker image; use the USER instruction in the Dockerfile to ensure that the container runs applications with the least privilege. There may not be a specific user in the image; create the user according to the instructions in the Dockerfile
FROM ubuntu:latest
RUN useradd -r -u 1001 -g appuser appuser
USER appuser
ENTRYPOINT ["sleep", "infinity"]
FROM ubuntu
RUN mkdir /app
RUN groupadd -r lirantal && useradd -r -s /bin/false -g lirantal lirantal
WORKDIR /app
COPY . /app
RUN chown -R lirantal:lirantal /app
USER lirantal
CMD node index.jsCreate a system user without a password, without setting the home directory, and without a shell (-r)
Add the created user to the existing group previously created (using groupadd)
Associate the created group with the final parameter set to be added to the username we are creating.
3.2 Configure trusted image source
Docker Content Trust (DCT) 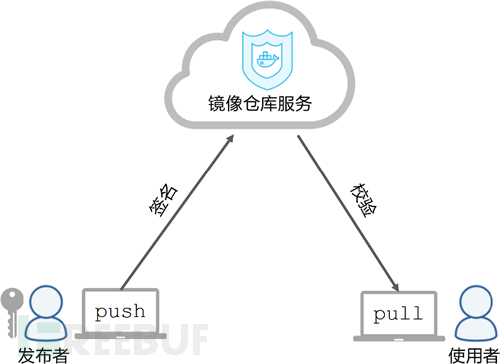
Docker Content Trust (DCT) provides the functionality to handle data sent to and received from remote Docker registries using digital signatures. These signatures allow clients or runtimes to verify the integrity and publisher of a specific image tag.
If the user enables DCT, they can only use trusted images for pull, run, or build. Enabling DCT is like applying a 'filter' to the registry. Consumers only 'see' the signed image tags, while the unsigned image tags that are less desirable are 'invisible' to them.
The prerequisite for signing an image is that the Docker registry connected to the notary service (such as Docker Hub or Docker Trusted Registry) is available. In the Docker CLI, we can use the $ docker trust command syntax to sign and push container images.
Add the delegation private key to the local Docker trust store. (By default, it is stored in ~/.docker/trust/). If you use $ docker trust key generate to generate the delegation key, the private key will be automatically added to the local trust storage. If you need to import a separate key (such as importing from a UCP client package), you need to use the $ docker trust key load command. Next, you need to add the delegation public key to the Notary server. This is specific to the image repository referred to by the global unique name (GUN) in the notary. If this is the first time you are adding a delegation to the image repository, this command will also use the local Notary specification root key to start the repository.
# Generate key
$ docker trust key generate jeff
# Or use an existing key
$ docker trust key load key.pem --name jeff
# Configure the DCT environment variable to enable DCT
$ export DOCKER_CONTENT_TRUST=1
# Tag the image so that it can be pushed to the target image repository. In this example, it will be pushed to the repository under my Docker Hub personal account namespace.
$ docker image tag alpine:latest nigelpoulton/dockerbook:v1
# Log in to Docker Hub (or another image repository) to push an image.
$ docker login
Push an image
$ docker push dtr.example.com/admin/demo:1
# View remote trust data for tags or repositories
$ docker trust inspect --pretty dtr.example.com/admin/demo:1
Docker Content Trust in Docker Enterprise Engine prevents users from using container images from unknown sources, and also prevents users from building container images from base layers from unknown sources. Trusted sources may include Official Docker Images found on Docker Hub or user-trusted sources, which include repositories and tags signed with the above commands.
Engine signature verification can prevent the following situations:
docker container running unsigned or modified images.
docker pull unsigned or modified images.
docker build with FROM image unsigned or erased.
When pulling images, configure the docker daemon at /etc/docker/daemon.json to pull images from trusted sources.Docker CE does not support
{
  "content-trust": {
    "trust-pinning": {
      "official-library-images": true
    ,
    "mode": "enforced"
  }
}
Pulling the image
$ docker pull dtr.example.com/user/image:1
Error: remote trust data does not exist for dtr.example.com/user/image: dtr.example.com does not have trust data for dtr.example.com/user/image
$ docker pull dtr.example.com/user/image@sha256:d149ab53f8718e987c3a3024bb8aa0e2caadf6c0328f1d9d850b2a2a67f2819a
sha256:ee7491c9c31db1ffb7673d91e9fac5d6354a89d0e97408567e09df069a1687c1: Pulling from user/image
Pull complete
a59a168caba3: Pull complete
Digest: sha256:ee7491c9c31db1ffb7673d91e9fac5d6354a89d0e97408567e09df069a1687c1
Status: Downloaded a newer image for dtr.example.com/user/image@sha256:ee7491c9c31db1ffb7673d91e9fac5d6354a89d0e97408567e09df069a1687c1
3.3 Use the smallest base image and do not install any additional software packages
If not, it increases the size of the image file and increases the attack surface.
3.4 Perform image scanning
some open-source image scanning tools
Anchore Engine:Anchore Engine is a tool used for analyzing container images. In addition to security vulnerability reports based on CVE, Anchore Engine can also use custom policies to evaluate Docker images. Policies are based on whitelist or blacklist, credentials, file content, configuration type, or other user-generated prompts. Anchore, packaged as a Docker container image, can run independently or on a business platform (such as Kubernetes). It can also be integrated with CI/CD tools like Jenkins and GitLab.
Clair:Clair collects a large amount of vulnerability data from various sources, such as Debian Security Bug Tracker, Ubuntu CVE Tracker, and Red Hat Security Data. Due to the use of many CVE databases, Clair's audit is comprehensive. Clair first builds an index for the feature list in container images. Then, developers can query vulnerabilities related to specific images in the database using the Clair API.
dagda:a tool to perform static analysis of known vulnerabilities, trojans, viruses, malware & other malicious threats in docker images/containers and to monitor the docker daemon and running docker containers for detecting anomalous activities
OpenScap: A set of automated audit tools used to check the configuration and known vulnerabilities in software according to the NIST certification security content automation protocol (SCAP). Not specifically for containers, but does include a certain degree of support.
Introduce Clair 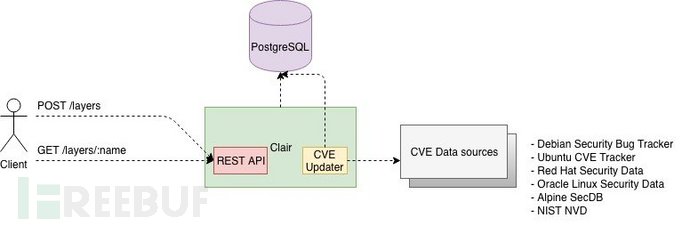
Installation process:
$ mkdir $PWD/clair_config
$ curl -L https://raw.githubusercontent.com/coreos/clair/master/config.yaml.sample -o $PWD/clair_config/config.yaml
$ docker run -d -e POSTGRES_PASSWORD="password" -p 5432:5432 postgres:9.6
$ docker run --net=host -d -p 6060-6061:6060-6061 -v $PWD/clair_config:/config quay.io/coreos/clair:latest -config=/config/config.yaml
The configuration file config.yaml needs to be modified (corresponding line)
source: host=localhost port=5432 user=postgres password=password sslmode=disable statement_timeout=60000Deployment test successful
[root@localhost ~]# curl -X GET -I http://localhost:6061/health
HTTP/1.1 200 OK
Server: clair
Date: Wed, 18 Mar 2020 13:32:33 GMT
Content-Length: 0
[root@localhost ~]# curl http://localhost:6060/v1/namespaces
...
The API interface is not convenient to use, and it integrates other toolshttps://github.com/quay/clair/blob/master/Documentation/integrations.md
Install third-party client claircli, perform scan, and locally generate an html report.
[root@localhost home]# pip install claircli
[root@localhost home]# claircli -l 127.0.0.1 postgres 2020-03-18 21:45:50,870|INFO|Starting local http server
2020-03-18 21:45:50,871|INFO|Local http server serving at port: 10963
2020-03-18 21:45:50,872|INFO|*****************************1******************************
2020-03-18 21:45:50,872|INFO|Analyzing <Image: postgres>
2020-03-18 21:45:56,449|INFO|Push layer [1/14]: 5c77fc16775dbda7fafd2db94684c22de93066e29dd686a2f46d995615458476
2020-03-18 21:45:56,715|INFO|Push layer [2/14]: 54a426d01ba59fb558c7cf6681c6840736e5d0654a62f0c383d227637cdee0db
2020-03-18 21:45:56,777|INFO|Push layer [3/14]: a31210340f3a4905656af9be0ee9ffe3291380e6764c5d2d62831c2626451231
2020-03-18 21:45:56,787|INFO|Push layer [4/14]: fb1bc94faf7fe27b7f7a36c980c8407d9f28bab2c047cf389dda8eb9349cfa32
2020-03-18 21:45:56,801|INFO|Push layer [5/14]: 8f5652501fa074cb5b9d54c6dceaa966c6591000837076de4c8aaf90ad3c919a
2020-03-18 21:45:56,834|INFO|Push layer [6/14]: 3f89d1179df8c1c036baf12dd6204a6f17f752e3c0f96b0d25eb408bcb6f2313
2020-03-18 21:45:56,876|INFO|Push layer [7/14]: 1034326be7395271eed2e8e3fbb6e8719ec21533776646eda190ab6d5d690404
2020-03-18 21:45:56,886|INFO|Push layer [8/14]: eba8f87a20b5efae0ab4540e5932e3920879ffbfcde08fd2664bd35a8392a48e
2020-03-18 21:45:56,896|INFO|Push layer [9/14]: 9fcb1e2984e4683b4c8e724b64836097b19d03e77f98fbe226ffd581fdfe0bcd
2020-03-18 21:45:57,101|INFO|Push layer [10/14]: 17685e9204242fce5aa038a05cf160bd4a7f6b516bb461a5c8ca5977f2fa1e74
2020-03-18 21:45:57,110|INFO|Push layer [11/14]: 4a4b72a0e224e07071b6d60e8c4335b5996ff58f894fc3c10e7bbf523de924e8
2020-03-18 21:45:57,121|INFO|Push layer [12/14]: 02053f40fe92249821c297ab7b9a10ee2071b005c541e022d74c3d1fbde5a28f
2020-03-18 21:45:57,132|INFO|Push layer [13/14]: 92e8c07039ed217658e3d78e3681dc19bcf8193caee4c85445ffa2a77cce1925
2020-03-18 21:45:57,142|INFO|Push layer [14/14]: 9d681078d309476626ccd11c7d2fa2f9010d6d4f67b3dd935075fd9ab16fad88
2020-03-18 21:45:57,153|INFO|Fetch vulnerabilities for <Image: postgres>
2020-03-18 21:45:57,172|INFO|Defcon1 : 0
2020-03-18 21:45:57,172|INFO|Critical : 0
2020-03-18 21:45:57,172|INFO|High : 0
2020-03-18 21:45:57,172|INFO|Medium : 0 2020-03-18 21:45:57,172|WARNING|Low : 10
2020-03-18 21:45:57,173|WARNING|Negligible : 47
[root@localhost home]# ls
clair-postgres.html
3.5 Execute HEALTHCHECK
The HEALTHCHECK instruction has two forms:
HEALTHCHECK [OPTIONS] CMD command (check the status of the container by running a command inside the container)
HEALTHCHECK NONE (disables any health check inherited from the base image)
The HEALTHCHECK instruction tells Docker how to test the container to check if it is still running. This can detect situations such as a web server getting stuck in an infinite loop and unable to handle new connections, even though the server process is still running.
After specifying the container's status check, in addition to its normal state, it also has a status. This state starts initially. As long as the status check passes, it will become healthy (regardless of its previous state). After a certain number of consecutive failures, it becomes unhealthy.
Options that can be displayed before CMD are:
--interval=DURATION (default: 30s)
--timeout=DURATION (default: 30s)
--start-period=DURATION (default: 0s)
--retries=N (default: 3)
The status check will run first within the interval seconds after the container starts, and then within the interval seconds after each previous check is completed.
If the time taken for a single check exceeds the timeout seconds, the check is considered to have failed, and continuous health checks that fail need to be retried before the container can be considered unhealthy.
The start time period provides initialization time for containers that require time to boot. Probes that fail during this period will not be counted in the maximum retry attempts. However, if the health check is successful during the boot, the container is considered to have started, and all consecutive failures will be counted in the maximum retry attempts.
Only one HEALTHCHECK instruction can be used in the Dockerfile. If multiple are listed, only the last 'health check' will take effect.
The command following the CMD keyword can be a shell command (such as HEALTHCHECK CMD / bin / check-running) or an exec array (like other Dockerfile commands; for details, see ENTRYPOINT).
The exit status of the command indicates the health status of the container. Possible values are:
0: Success - The container is healthy and can be used
1: Unhealthy - The container cannot operate normally
2: Reserve - Do not use this exit code
For example, to check every five minutes so that the network server can provide services for the homepage of the website within three seconds:
HEALTHCHECK --interval=5m --timeout=3s \
  CMD curl -f http://localhost/ || exit 1
To help debug failed probes, any output text (UTF-8 encoded) written to stdout or stderr by the command will be stored as health status and can be queried through docker inspect. Such output should be kept brief (currently only the first 4096 bytes are stored).
When the health status of the container changes, a health_status event will be generated with the new status.
3.6 Should not use OS package manager update instructions such as apt-get update or yum update separately or on a single line in the Dockerfile
Adding update instructions on a single line in the Dockerfile will cause the update layer to be cached. When you use the same instruction to build any image in the future, this will cause the previously locally cached update layer to be used, which may prevent any new updates from being applied to future builds.
When installing software packages, the update notes, installation instructions, and version notes should be used simultaneously. This can prevent caching and force the extraction of the required version. Alternatively, you can use the --no-cache flag during the docker build process to avoid using cached layers.
docker build [OPTIONS] PATH | URL | --no-cache3.7 Delete setuid and setgid permissions
Two special permissions can be set on executable files: set user ID (setuid) and set group ID (sgid). These permissions allow executing files with the privileges of the owner or group. For example, if a file is owned by the root user and the setuid bit is set, it will always run with root user privileges regardless of who executes the file.
Applications may not require any setuid or setgid binary files. If such binary files can be disabled or deleted, any possibility of using them for buffer overflow, path traversal/injection, and privilege escalation attacks can be stopped.
The setuid bit is used for files with executable permissions. The setuid bit only indicates that when running an executable file, it sets the permissions to the user (owner) who created it, rather than setting them to the user who started it. Similarly, there is a setgid bit that does the same thing for gid. Setgid affects files and directories. When used on a file, it executes with the privileges of the user group that owns the file, rather than with the privileges of the user group that executes the file. Setting the directory to this bit makes the set of files in the directory have the same group as the parent directory, rather than the group of the user who created the files. This is used for file sharing because all users belonging to the parent directory group can now modify it.
Find and delete files with setuid permissions in Linux
find / -perm +6000 -type f -exec \ ls -ld {} \; 2> /dev/null
# Find in the container
$ docker run debian find / -perm +6000 -type f -exec ls -ld {} \; 2> /dev/null
Remove setuid permissions when running the container
$ docker run -d --cap-drop SETGID --cap-drop SETUID <container_id>Perform setuid and setgid checks after dockerfile build is successful
docker run --rm defanged-debian find / -perm +6000 -type f -exec ls -ld {} \; 2> /dev/null | wc -lA result of 0 indicates that the created image does not have files with special permissions.
3.8 Use the CPOY instruction in Dockerfile instead of the ADD instruction
The COPY instruction only copies files from the local host to the container file system. The ADD instruction may retrieve files from a remote URL and perform operations such as extracting them. Therefore, the ADD instruction may pose a security risk. For example, malicious files may be accessed directly from the URL without scanning, or there may be vulnerabilities related to the decompression program.
3.9 Should not contain passwords, keys, and other information in the Dockerfile
The Dockerfile itself may have access control vulnerabilities, and users who have permission to run docker history on the docker host can see the key information in the Dockerfile.
The following example Dockerfile is only to demonstrate that access to the key is possible, and the key information is displayed in the build output. The final image built does not contain a key file:
$ docker build --no-cache --progress=plain --secret id=mysecret,src=mysecret.txt .
...
#8 [2/3] RUN --mount=type=secret,id=mysecret cat /run/secrets/mysecret
#8       digest: sha256:5d8cbaeb66183993700828632bfbde246cae8feded11aad40e524f54ce7438d6
#8         name: "[2/3] RUN --mount=type=secret,id=mysecret cat /run/secrets/mysecret"
#8      started: 2018-08-31 21:03:30.703550864 +0000 UTC
#8 1.081 WARMACHINEROX
#8    completed: 2018-08-31 21:03:32.051053831 +0000 UTC
#8     duration: 1.347502967s
#9 [3/3] RUN --mount=type=secret,id=mysecret,dst=/foobar cat /foobar
#9       digest: sha256:6c7ebda4599ec6acb40358017e51ccb4c5471dc434573b9b7188143757459efa
#9         name: "[3/3] RUN --mount=type=secret,id=mysecret,dst=/foobar cat /foobar"
#9      started: 2018-08-31 21:03:32.052880985 +0000 UTC
#9 1.216 WARMACHINEROX
#9    completed: 2018-08-31 21:03:33.523282118 +0000 UTC
#9     duration: 1.470401133s
...
The best way is to obtain key information from the network server
FROM busyboxRUN echo "The secret is: " && \
    wget -O - -q http://localhost:8000/secret.txt
3.10 Use software whitelist, only install verified software packages
It is usually integrated into the devops process
dependency check, supports various languages, continuously updated by the community, has command line, docker deployment, rich report formats. The principle is to monitor security vulnerabilities based on the open source NVD open source vulnerability database, the disadvantage is that it uses Lucene token matching based on file name to use cpe, which is not accurate, and this link introduces some false positives.
dependency track, is a new tool from owasp, with a good interface, convenient for management.
SAP company has opened source Java and Python SCA tools, providing static code security testing features.
For node applications, there is an npm audit fix command that can automatically upgrade versions, the principle is to query vulnerabilities through the nodesecurity.io interface, for details seehttps://www.npmjs.com/solutions/security-compliance.
If based on githubThen there is snyk.io, git alert, lgtm, sonar oss free services can be used. In addition, gitlab enterprise edition also provides security features directly.
Commercial Products 
Reference
*Author: Baihe Chou, please indicate the source as FreeBuf.COM when转载

评论已关闭