This article mainly includes the following contents: WinAFL Introduction and Installation, building the minimum Fuzz case library with ABC image viewer as an example, executing Fuzz to generate Crash, and finally classifying Crash using Bugid
WinAFL Introduction and Installation
WinAFL isIvan Fratricbased onlcumtuf's AFLCreate a large Fuzzing program, due toAFLIt cannot be used directly under Windows, Winafl fills this gap, using DynamoRIO for code instrumentation & coverage measurement, and using Windows API for memory and process creation.

WinAFL project address: https://github.com/ivanfratric/winafl
Please note: For the latest Windows versions 1809 and above, you need to use DynamoRIO 8.0.0 or above
If you directly perform the operation at this time, the following error may occur

This process needs to be recompiled, and it is as follows:
(1) Download and install the DynamoRio source code, or directly download the DynamoRio Windows binary package (https://github.com/DynamoRIO/dynamorio/wiki/Downloads)
(2) Open the Visual Studio command prompt tool, if you want to install the 64-bit version, open the Visual Studio x64 command prompt tool (usually found in [Start - All Programs - Visual Stdio - Visual Studio Tools]). Because when fuzzing 64-bit programs, a 64-bit winafl.dll is required, so the correct version should be selected during installation
(3) Go into the directory of WinAFL in the command prompt tool
(4) Enter the following command in the Visual Studio command prompt tool to compile and install WinAFL (you need to set the -DDynamoRIO_DIR parameter to the location of your DynamoRIO cmake file)
32-bit build:
mkdir build32
cd build32
cmake -G"Visual Studio 16 2019" -A Win32 .. -DDynamoRIO_DIR=..\path\to\DynamoRIO\cmake
cmake --build . --config Release
64-bit build:
mkdir build64
cd build64
cmake -G"Visual Studio 16 2019" -A x64 .. -DDynamoRIO_DIR=..\path\to\DynamoRIO\cmake
cmake --build . --config Release
Here are some points to note - When selecting the platform, there is a difference between VS16 and the default target platform architecture of previous versions:
cmake -G "Visual Studio 16 2019" -A Win32   ;x32
cmake -G "Visual Studio 16 2019" -A x64     ;x64  Default target platform name (architecture) is Win64

cmake -G "Visual Studio 15 2017"            ;x32  Default target platform name (architecture) is Win32
cmake -G "Visual Studio 15 2017 Win64"      ;x64
winafl command line parameters are mainly divided into three parts, (AFL execution parameters – DynamoRIO execution parameters – program execution parameters)
The AFL execution parameters mainly include
-i -oSpecify the input and output folders
-DSpecify the DynamoRIO root directory
-tThe timeout limit for each sample execution
-fThe location where the fuzz program reads
-M \ -SDistributed mode
-xOptional fuzz dictionary
The execution parameters of dynamRIO mainly include
-coverage_moduleThe module for calculating coverage
-fuzz_iterationsThe maximum number of iterations the target function must run before restarting the target process
-target_moduleThe module (an executable file image) containing the target function needs to be specified with -target_method or -target_offset
-target_methodTarget function, needs to be exported or have symbols
-target_offsetTarget offset, relative to the target_module offset, used when the method cannot be exported
-nargsThe number of parameters required for program execution
-debugDebug mode. Do not try to connect to the server. The log file output contains loaded modules, open files, and coverage information
-logdirSpecify the directory where the log file will be written (only used with -debug)
Program execution parameters
The command line of the program to be fuzzed
Build a Fuzz minimal case library
Now we collect a bunch of ABC image support formats from the internet, including tif, jpg, png, ico, etc., and there are many Fuzz case libraries on GitHub. Such case libraries contain a large number of files, and running them will be very inefficient. According to the senior brother's blog, AFL has corpus distillation (Corpus Distillation) tools, afl-cmin and afl-tmin.
Remove input files that execute the same code - AFL-CMIN
The core idea of afl-cmin is to try to find the smallest subset that has the same coverage as the corpus universe. For example: suppose there are multiple files that cover the same code, then discard the redundant files.Reduce the size of individual input files - AFL-TMIN
The overall size has been improved, and next, we need to refine the processing of each file. afl-tmin tries to reduce the file volume as much as possible.
In winafl, they exist in winafl-cmin.py, which performs minimization processing on the input sample file to improve the execution efficiency of WinAFL.
Filter command
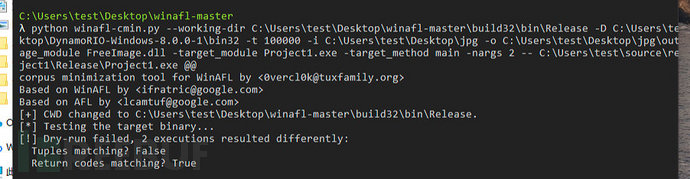
python winafl-cmin.py --working-dir C:\Users\test\Desktop\winafl-master\build32\bin\Release -D C:\Users\test\Desktop\DynamoRIO-Windows-8.0.0-1\bin32 -t 100000 -i C:\Users\test\Desktop\jpg -o C:\Users\test\Desktop\jpg\out -coverage_module FreeImage.dll -target_module Project1.exe -target_method main -nargs 2 -- C:\Users\test\source\repos\Project1\Release\Project1.exe @@
At this time, it may occur the error [!] Dry-run failed, 2 executions resulted differently: Tuples matching? False
It seems that there are some bad test cases in the test cases that cause the reduction to be incorrect, and you can use the following bash script to simply judge in the folder where the corpus is located
λ for file in *; do printf "==== FILE: $file =====\n";/c/Users/test/source/repos/Project1/Release/Project1.exe $file ;echo $?; done
The return values of files that run normally are all 0, and the return results of files with problems are not quite normal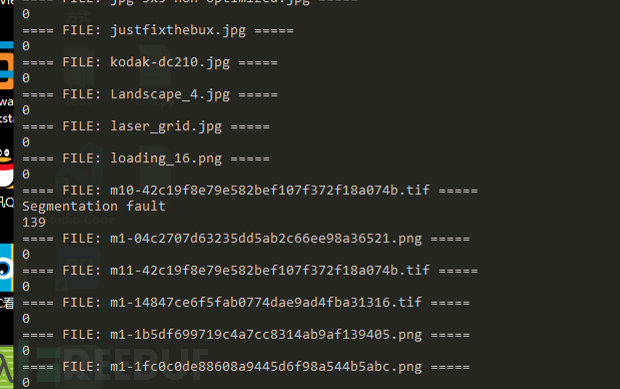
After deleting the returned results that are not quite normal, running the corpus distillation again found that it was successful
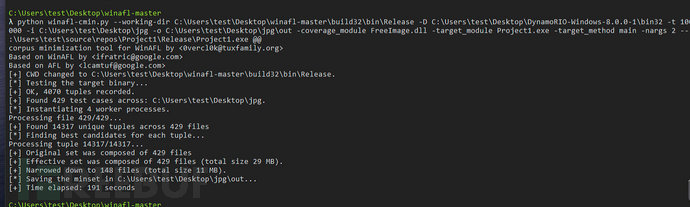
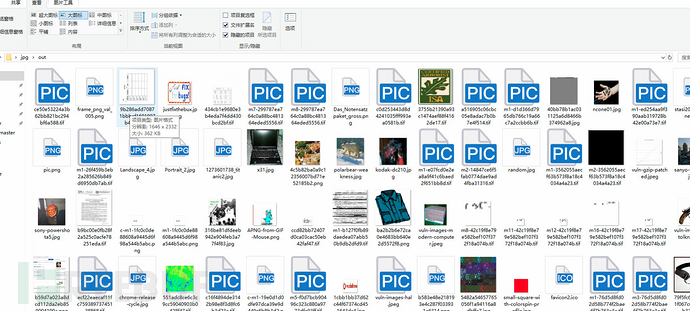
It can be seen that the original 429 pictures have been reduced to 148, which is indeed a lot less. According to the hints in the reference tutorial, Winafl will become very slow when processing images larger than 4Kb, so another round of deletion is made, and the final corpus is left like this.
Start running
After simple dynamic and static analysis, it was found that ABC picture viewer mainly calls Freeimage.dll for image parsing. It was decided to perform a fuzzy test on the loading function of the FreeImage library, and write a test program for the FreeImage_LoadU function.
#define _CRT_SECURE_NO_WARNINGS
#include <windows.h>
#include <tchar.h>
#include <iostream>
using namespace std;

extern "C" __declspec(dllexport) int main(int argc, char** argv);
void test(HINSTANCE hinstLib, wchar_t* PathName);
wchar_t* charToWChar(const char* text);

typedef DWORD(__stdcall* FreeImage_GetFileTypeU)(const wchar_t* lpszPathName, int flag);
typedef DWORD(__stdcall* FreeImage_Initialise)(BOOL load_local_plugins_only);
typedef DWORD(__stdcall* FreeImage_DeInitialise)();
typedef DWORD(__stdcall* FreeImage_LoadU)(DWORD format, const wchar_t* lpszPathName, int flag);
typedef DWORD(__stdcall* FreeImage_UnLoad)(DWORD dib);

FreeImage_Initialise Initialise;
FreeImage_GetFileTypeU LoadFileType;
FreeImage_LoadU LoadU; DWORD load;
FreeImage_UnLoad UnLoad;
FreeImage_DeInitialise DeInitialise;

int main(int argc, char** argv)
{
	if (argc < 2) {
		printf("Usage: %s <file>\n", argv[0]);
		return 0;
	}

	wchar_t* PathName = charToWChar(argv[1]);

	HINSTANCE hinstLib; BOOL fFreeResult, fRunTimeLinkSuccess = FALSE; DWORD Error = NULL;
	hinstLib = LoadLibrary(TEXT("C:\\FreeImage.dll"));

	if (hinstLib != NULL)
	{
		fRunTimeLinkSuccess = TRUE;

		Initialise = (FreeImage_Initialise)GetProcAddress(hinstLib, (LPCSTR)163); // Initialize FreeImage library
		LoadFileType = (FreeImage_GetFileTypeU)GetProcAddress(hinstLib, (LPCSTR)126); // Get bitmap file type
		LoadU = (FreeImage_LoadU)GetProcAddress(hinstLib, (LPCSTR)181); // Load bitmap
		UnLoad = (FreeImage_UnLoad)GetProcAddress(hinstLib, (LPCSTR)242); // Unload bitmap
		DeInitialise = (FreeImage_DeInitialise)GetProcAddress(hinstLib, (LPCSTR)83); // Unload FreeImage library

		test(hinstLib, PathName);
		fFreeResult = FreeLibrary(hinstLib);
	}

	if (!fRunTimeLinkSuccess)
		cout << "Failed to load function, Error: " << Error << endl;
	return 0;
}

void test(HINSTANCE hinstLib, wchar_t* PathName)
{

	DWORD FileType = (LoadFileType)(PathName, 0);
	load = (LoadU)(FileType, PathName, 0);
	return;

}

wchar_t* charToWChar(const char* text)
{
	size_t size = strlen(text) + 1;
	wchar_t* wa = new wchar_t[size];
	mbstowcs(wa, text, size);
	return wa;
}
After compiling the program, you can first test whether WinAFL can be used normally. -debug indicates setting to debug mode.
\winafl\bin32> C:\Users\test\Desktop\DynamoRIO-Windows-8.0.0-1\bin32\drrun.exe -c winafl.dll -debug -coverage_module FreeImage.dll -target_module Project1.exe -target_method main -fuzz_iterations 10 -nargs 2 -- C:\Users\test\source\repos\Project1\Debug\Project1.exe C:\Users\test\Desktop\jpg\1x1-low.jpg
As shown in the figure below, the module is loaded normally in the log file without any error display

The fuzz testing is about to begin, following the tutorial, but its target function is main. Let's see how the result is.
afl-fuzz.exe -i C:\Users\test\Desktop\jpg\out -o C:\Users\test\Desktop\jpg\re -D C:\Users\test\Desktop\DynamoRIO-Windows-8.0.0-1\bin32 -t 9000 -- -coverage_module FreeImage.dll -target_module Project1.exe -target_method main -fuzz_iterations 5000 -nargs 2 -- C:\Users\test\source\repos\Project1\Debug\Project1.exe @@@
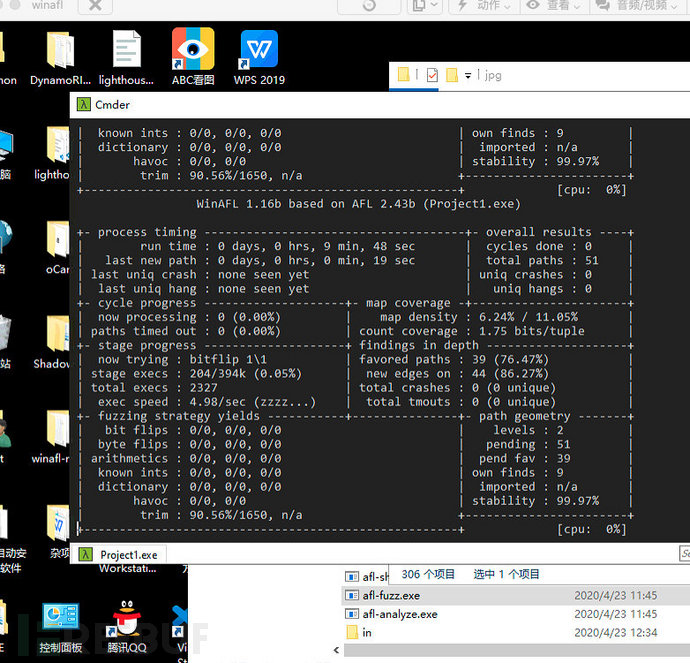
As shown in the figure, it can run, but this speed is too slow. The execution of the main function wastes too much time. In fact, our load function only needs to test the test function. We will try changing -target_method to test.
afl-fuzz.exe -i C:\Users\test\Desktop\jpg\out -o C:\Users\test\Desktop\jpg\re -D C:\Users\test\Desktop\DynamoRIO-Windows-8.0.0-1\bin32 -t 9000 -- -coverage_module FreeImage.dll -target_module Project1.exe -target_method test -fuzz_iterations 5000 -nargs 2 -- C:\Users\test\source\repos\Project1\Debug\Project1.exe @@@
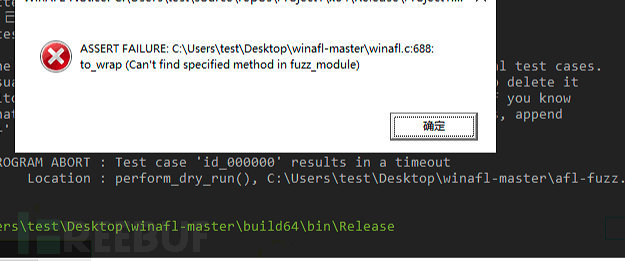
Then the window popped up, it seems that the test function we wrote was not found. I forgot to export the test function in VS.

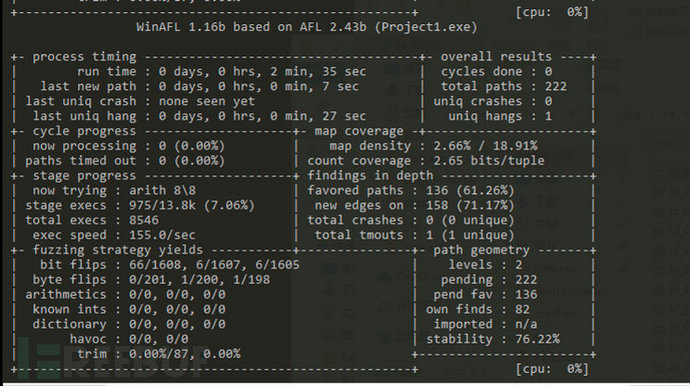
After exporting here and compiling it again, try it, and it succeeded. The speed has been significantly improved by several times.
In order to improve the fuzzing efficiency a bit and make full use of the multi-core CPU, parallel testing on a multi-core system is performed.
afl-fuzz.exe -i C:\Users\test\Desktop\jpg\out -o C:\Users\test\Desktop\jpg\re -M master -D C:\Users\test\Desktop\DynamoRIO-Windows-8.0.0-1\bin32 -t 9000 -- -coverage_module FreeImage.dll -target_module Project1.exe -target_method test -fuzz_iterations 5000 -nargs 2 -- C:\Users\test\source\repos\Project1\Debug\Project1.exe @@@

afl-fuzz.exe -i C:\Users\test\Desktop\jpg\out -o C:\Users\test\Desktop\jpg\re -S slaver01 -D C:\Users\test\Desktop\DynamoRIO-Windows-8.0.0-1\bin32 -t 9000 -- -coverage_module FreeImage.dll -target_module Project1.exe -target_method test -fuzz_iterations 5000 -nargs 2 -- C:\Users\test\source\repos\Project1\Debug\Project1.exe @@

afl-fuzz.exe -i C:\Users\test\Desktop\jpg\out -o C:\Users\test\Desktop\jpg\re -S slaver02 -D C:\Users\test\Desktop\DynamoRIO-Windows-8.0.0-1\bin32 -t 9000 -- -coverage_module FreeImage.dll -target_module Project1.exe -target_method test -fuzz_iterations 5000 -nargs 2 -- C:\Users\test\source\repos\Project1\Debug\Project1.exe @@
Because my configuration is quite poor with only four cores, so I have to run so many, let's try it first
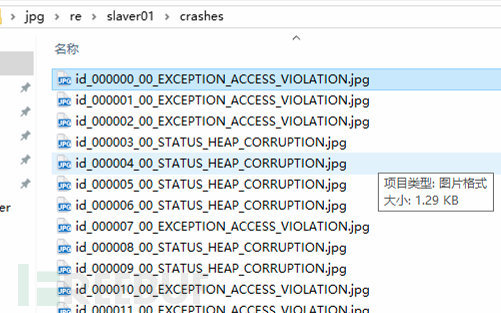
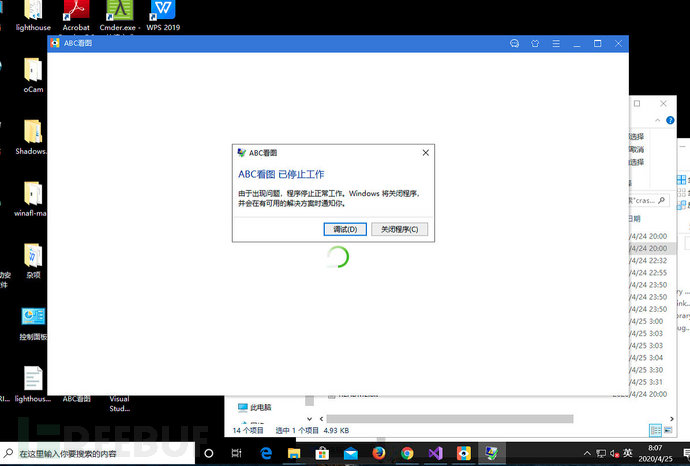
Throw it into ABC's image viewer and find that it really crashed
Classify crashes using Bugid
With so many crashes, there must be a lot of duplicates, and the reasons are also different. How can we quickly classify them and find the problem points?
Here I used BugID, which can provide detailed reports on the exploitability of crashes and crashes. The following environments are required for the installation of BugID:
The latestPython 2.7.14
WindowsThe latestDebugging tools
The latestBugId version
If you install Windows Python and debugging tools with the default settings, BugId should run without any adjustments. You can unzip BugId anywhere in the local file system.
Theoretically, BugID needs to analyze files one by one, but with so many crashes, it is just as good to write a Python script to help us.
import sys
import os
sys.path.append(r"C:\Users\test\Desktop\BugId-master")
testcases = []
for root, dirs, files in os.walk(r"C:\Users\test\Desktop\jpg\re\slaver01\crashes", topdown=False):
for name in files:
testcase = os.path.abspath(os.path.join(root, name))
testcases.append(testcase)
for testcase in testcases:
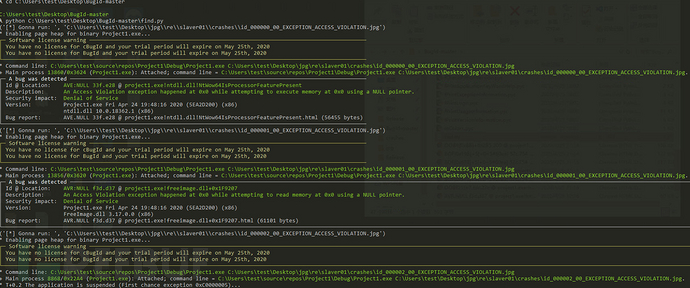
print ("[*] Gonna run: ", testcase)
os.system(r'PageHeap.cmd "Project1.exe" ON')
os.system(r'python C:\Users\test\Desktop\BugId-master\BugId.py C:\Users\test\source\repos\Project1\Debug\Project1.exe --isa= x86 -- %s' % testcase)
Please note to add --isa= x86 at the end of the program; if not added, it defaults to 64-bit debugging, which will result in an error.
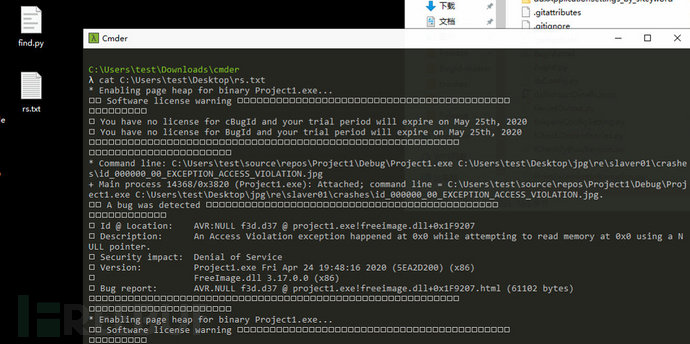
After running the script, we see a continuous stream of bug information appear.
Finally, you can write it into a document to save it. It seems there is a problem with the characters, but it is not a big issue.
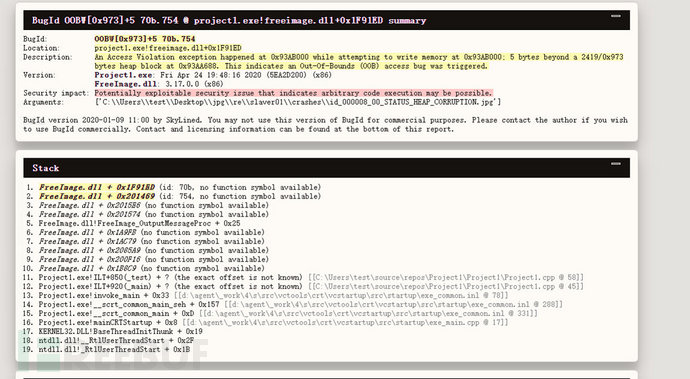
This is just a brief piece of information; the BugID has automatically generated a more detailed analysis report during runtime. You can view it by opening the BugID directory.
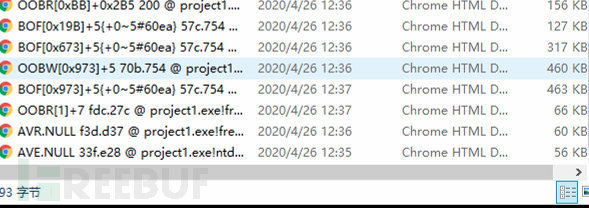
Just open one to take a look, it's very detailed
References
winafl usage http://www.simp1e.site/2020/04/18/winafl/
WinAFL usage guide for Fuzz testing tools https://www.freebuf.com/articles/system/216437.html
Initial introduction to the Fuzzing tool WinAFL https://paper.seebug.org/323/
Experience with the Fuzz tool WinAFL https://bbs.pediy.com/thread-255162.htm
Fuzzing the MSXML6 library with WinAFL https://symeonp.github.io/2017/09/17/fuzzing-winafl.html

评论已关闭